Ok, not a really complicated project, but with some features:
I use one of those cheap “DF-mp3 player modules”:
http://www.dfrobot.com/wiki/index.php/D … KU:DFR0299
They are really small, with TF-card holder and a build in 3W speaker connector (mono, but with stereo headphone out also)
Drawback with these modules: You don’t have access to the SD card, so you wont get the file names. But for my project this isn’t necessary, because there is no display
I’ve rewritten their library and added most of the commands from the data sheet to it. The communication is simple over 9600baud Serial.
The player itself has very less knobs, LED’s or buttons (what the developer are thinking with their plastic bombs (aka “child cd/mp3 player”) on the market?!?) and is made of completely of wooden.
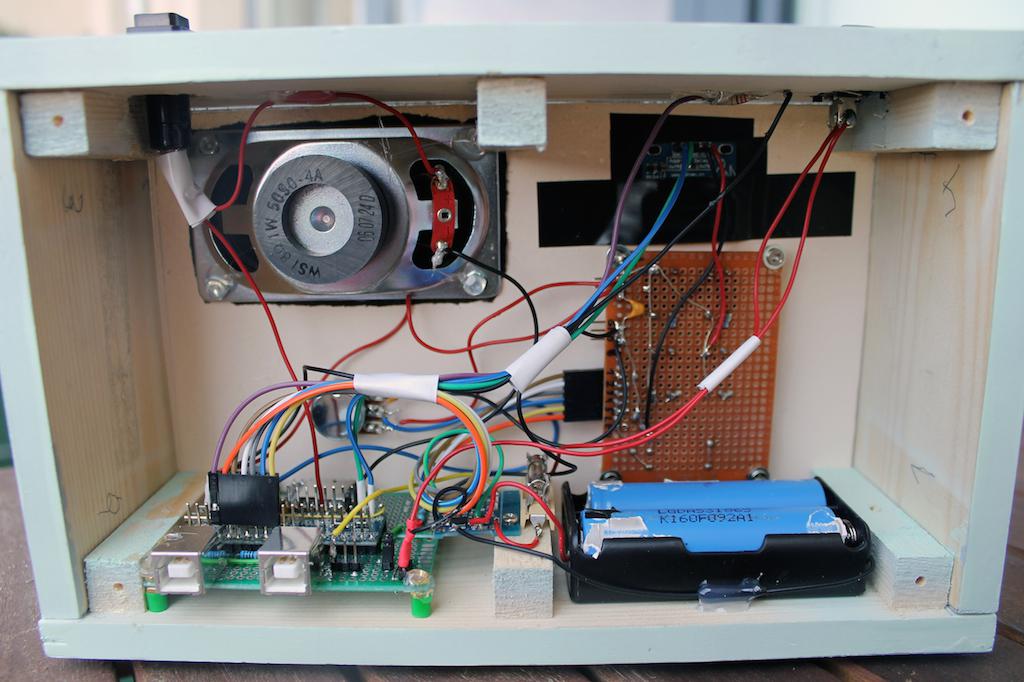
I use four 18600 lithium ion batteries cells gives me a total current of 8800mAh, should be enough for several hours playing
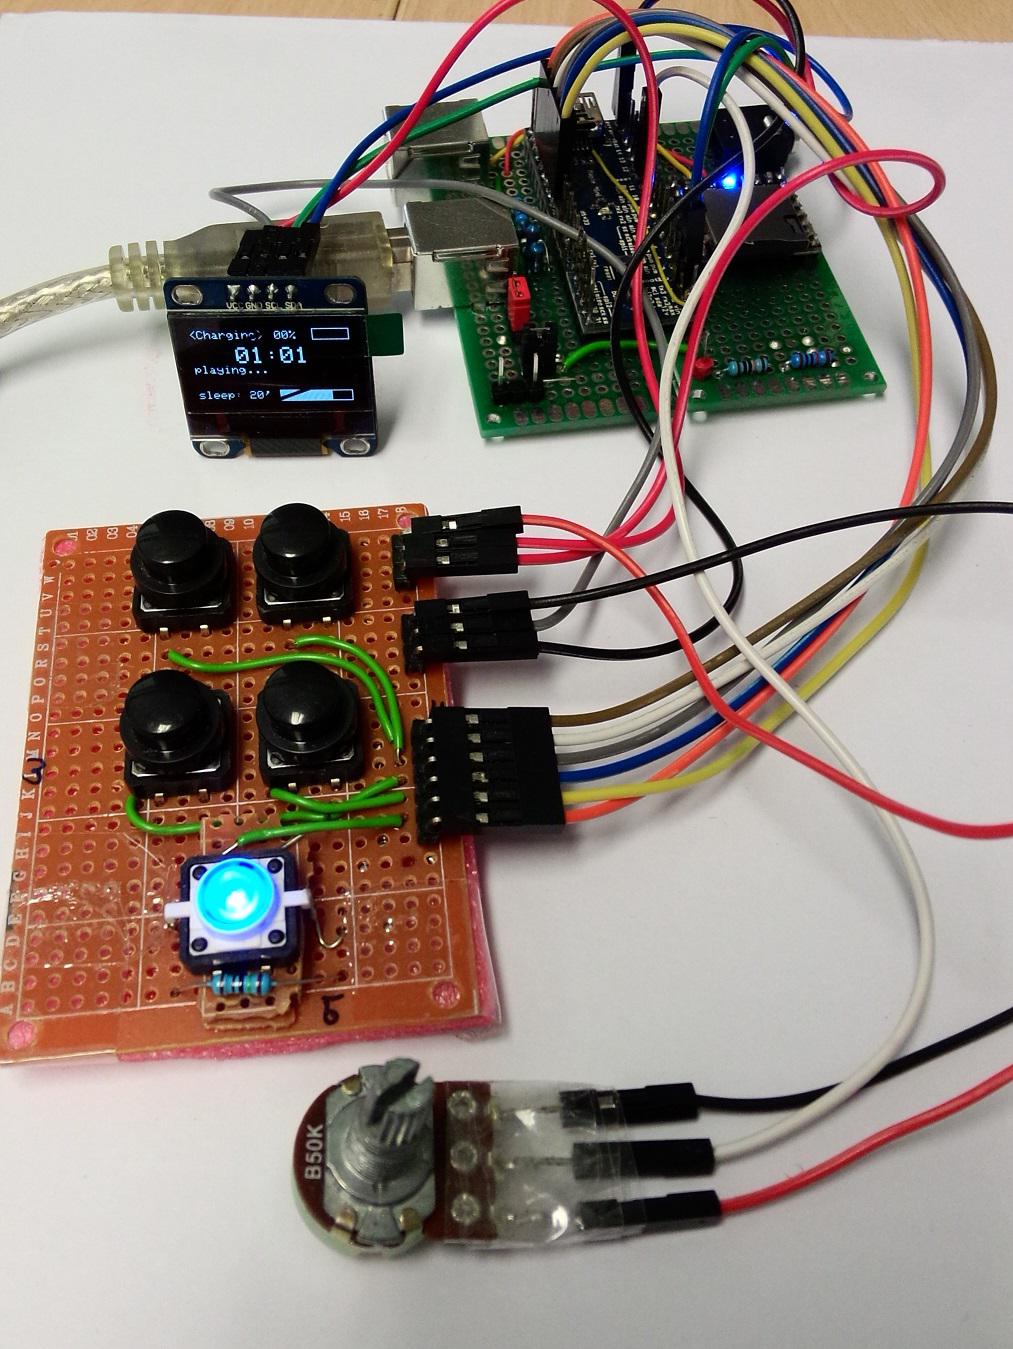
The maple mini inside is doing everything: manage buttons, serial protocol, even observe the remaining power of the batteries (first reduce the volume, then gets into standby mode).
On the software side, there are nice features, like the “sleep mode”: In this “parent mode” the mp3 player plays 10-20 minutes and reduce with every minute the volume until the child will fall asleep (OK, that’s my wish!), maybe I implement some “spoken words” for each folder.
I have one of those MP3 players, well I think I have the same one, but it doesn’t actually play MP3 files
Does yours definitely play MP3 files ?
Edit.
I’ve been thinking if its possible to play sound files (not MP3 initially), just using a single GPIO
Its possible to get the PWM rate on a GPIO pin very high, I’ve tested up to 18Mhz, so it would probably be technically possible to create a 1-bit DAC http://en.wikipedia.org/wiki/1-bit_DAC
However I don’t think its that simple to do. You could also look at a parallel 8 bit DAC, or for that matter use a resistor ladder (I used a resistor ladder on an old project)
resistor ladder: If you have time and space…keep in mind, that they MUST match about 0.1%!
PWM: you must set the PWM frequency to a high rate (400kHz are ok, don’t mess up MCU time with higer rates!) and filter the output, many tutorials for the arduino. Sound is ok, but weak output. There is also a combination of two pwm pins (look at http://sensorium.github.io/Mozzi/ ). But I think, it’s easy to convert a arduino example, they all use an extra timer: http://playground.arduino.cc/Code/PCMAudio just convert the timer ISR routine into a “maple one” or look at this example: http://www.hackerspace-ffm.de/wiki/inde … pleSDAudio
external DAC’s:
SPI DAC’s like MCP49xx: easy to handle, 1 or 2 channels, 8,10 or 12 bit. They are ok, but I dont use them for audio
I2C DAC’s: forget them, too slow.
TLC7528: dual 8-bit parallel DAC: VERY fast, need much pins, only 8-bit, I used it for my AVR synth, because of low MCU cycles, maybe not necessary on the maple. Same concept as the “resistor ladder”
next and best level would be I2s DAC’s: I use them on my PIC32: 16-24 bit, “real” audio DAC’s…but: You must write a library for your new board
DF-mini Player: Yes, it worked without problems! Plays mp3’s well. Maybe you need a separate power line (I don’t think so, but you must take 5V as VCC!!!)
The original library is a piece of ****** cannot play tracks in sub folders (takes only the tracks from “mp3” folder), missing commands…
You must set the directory following:
foldes in root:
mp3 <common folder>
01 <first folder>
02 <second folder>
03 etc….
in the folders (mp3, 01,02….) just must set the track names:
001.mp3
002.mp3
and so on.
It’s ok, doing this, because the player reads only the first 3:
001_artist_songtitle.mp3
I’ll post my library and demo sketch, as soon as possible!
You can also grab a VS1053 mp3 module, but you have to solder two pins together. I got such a module working basically (didn’t spend much time for this)
It was sold as an “MP3” player, but actually only plays files in some special format ;-( so I gave up with it.
I have made resistor ladder DAC’s before, and the sound quality was OK, but I was not playing real music.
Years ago, I built a 8 bit sound drum machine, using some existing software, I just made the DAC. (on a Zilog Z80 processor)
Also, years ago, I think I also used a resistor DAC on a PC parallel port to make a “MOD” file player for a old PC that didn’t have a sound card
The STM32F103RC and STM32F103RE devices, have 2 DACs, and I did some basic testing on my RC board, but have not had time to do anything except confirm the DAC worked.
Shame the Maple mini didn’t have a nice chip like the F103RET, but perhaps it won’t fit on that size board.
I also built some resistor ladder DAC’s, then I bought the TLC7528 (on ali for a few bucks), much more comfortable.
.. a while back, but never got a chance to try them out. They look to be fairly useful for this sort of application.
Jens: Just buy this and connect it to the headphone pins (30cent per piece): http://www.aliexpress.com/item/PAM8403- … 55554.html
I bought this player: http://www.aliexpress.com/item/Mini-MP3 … 68837.html not really a bargain, but ok.
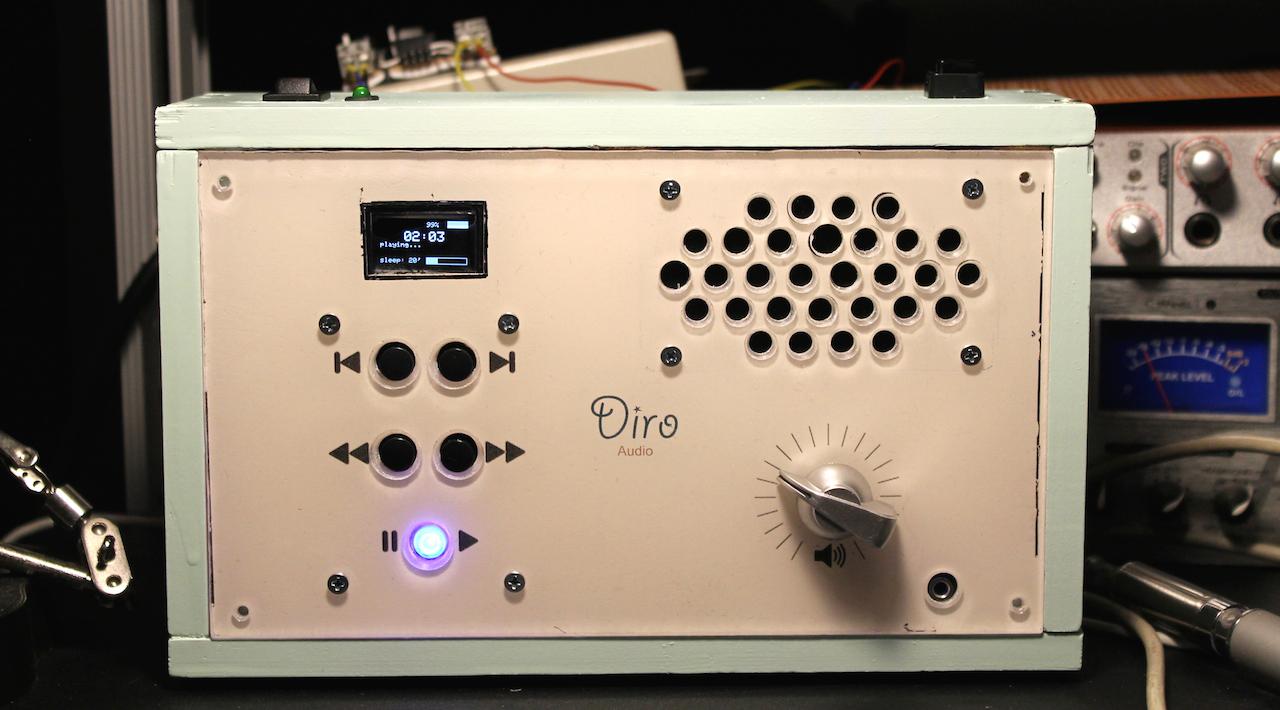
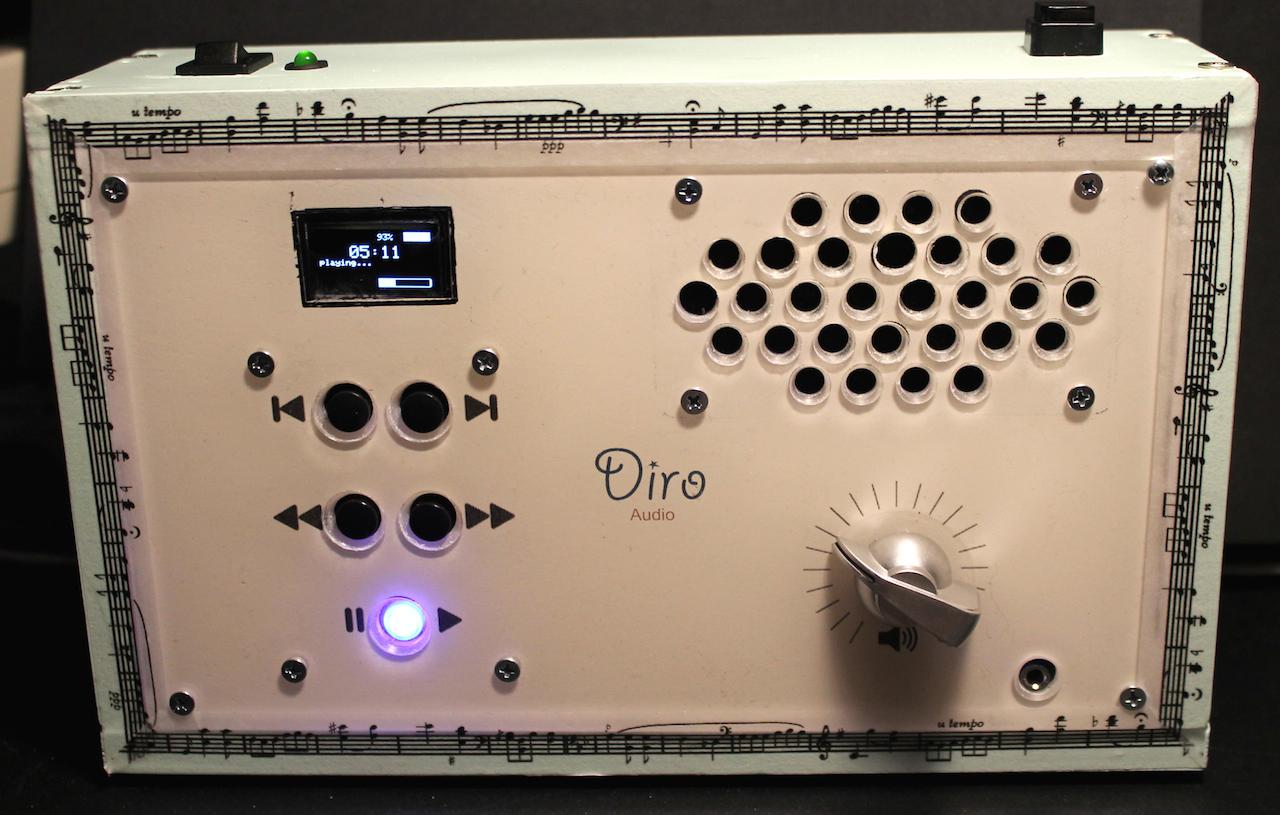
The electronic is completely working!
There are not many “features” but many things “under the hood”:
only 5 buttons (one with LED): Track+/-, Folder +/-, Play/Pause/Stop (short press: switch play/pause, long press stop). LED is on while playing, fading while pause, flashing if battery is low.
The STM32 is connected via serial with the DF-Player bidirectional: Getting status if USB is plugged in (for file transfer) and everything else. Even the volume poti is digital. Sadly there is no way to get the filenames from the module. Software for the exchange is really ingenious, I spent very much time for it (devil in the detail! like how to get back the right number of files in folder without getting all the hidden and not *.mp3 files back…)
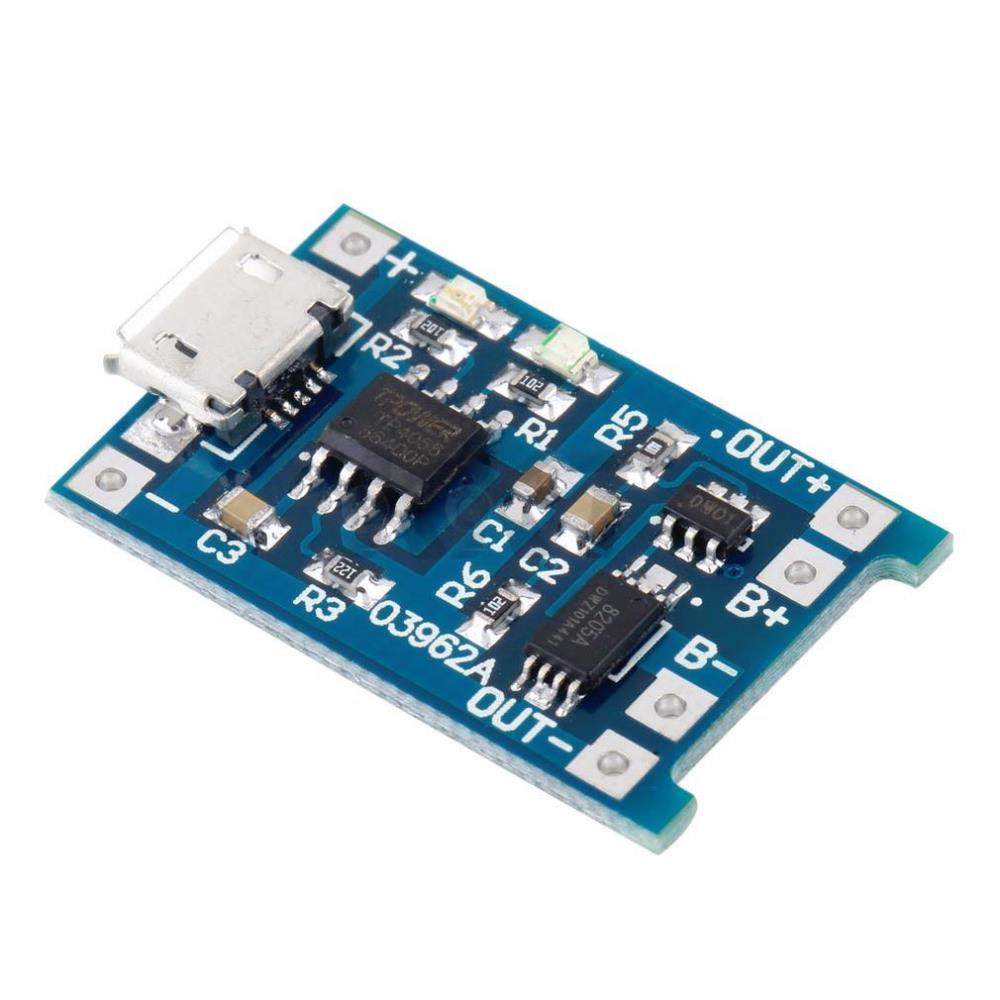
I also implemented a smart battery watchman system: Getting the real voltage from the 18650er, status: charging, idle… So if the voltage drops under 3.2V the system goes to sleep (must be implemented). I’ve choosen the “better” charger module with seperate power out: http://g02.a.alicdn.com/kf/HTB1tkmDIXXX … -Store.jpg
The OLED is just for us parents: Showing batterie status, charging, volume, track/folder…
To be done: Battery indicator calibration, all the power saving routines (display, DF-player, even STM32 itself), at the moment I’m at 60mA without playing for 2x 2200mHa batteries about 73 hours idle time. Time enough for the parents to turn it off. (For soft-power off I looked at many circuits like http://www.eevblog.com/2012/03/30/eevbl … h-circuit/ , but I do not have the time for such a thing yet) Power consumption with loudspeaker full volume: about 300mHa (but it’s really too loud! – so 50% and about 150-200mHa while playing, only with headphones about 80-100mHa)
The wooden housing was(!) nearly finished, but I completely messed up the frontpanel with the last layer of acryilc paint (too many ugly crackles on all layers) so it’s unrepairable and I’ve to build a new one (this time from acrylic glass). So I wasted many hours of work :/
I also playing to using oled to displaying volume, track and other info using SSD1306 and VS1053 dsp,
Good job, and please stay update the progress ![]()
We found some old code in the leaflabs forums that work good to put the MCU into sleep, stop, and standby mode. They may help you extend the battery life. Specially the stop mode, since the MCU is powered up and can wake with interrupts (i.e. pressing a button) but the peripherals clocks are stopped and takes little power.
When it goes to stop mode the clock switches to internal high speed, but you can set your code to go back to external Chrystal and enable the peripheral clocks again. So you could take advantage of that mode when the MCU is not playing a file but just waiting for the user input.
The standby mode shuts it down completely, so you have to wake it with a reset and it loses the RAM, but the 1117 would still take a few mA, so for power shutdown that circuit you posted looks more interesting, as you don’t need the MCU to wake automatically.
I think Ahull is playing with that mode for his camera sketch.
EDIT:
I have read your latest post but not the first, now I went back to it and I see you are already using standby and sleep modes.
Victor:
Power saving is the next piece of work. But I suspect, that the STM32 won’t be my problem with/or without power saving…. I’ve a good multimeter with RS232 and software, so I will take some records over hours with different settings. Good thing I had thought of schedule measurement points in my circuit….
Saw: Just a standard fretsaw is fine and sawing is smooth and exactly.
Transfer printing:
I use a thing called “foto potch” (perhaps nothing more than wooden glue and water). So printing with a colour laser printer your design (not reversed in this case!) on a normal paper, put it with the potch on the backside of the acrylic glass, but spare out with tape any square you need plain (like for displays), let it dry, remove it with water (rub rub rub) and use some white acrylic spray. So the whole print is on the bottom and the front panel has a nice “looking through the glass” look.
Drills:
I’ve tried out many drills (and combinations). This works best: Pre-drill every hole with really thin (3-4mm) wooden drill (yes, I know that many professionals advise against wooden drills for acrylic glass, but had no problem with the thin ones) .
Next step are such special drills like step drill (don’t know all english names for that, so see picture:)
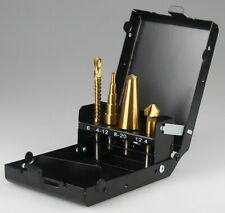
The result was no single crack on any hole. Only drawback (you can see it on 3 holes on the photo -> loudspeaker): My drill stand is crap, because the margin is about 1-2mm (even with fixation) so these holes (I wanted flattened holes) are a little bit thicker, caused by the step drill and I was in hurry (and got nervous, to call the “real problem”
That would be the best birthday gift for your daughter because it’s been made from her dad with love and it’s unique in the world!
.. a while back, but never got a chance to try them out. They look to be fairly useful for this sort of application.
Controlling nearly everything via serial commands (sadly track names aren’t be transfered). Gimmick: (Not in the datasheet/manual): If you connect the USB+ and USB- to a PC it will show you the SD-Card on PC, so super easy file transfer. (In my project the SD-card is build in).
Speaker out is mono, but you have DAC-L and DAC-R for headphones. So connect this to a super cheap PAM8403 amplifier module to get a stereo amplified output.
Vassilis: Thank you for your nice words! My intention is to bring my daughter technology without too much “technology”. So there is no touch display with fancy slide- and clickable images (she loves mama’s Iphone!) or thousands of LED’s, the main concept is getting away from visually to “audioally”. All audiobooks on the player are with spoken words from myself on the first track of each folder.
Thanks.
I love the Music tape, where did you get that?
The tape is from a local store called “pagro”
https://www.pagro.at/folia-wahi-tape-kl … steln.html
Here is a photo from the inside:
At that time, I didn’t own/had access to a 3D-printer, CNC router and not even the right tools for wood working (but I was on a school for art&crafts as I was young)

