This tutorial shows how to debug STM32 with VScode
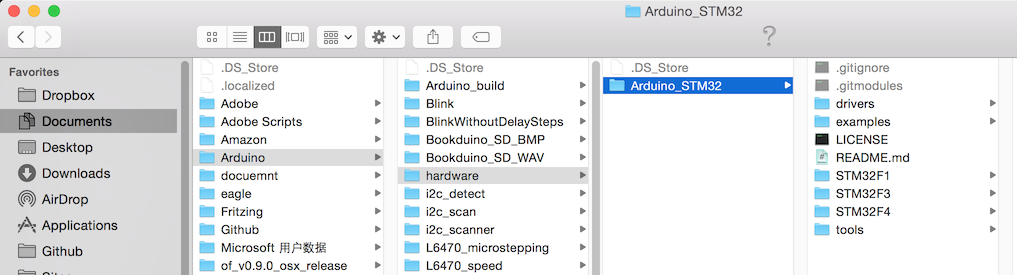
Follow instructions on https://github.com/rogerclarkmelbourne/Arduino_STM32
And make sure it works in Arduino IDE. Also make sure the folder is called “Arduino_STM32”, not “Arduino_STM32-master”
- 1_installSTM32.png (150.59 KiB) Viewed 8731 times
- 4_download_openOCD.png (188.25 KiB) Viewed 8730 times
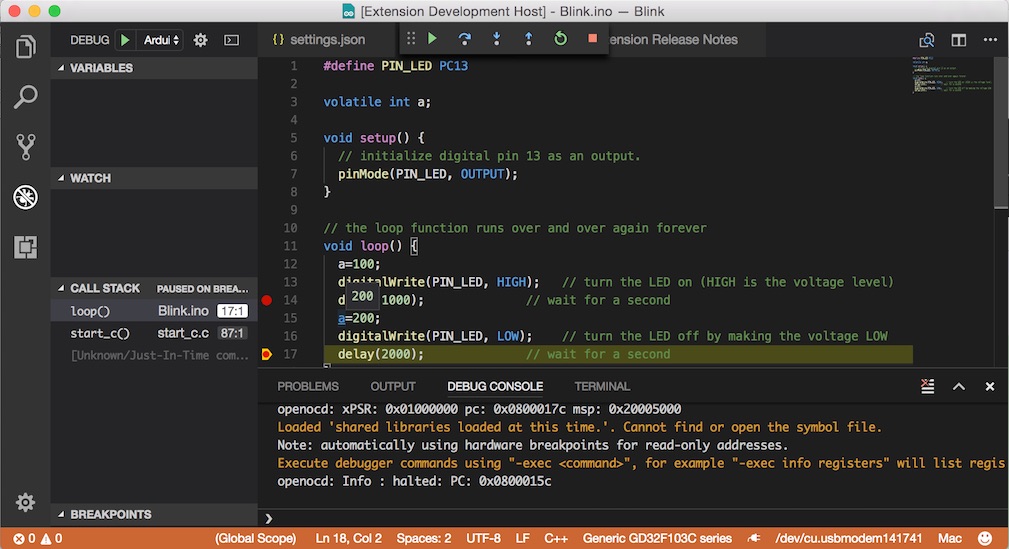
- 7_debug.jpg (144.74 KiB) Viewed 8730 times
But I got a few questions:
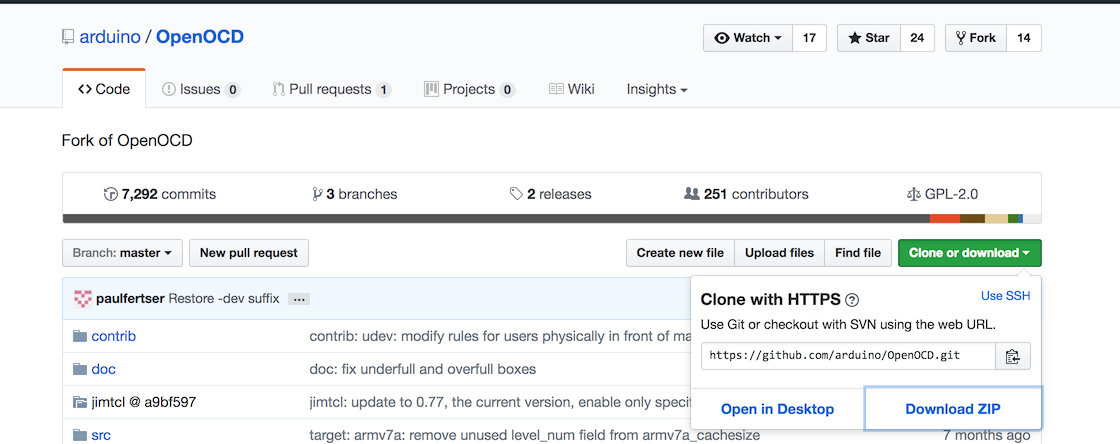
#4 there are no scripts files in the Arduino/OpenOCD repository!?
#5 How did you get the Board available, although I have installed in Arduino the STM boards, I dont see the available in the VScode Arduino extension!>
Thank you!
There are
https://github.com/arduino/OpenOCD/tree/master/tcl
#5
Make sure you put STM32duino in Documents instead of the Arduino itself. Otherwise VScode won’t look for it.
[iamseer – Thu Jul 20, 2017 4:21 pm] –
#5
Make sure you put STM32duino in Documents instead of the Arduino itself. Otherwise VScode won’t look for it.
I use the portable version od the official Arduino IDE. VScode was able to find all the boards installed in the portable/sketchbook/hardware folder.
There are two Arduino plugins, I used the Microsoft plugin like iamseer.
Remember that VScode is not VSstudio.
[iamseer – Thu Jul 20, 2017 4:21 pm] –
#4
There are
https://github.com/arduino/OpenOCD/tree/master/tcl
Actually, I found they are already available from step #2 under
\packages\arduino\tools\openocd\0.9.0-arduino6-static\share\openocd\scripts\
[iamseer – Thu Jul 20, 2017 4:21 pm] –
#5
Make sure you put STM32duino in Documents instead of the Arduino itself. Otherwise VScode won’t look for it.
Perfect, that was the key! ![]()
I had for other reasons the installation of Arduino_STM32 in the Arduino Program Files folder, so I had to move.
Awesome, thank you so much ![]()
It works on windows too.
thnx
caniggia
{

"version": "0.2.0",

"configurations": [
{
"name": "Arduino",
"type": "arduino",
"request": "launch",
"program": "${file}",
"cwd": "${workspaceRoot}",
"MIMode": "gdb",
"targetArchitecture": "arm",
            "miDebuggerPath": "/usr/bin/arm-none-eabi-gdb",

"debugServerPath": "/usr/bin/openocd",

"debugServerArgs": "-f interface/stlink-v2.cfg -f target/stm32f1x.cfg",
"customLaunchSetupCommands": [
{
"text": "target remote localhost:3333"
},
{
"text": "file ${file}"
},
{
"text": "load"
},
{
"text": "monitor reset halt"
},
{
"text": "monitor reset init"
}
],
"stopAtEntry": true,
"serverStarted": "Info\\ :\\ [\\w\\d\\.]*:\\ hardware",
"launchCompleteCommand": "exec-continue",
"filterStderr": true,
"args": []
}
]
}
stephen

and that is how it looks like ![]()
But it keeps telling me I need to select a Board, but there isnt an option to do this
Did you somehow get it to run the settings.json file ??
Currently the auto complete and contextual help do not work at all for Arduino i.e it doesnt know what Serial is or delay() is etc etc
Press F1 (or Ctrl+Shift+p),
and type “arduino” and you will get all arduino plugin commands.
caniggia
[caniggia – Tue Aug 01, 2017 10:37 am] –
@RogerClarkPress F1 (or Ctrl+Shift+p),
and type “arduino” and you will get all arduino plugin commands.caniggia
Thanks
I managed to at least select an AVR board.
But the context sensitive completion seems to be odd.
If I start typing
Serial.
The first suggested completion is .addr
Which AFIK is not part of the API
https://www.arduino.cc/en/Reference/Serial
However it does work for delay() and millis() etc
I guess they need to do more work on this…
Set for ST-Link upload.
To change upload method:
Press F1 nad type “Arduin: Board Config”
For Verify/Compile press CTRL+ALT+R
For Upload press CTRL+ALT+U
caniggia
Windows 7 (yes yes, I shall burn myself at the stake later..), VS Code, Arduino pluging, etc, etc.
I can get it to accept the board, build, upload (although it would be nicer if you didnt have to use the arduino specific vrtify/upload commands).
I would prefer it if I could see compiler output, however it is probably hidden somewhere.
Serial monitor works, blink blink blink..
However, any attempt at debug (STLink to blue pill) results in ‘Unable to start debugging. No process is associated with this object.’
And thats when several days of tearing my hair out started..
Now, when I initialise the project, I get a launch.json file with not much in the way of links to things, ie:
“targetArchitecture”: “arm”,
“miDebuggerPath”: “”,
“debugServerPath”: “”,
“debugServerArgs”: “”,
“customLaunchSetupCommands”: [
{
“text”: “target remote localhost:3333”
},
etc..
The error implies I need links in there, and I have followed the instructions at the start of the thread as best I have been able, but it just seems to have it in for me.
Any thoughts?
Make sure the folder in “..\Documents\Arduino\hardware\” is called “Arduino_STM32”, not “Arduino_STM32-master”.
* For OpenOCD you need:
Add 2 folders(Arduino_STM32 & scripts) from attached zip to “C:\Users\<username>\AppData\Local\Arduino15\packages\”.
Zip is too long to attach it here, so i put up link to dropbox:
https://www.dropbox.com/s/oce9danpebl25 … d.zip?dl=0
If you don’t trust this link/files, you can find all this files in:
“C:\Users\<username>\AppData\Local\Arduino15\packages\arduino\tools\openocd\0.9.0-arduino6-static”
You don’t need to change anything in launch.json.
Next step is not needed anymore with extension v0.2.5
* For ST-link Debugging to work with selected generic board:
You also need(for current version of extension v0.2.4) to replace “usbmapping.json” with file in attached zip in:
“C:\Users\<username>\.vscode\extensions\vsciot-vscode.vscode-arduino-0.2.4\misc\”
BR
caniggia
I would prefer it if I could see compiler output, however it is probably hidden somewhere.
Add to “arduino.json” this line:
“output”: “build”,
and you will get all compiled files in subfolder named “build”.
BR
caniggia
"miDebuggerPath": "/usr/bin/arm-none-eabi-gdb",
"debugServerPath": "/usr/bin/openocd",
"debugServerArgs": "-f interface/stlink-v2.cfg -f target/stm32f1x.cfg",
            "miDebuggerPath": "D:/VScode/arm-none-eabi-gdb",

"debugServerPath": "D:/VScode/openocd",

"debugServerArgs": "-f interface/stlink-v2.cfg -f target/stm32f4x.cfg",
What I’m doing wrong?
STM32 ST-LINK works fine, but upload via st-link don’t work
[iamseer – Wed Jul 19, 2017 7:58 pm] –
Happy debugging!
7_debug.jpg
Maybe I missed something, I follow all the steps and cant get it running.
Could you help?
How i did it on Windows 10.
Tested with ST-Link & Bluepill.
1.) Download and install “Arduino”:
https://www.arduino.cc/en/Main/Software
2.) In Arduino “Boards Manager” install “Arduino SAMD Boards”, not “Ardiuno SAM Boards”!!!
3.) Download rogerclarkmelbourne’s repo:
https://github.com/rogerclarkmelbourne/Arduino_STM32
Put folder from zip to:
C:\Users\<username>\Documents\Arduino\hardware
and rename it to “Arduino_STM32” !!!
4.) In Arduino Try to compile & upload blink example
5.) Download and install “Visual Studio Code”
https://code.visualstudio.com/download
6.) Download and instal “Visual Studio Code extension for Arduino” v0.2.5 !!!
https://marketplace.visualstudio.com/it … de-arduino
It will also install “C/C++ for Visual Studio Code”
7.) You don’t need to set/change anything in “launch.json”
8.) Set the project in VSCODE for blink example and try to compile(ctrl+alt+r), upload(ctrl+alt+u) and debug(F5).
BR
caniggia
[caniggia – Wed Aug 30, 2017 9:48 am] –
@vitor_bossHow i did it on Windows 10.
Tested with ST-Link & Bluepill.1.) Download and install “Arduino”:
https://www.arduino.cc/en/Main/Software2.) In Arduino “Boards Manager” install “Arduino SAMD Boards”, not “Ardiuno SAM Boards”!!!
3.) Download rogerclarkmelbourne’s repo:
https://github.com/rogerclarkmelbourne/Arduino_STM32Put folder from zip to:
C:\Users\<username>\Documents\Arduino\hardwareand rename it to “Arduino_STM32” !!!
4.) In Arduino Try to compile & upload blink example
5.) Download and install “Visual Studio Code”
https://code.visualstudio.com/download6.) Download and instal “Visual Studio Code extension for Arduino” v0.2.5 !!!
https://marketplace.visualstudio.com/it … de-arduinoIt will also install “C/C++ for Visual Studio Code”
7.) You don’t need to set/change anything in “launch.json”
8.) Set the project in VSCODE for blink example and try to compile(ctrl+alt+r), upload(ctrl+alt+u) and debug(F5).
BR
caniggia
Only work with F1? My board is F407VE. And how include another library like STM32GENERIC?
[caniggia – Wed Aug 30, 2017 9:48 am] –
@vitor_boss
7.) You don’t need to set/change anything in “launch.json”8.) Set the project in VSCODE for blink example and try to compile(ctrl+alt+r), upload(ctrl+alt+u) and debug(F5).
I tried to do all this, but the program ask me to choose board and I cannot see genericSTM32 in the list. What should I choose?
Press F1 and type “arduino” and you will get all the Arduino commands:
- Arduino: Board Manager: Manage packages for boards. You can add 3rd party Arduino board by configuring Additional Board Manager URLs in board manager.
- Arduino: Change Baud Rate: Change the baud rate of selected serial port.
- Arduino: Change Board Type: Change board type or platform.
- Arduino: Close Serial Monitor: Stop serial monitor and release the serial port.
- Arduino: Examples: Show example list.
- Arduino: Initialize: Scaffold a VS Code project with an Arduino sketch.
- Arduino: Library Manager: Explore and manage libraries.
- Arduino: Open Serial Monitor: Open serial monitor in the intergrated output window.
- Arduino: Select Serial Port: Change the current serial port.
- Arduino: Send Text to Serial Port: Send a line of text via the current serial port.
- Arduino: Upload: Build sketch and upload to Arduino board.
- Arduino: Verify: Build sketch.
Please, read this page “Visual Studio Code extension for Arduino”:
https://marketplace.visualstudio.com/it … de-arduino
BR
caniggia
Im trying to run STM32F4 Discovery board.
I came across a couple issues:
Regarding copying scripts and executing the instruction inside the termian, after doing so Im getting different result, much longer result.
Cant find “misc/usbmapping.json”.
I tried to add following path: “-f interface/stlink-v2.cfg -f target/stm32f4x.cfg” into “debugServerArgs”.
After hit debug I get an Error that “arm-none-eabi-gdb is not signed”.
Im running Mac os high sierra
I appreciate every help,
Regards!
EDIT:
I finally managed to debug my project.
I installed openocd and gcc-arm-none-eabi using Homebrew.
Then I set up parameters inside launch.json file:
            "miDebuggerPath": "/usr/local/Cellar/gcc-arm-none-eabi/20160928/bin/arm-none-eabi-gdb",

"debugServerPath": "/usr/local/Cellar/open-ocd/0.10.0/bin/openocd",

"debugServerArgs": "-f interface/stlink-v2.cfg -f target/stm32f4x.cfg",
[otw – Wed Dec 06, 2017 10:35 pm] – I finally managed to debug my project.
I installed openocd and gcc-arm-none-eabi using Homebrew.
Then I set up parameters inside launch.json file:
            "miDebuggerPath": "/usr/local/Cellar/gcc-arm-none-eabi/20160928/bin/arm-none-eabi-gdb",

"debugServerPath": "/usr/local/Cellar/open-ocd/0.10.0/bin/openocd",

"debugServerArgs": "-f interface/stlink-v2.cfg -f target/stm32f4x.cfg",
All of this is predicated upon having the c/cpp extension and the MS Arduino extension installed.
Here’s what I did on Windows to make this work for rogers core – the intellisense settings are set per project in c_cpp_properties.json (I suspect there’s a master template that can also be edited however)
First of all switch on the new tag parser in the global settings in vscode:
Click the settings cog bottom left, and choose ‘Settings’
In the right hand pane paste this into ‘USER SETTINGS’
{

"C_Cpp.intelliSenseEngine": "Tag Parser",

}
The original instructions are wrong, they state to install the SAMD M3 support, openocd comes with the M0+ support.
On windows the Arduino15 folder lives here:
%USERPROFILE%\AppData\Local\Arduino15
Compilation is tediously slow via vscode, no idea why. I have a 16 core cpu and it’s doing literally ‘nothing’ whilst the build runs.
I really like the editor and context sensitivity, but this right now may not be practicable ![]()
EDIT – fixed compile times by disabling Windows Real Time protection. Would still like to get debugging working though.
[BennehBoy – Sun Jan 28, 2018 5:07 pm] –
So this has turned out to be a huge exercise in frustration, looks like due to the board options Maple Mini isn’t supported for debugging (no st-link upload method?).
You might check out the entries I added to the boards.txt
To use STLink on the Maple mini you would also need to change the setting in boards.txt that disables the STLink pins, and initially use Connect Under Reset to get STLink to connect, as the setting wont change until you have loaded your next sketch.
I could add STLink as an option, but no one reads the docs and we would constantly be telling people they need to initially use Connect Under Reset to get the ball rolling.
Hence I think this is more trouble than its worth,
Most people who use STLink use the Blue Pill, and I now use the RobotDyn Black Pill in preference to the Maple Mini as it has the correct USB pull-up resistor, and has separate SWD pins and even more important has access to the 5V rail from USB
Rick, I’ll have a look at that if it annoys me too much prior to the pill’s arriving on the slow boat.
on aliexpress i’m seeing £3.50 for the first ![]() and £1.47 for the latter
and £1.47 for the latter ![]()
a link if possible ?
srp
Whatever makes them black does not easily scrape off
srp
I think perhaps 2 different existing Black Pill versions. One with links for Boot0 and Boot1, but the other versions only has a Boot0 jumper.
AFIK, these have the same issue as the Blue Pill, with the wrong USB pull up resistor circuit.
The RobotDyn version has the correct USB pull-up resistor to 3.3V.
RobotDyn were also supposed to be selling a version with the bootloader pre-installed, but they never sent me a follow up email to confirm they are actually doing that.
I will check their website and update this post …
Update.
Looking on RobotDyn’s website, they seem to be selling a BlackPiol with the bootloader for $2.79 . It looks like it has the headers soldered on, but I am not sure if they are really doing that.
There is another STM32F103C8 listed for $1.99 but the picture is missing, so it’s hard to know if it’s the same as the one with the bootloader, but potentially not assembled and without the bootloader.
They told me in an email, that the bootloader version would be the same price , but I susoect they are charging 80 cents to install the bootloader.
Though possibly the more expensive one has the headers soldered on as well, so the 80.cents may be for both changes.
If they are changing 80 cents, for the bootloader, I better apply for the job of bootloader installed, as STLink can instal the bootloader in less than 30 seconds.
So I could earn $120 an hour plugging in boards and watching STLink upload to them.
In fact, I could run 2 Stlinks at the same time and get my wage up to $240 an hour
![]()
![]()
srp
[BennehBoy – Sun Jan 28, 2018 5:07 pm] –
So this has turned out to be a huge exercise in frustration, looks like due to the board options Maple Mini isn’t supported for debugging (no st-link upload method?).Compilation is tediously slow via vscode, no idea why. I have a 16 core cpu and it’s doing literally ‘nothing’ whilst the build runs.
I really like the editor and context sensitivity, but this right now may not be practicable
EDIT – fixed compile times by disabling Windows Real Time protection. Would still like to get debugging working though.
To speed up compile times:
You can add for example:
“output”: “.build”
to “.vscode/arduino.json” file.
More on this page:
https://marketplace.visualstudio.com/it … de-arduino
After first compile it will add “.build” folder to your project folder with all compiled files including .bin, .elf, …
The next time you compile it will reuse this files and compile times will be much faster.
BR
caniggia
Thanks Caniggia – I already did that, the main problem with build times was actually MS Antimalware, disabling it improved things dramatically.
Previous post, edited :
(I have fixed most of the problems I described, so no use to leave them in this thread)
I have installed VSCode today, and I have been using STM32 for Arduino for a while now.
I am on Windows 10.
First I am surprised that the hardware folder should be placed in documents, and moreover within the Sketched folder. Is this a mistake from the authors of the arduino extension?
Next, I am unable to start debugging. I end up with an error message “Unable to start debugging. Aucun processus n’est associé à cet objet.”
Since my windows is in french, I get a mixed language message. Basically it means “no process is associated with this object”.
What is the problem?
“Debug for board BLACK F407VE/ZE/ZG boards is not supported by now”
Seems I’m missing some configuration but what ?
Download https://developer.arm.com/open-source/g … /downloads latest arm GCC
And https://sourceforge.net/projects/openoc … cd/0.10.0/ openOCD 0.10 that is important because early versions won’t work wit F4 chips
launch.json:
{

"version": "0.2.0",

"configurations": [
{

"name": "Arduino",

"type": "arduino",

"request": "launch",

"program": "${file}",

"cwd": "${workspaceRoot}",

"MIMode": "gdb",

"targetArchitecture": "arm",

"miDebuggerPath": "D:/VScode/arm-none-eabi-gcc/7.0-2017q4/bin/arm-none-eabi-gdb.exe",

"debugServerPath": "D:/VScode/openocd/0.10.0/bin/openocd.exe",

"debugServerArgs": "-f interface/stlink-v2.cfg -f target/stm32f4x.cfg",

"customLaunchSetupCommands": [

{

"text": "target remote localhost:3333"

},

{

"text": "file ${file}"

},

{

"text": "load"

},

{

"text": "monitor reset halt"

},

{

"text": "monitor reset init"

}

],

"stopAtEntry": true,

"serverStarted": "Info// :// [//w//d//.]*:// hardware",

"launchCompleteCommand": "exec-continue",

"filterStderr": true,

"args": []
}

]
}
srp
[vitor_boss – Fri Feb 23, 2018 12:03 am] –
Here is some changes I’ve made to work.
Download https://developer.arm.com/open-source/g … /downloads latest arm GCC
And https://sourceforge.net/projects/openoc … cd/0.10.0/ openOCD 0.10 that is important because early versions won’t work wit F4 chips
launch.json:
{
"version": "0.2.0",
"configurations": [{
"name": "Arduino",
"type": "arduino",
"request": "launch",
"program": "${file}",
"cwd": "${workspaceRoot}",
"MIMode": "gdb",
"targetArchitecture": "arm",
"miDebuggerPath": "D:/VScode/arm-none-eabi-gcc/7.0-2017q4/bin/arm-none-eabi-gdb.exe",
"debugServerPath": "D:/VScode/openocd/0.10.0/bin/openocd.exe",
"debugServerArgs": "-f interface/stlink-v2.cfg -f target/stm32f4x.cfg",
"customLaunchSetupCommands": [
{
"text": "target remote localhost:3333"
},
{
"text": "file ${file}"
},
{
"text": "load"
},
{
"text": "monitor reset halt"
},
{
"text": "monitor reset init"
}
],
"stopAtEntry": true,
"serverStarted": "Info// :// [//w//d//.]*:// hardware",
"launchCompleteCommand": "exec-continue",
"filterStderr": true,
"args": [] }
] }
[michael_l – Fri Feb 23, 2018 6:39 am] –
Hi, thanks.But I still get the error about board not supported. I took a look and it comes from Arduino plugin. As if it was expecting every board name to be defined before it can be used. That does not make sense.
Look at your .vscode folder, it should have this files:
arduino.json
c_cpp_properties.json
DebugUsbMapping.json
launch.json
usbmapping.json
[vitor_boss – Fri Feb 23, 2018 10:51 pm] –[michael_l – Fri Feb 23, 2018 6:39 am] –
Hi, thanks.But I still get the error about board not supported. I took a look and it comes from Arduino plugin. As if it was expecting every board name to be defined before it can be used. That does not make sense.
Look at your .vscode folder, it should have this files:
arduino.json
c_cpp_properties.json
DebugUsbMapping.json
launch.json
usbmapping.json
Thanks, now I understand!
I wasn’t aware of that you’d have to copy DebugUsbMapping and usbmapping into your sketch folder .vscode. They are found globally in
C:\Users\michael\.vscode\extensions\vsciot-vscode.vscode-arduino-0.2.10\misc
I have added to the .vscode folder under the sketch folder the files you mention, taken from the path you give (in my case C:\Users\Jean-Marc\Documents\Arduino\Sketches\CodeSerrureMarronniers2\.vscode).
However, i still have when I attempt to start debugging the following error :
“Unable to start debugging. Aucun processus n’est associé à cet objet.” The french part says “no process is associated with this object”.
I have connected a ST-link V2 which is recognised as a USB device by my computer. I am running Windows 10.
Should there be a service associated with it, that was not started?
[Phono – Fri Mar 23, 2018 2:54 pm] –
Hi,
I have added to the .vscode folder under the sketch folder the files you mention, taken from the path you give (in my case C:\Users\Jean-Marc\Documents\Arduino\Sketches\CodeSerrureMarronniers2\.vscode).
However, i still have when I attempt to start debugging the following error :
“Unable to start debugging. Aucun processus n’est associé à cet objet.” The french part says “no process is associated with this object”.
I have connected a ST-link V2 which is recognised as a USB device by my computer. I am running Windows 10.
Should there be a service associated with it, that was not started?
Hi everyone,
I’m getting the same issue. I followed all the recommended steps, but I am still unable to start debugging. Upload and verify works fine but, I keep getting the “Unable to start debugging. Aucun processus n’est associé à cet objet.” error message when i’m trying to debug. I am also running Windows 10. I’ve noticed that there is a OpenOCDMapping file in the .misc folder ( C:\Users\randolpa\.vscode\extensions\vsciot-vscode.vscode-arduino-0.2.11\misc , for me), and I’ve tried to add my board there but I’m still facing the same problem. Does anyone have any ideas on how to solve this ?
Path to the debugger is different on every computer (just to take under consideration).
My launch.jason:
        {

"type": "gdb",

"request": "attach",

"name": "Attach to gdbserver",

"executable": "/Users/grzes/Documents/Arduino/tests/AC6Hello/Debug/AC6Hello.elf",

"target": "localhost:3333",

"remote": true,

"cwd": "${workspaceRoot}",

"gdbpath": "arm-none-eabi-gdb",

"autorun": [

"monitor reset",

"monitor reset halt"

]
},I’m using an STM32F3Discovery board for ST-Link and connecting it to my Blue Pill.
I had to (against recommendation of connecting only SWDCLK, SWDIO, GND) connect all 5 pins (RESET + VDD) to get debugging and SWD upload working correctly and 100% reliably. Until that, the STLINK would not see the target or have USB issues except maybe 1/20 times where it would connect. I don’t know the procedure when using the knock-off ST-Link adapters but when using the actual STM Discovery boards, it’s alright if you connect the VDD port from the Discovery board to the target board.
The launch.json posted in this thread and the script suggestions helped massively.
Thanks guys.
