I got a few Bitmap fonts for the Adafruit library which were not what I was looking for, Adafruit also provides a binary to convert TrueType fonts to bitmap fonts, however the fonts produced are substandard quality, specially at small sizes since the rendering of TrueType make use of interpolation and anti-aliasing to make it look good hence fonts transformed to a monochromatic plane and specially small ones suffer from a large deformation.
Also I needed extra attributes on the fonts, like the ability to generate a border or blending with whatever was in the display, GFX fonts don’t provide that.
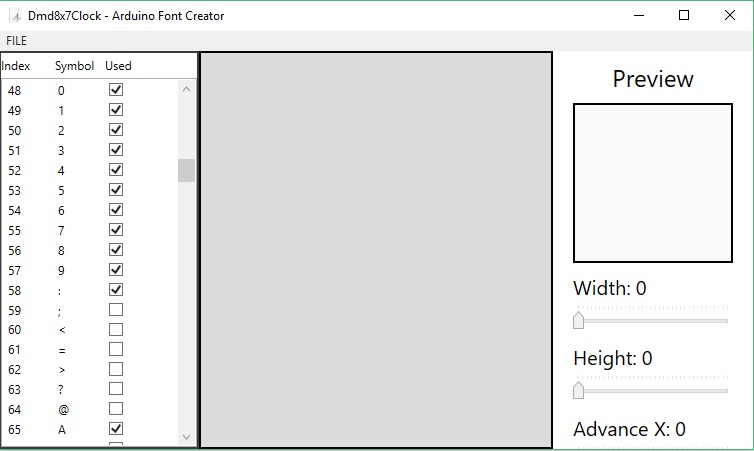
I decided to create my own tool to create my extended fonts, this is a graphical interface that is very easy to use, these fonts only work with an derived class of Adafruit_GFX class that I created, however that is outside the scope of this message.
These fonts will support several attributes, however they will require more memory to store them and inherited version of the Adafruit GFX library.
The format of the output header files .h are very similar to what is produced by Adafruit but not compatibles.
So, with small extra code I added an option to export the created fonts as Adafruit GFX compatible fonts as well.
Any font created with this tool can also be exported as Adafruit GFX font.
I created a project on BitBucket and uploaded the source and binaries, let me know any question you have.
I provided two fonts “Dmd8x7Clock.xft, Dmd13x20Clock.xft” that I created to display the time on the display so only numbers and few characters were included.
The native format is .xft (JSON) then these can be exported from the File menu to “ESP8266 Adafruit” font. “.h” files
What am I missing?
- pic1.jpg (54.21 KiB) Viewed 1733 times
What is the behavior? do you have the runtime?
As soon as I select something, it will be displayed.
So it works.
Thanks.
Code is not the best and lacks of documentation too, however if there is interest on it I’ll be adding support/feature and documentation.
Also I’m a strong believer a Graphical Interface should be intuitive and not to require extra documentation, I’ll take the feedback and improve the discoverability.
What is Advance X?
Advance X seems to be always (Width -1). Can’t be automated always to width -1 (no reason to display it)?
Usually this number is the same as width, however it may not, as for example because my font have border, I need to make advaceX equal to Width -1 so two characters will be adjacent by only one pixel and not 2.
I’ll explain in next post what every value does.
For example on Adafruit fonts this can be normally as Width + 1 since they don’t have borders.
Also for example in the case of a Space (32) there is no really Width, however the cursor still have to move right.
Height: This is the height of the Glyph, this value has a direct implication on the .h size since is the number of vertical pixels that will be rendered on the screen, empty pixels also take space.
AdvanceX: Number of pixels that the rendering engine will move right from the cursor after the glyph is rendered on the screen, usually this value is Width + 1 since every character should be rendered next each other with one empty pixel between them. For example a value of Width + 5 will leave 5 empty pixels to the next character.
There are cases where this value should be With -1, When a Glyph has borders (usually black), they take 2 extra pixels on the left/right of the glyph, if the default Width + 1 is used for AdanceX then 3 pixels will be between each characters, so if we want to have only one pixel between them, then we have to advance only Width -1.
OffsetX: How many pixels this glyph will be offset to the left from the cursor during rendering without affecting the cursor position, usually this value is 0
OffsetY: How many pixels this glyph will be offset to the top of the cursor during rendering without affecting the cursor position, usually this value is 0, however for example lower case Glyphs may require offset from the cursor position. as for example the glyph “P” OffsetY is 0 however the glyph “p” has a OffsetY of 2 since the bottom portion of the “p” fall under the cursor line.
Auto generate border: Automatically add and remove a border around the pixel every time a new pixels is added/removed from the glyph (This is not used on Adafruit GFX fonts and borders are ignored during Adafruit exports)
Left-Click: Add/Toggle a foreground pixel or remove it if a foreground pixel was already set
Right-Click: Add/Toggle a border pixel or remove it if a border pixel was already set
Mouse-Wheel on preview: Zoom-In, Zoom-Out the preview
Also I’ll be adding a “Preview Text as well” so there will be a TextBox where the user can type several characters and will display a real-time preview, that will highly help to identify if all attributes of each Glyphs are properly set


