The question for me was to buy a new printer such as prusa i3 or to build my own 3D printer version.
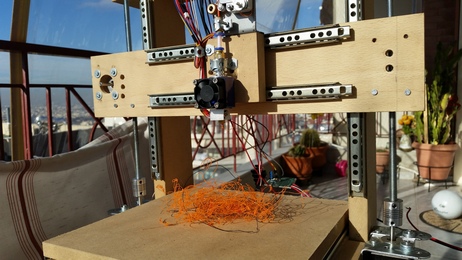
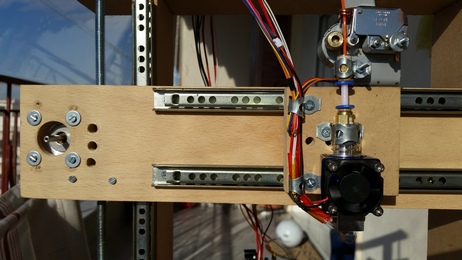
As you already know, I love constructions! So, today I did the assembly of the wooden chassis, including the 3 of 4 step motors. The 4th step motor and the extruder nozzle are on the way. I don’t know if the movement accuracy is the same as a commercial 3D printer because it’s based on common threaded rods instead of using belts and gears for moving to the XYZ axes.
Each motor will be controlled by L298 H bridge. A maple mini will be the main MCU.
Maybe some parts will be replaced on the way.


_________________________________________________________________________________
–== 26 Jan 2016 ==–
_________________________________________________________________________________
Progress up today:
– I made the X,Y,Z axes NEMA17 step motor drivers to work
– I make the g-code commands parser
The source code is written from the scratch, entirely by me, for Maple mini board. The source code is NOT based on any other other 3D printer project (yeah… I would like to reinvent the wheel !).
Next step: Put the extruder step motor in the game!
_________________________________________________________________________________
–== 31 Jan 2016 ==–
_________________________________________________________________________________
Test print 1 (cylinder)
Test print 2 (cubic container / vessel)
Ray
Are the drawer slides salvaged or were they purchased specifically for the build?
I have a bunch of drawer slides and even a bunch of threaded rods lying about, but like a lot of things, I have never had sufficient time to start planning the construction. My intention is to build a small Dremel based CNC or 3D printer, or possibly both.
I presume the maple mini is being used because there is existing firmware for it. What firmware are you panning on using? Would you gain any advantage by substituting an STM32F103?
It’s my own design but I get some ideas from existing designs. For example, I used 2 step motors for Z axis like Prusa i3 uses.
Are the drawer slides salvaged or were they purchased specifically for the build?
I used drawer slides because I found them on a local store for 2€ / pair and I bought them immediately. The drawer slides I get do not have any gap (the slider is very tight when it moves from the one side to the other).
I have a bunch of drawer slides and even a bunch of threaded rods lying about, but like a lot of things, I have never had sufficient time to start planning the construction. My intention is to build a small Dremel based CNC or 3D printer, or possibly both.
I will see in practice if the sliders are strong enough to move a Dremel on a wooden surface.
I presume the maple mini is being used because there is existing firmware for it. What firmware are you panning on using? Would you gain any advantage by substituting an STM32F103?
I intend to write my own firmware instead of using an existing one. Buying an arduino kit (arduino mega, microstep motor controllers, lcd etc) at 30€ is attractive also !
Well done. Building a 3D printer from scratch is not easy….
I agree with Matthias
Threaded rods for all axis’s will make the printer very slow. If possible can you redesign to use belts?
You can buy the belts quite cheaply on Aliexpress or eBay.
I started to design and build another 3D printer, using aluminium L shaped extrusions.
The aluminium is sold by DIY stores here in Australia, as it must be used for house building and repair, or perhaps to make shelves etc.
I thought I could design a 3D printer that people could build with a lot of components from hardware and DIY stores.
However, I did not complete the project as it was taking so many hours to design and cut and drill the metal etc.
I also realised that the cost of the tools needed to make the printer would vastly exceed the cost of just buying a 2D printer, as I ended up needing a drill press and also a circular saw that could cut aluminium, as well as lots of specialised drills etc etc etc ![]()
My design was more like a MakerBot, with an wireframe cuboid shape, but using 2 Z stepper motors, (one on the left and one on the right) rather than one Z stepper at the back.
I decided to use the Z axis arrangement like the Prusa, as just having one Z axis motor and support at the back, causes wobble on the print bed.
BTW. I know that it would be good to use a Maple mini and H bridges etc, but I would recommend you buy a Mega2560 and a RAMPS board for initial testing, and flash Marlin onto it, as its very mature and stable firmware, and will allow you to fix any mechanical issues without also having software and electronics issues from the Maple Mini and H brigdes etc
If the are really gap- and noise(!!!!!)less this would be a funny alternative, so please hold on on your project!
Roger: I use repetier as firmware instead of marlin and I’m very happy about it, because of the superb online configurator.
http://www.repetier.com/firmware/v092/
Mine came with Marlin and I know the config settings for Marlin, so when I had to replace the Mega2560 as I accidental managed to short out the original one (I’m not sure if it was my fault of a production fault on the board), I just decided to say with what I know works ![]()
I’m sure there are better firmware’s as mine of several years old…
The Z axis motors are rotating very slow but that is not a problem because the Z axis elevation doesn’t need to be very fast.
The problem is to the X and Y axes. The movement is too slow because of the threaded rods. The torque is very high though. Maybe the threaded rods are good for a CNC but not for a 3D printer.
The tests were made with the L298 H bridges.
After those tests, I found an old board I had in my stuff with three TB6560A step motor controllers. I wrote a minimal sketch to test that board too. The speed was a little bit better but when I was increasing the speed I lost the motor torque. Generally, the TB6560 was better than the L298 because of the microstep feature but the threaded rods are still a problem.
So, I purchased a set of open belts and gears to modify the X and Y axes.
I might see how practical it would be to make a micro CNC with them. Everybody is always looking for larger and larger build areas, but I wonder what the smallest practical CNC/Mill or 3d printer size might be. How small both in terms of the size of the machine itself, and also the scale of the parts it could produce. Note the word practical there, I have seen 3d printed objects a the nano scale, I’m think of something to work on objects more like http://www.gizmag.com/3d-printed-smalle … ill/36654/ this sort of scale.
GT2 belt:
http://www.aliexpress.com/item/10pcs-lo … 54766.html
GT2 belt + aluminium pulley
http://www.aliexpress.com/item/2-x-Alum … 72348.html
Don’t forget some linear ball bearings, they are cheap and useful, I bought these as reserve:
http://www.aliexpress.com/item/10pcs-LM … 70111.html
Some search terms for ali:
SC8LUU ball bearings with case: http://www.aliexpress.com/wholesale?cat … ext=SC8LUU+
sliding rod (8mm please take at least 300mm, better too much than anger)
http://www.aliexpress.com/wholesale?cat … liding+rod
Its interesting that it is possible to buy the steel rod from AliExpress. I assumed that because if the weight of the steel that it would not be cost effective to buy these parts via the Internet ( but I was wrong)
I am lucky, because i have some local suppliers of both steel and stainless steel, but i know not everyone is this lucky.
So its great you can buy steel from AliExpress.
I did buy all my other components from the Internet, and have a stock of various sizes of linear and rotary bearings and belts and pullies etc ![]()
GT2 belt:
http://www.aliexpress.com/item/10pcs-lo … 54766.html
GT2 belt + aluminium pulley
http://www.aliexpress.com/item/2-x-Alum … 72348.html
Don’t forget some linear ball bearings, they are cheap and useful, I bought these as reserve:
http://www.aliexpress.com/item/10pcs-LM … 70111.html
Some search terms for ali:
SC8LUU ball bearings with case: http://www.aliexpress.com/wholesale?cat … ext=SC8LUU+
sliding rod (8mm please take at least 300mm, better too much than anger)
http://www.aliexpress.com/wholesale?cat … liding+rod
– 5pcs A4988 stepper drivers (@bianchifan I saw your post about DRV8825 after I made the purchase
– 2Pcs GT2 20 tooth Timing Pulleys and 2 Meters Of GT2 Belt For 3D Printer for X,Y axes
– 2pcs 20T 5mm Bore 6mm Gt2 Belt Smooth Idler Pulley Aluminum Alloy For 3D Printer
But there are two fun killers: Not fitting LMUU (no “drop in” replacement) and the big questions: “How to get low quantity without $$$ shipping costs”
This are all available options for me in future, when my chinese printer kit wont work anymore (BTW: After some modifications the printer works excellent even with higher speed, so I would say for a standard prusa i3-type it was a good option for sure much better than the velleman K8xx or the DAYCOM 3DP-100 (this one is on sell only today for 400 Euros – maybe the housing is interesting -but it’s small!))
2 pins for Serial port (USB serial port or hardware Serial port)
2 pins for I2C
12 pins for five step motor controllers (Step, Dir, Enable). Z axis uses 2 controllers with the same control pins.
3 pins for 3 axes limits (End stop)
2 pins for heaters (extruder, heated bed)
2 pins for thermistors (extruder, heated bed)
1 pin for fan
———————-
24 total pins will to be used, 32 – 24 = 8 pins are left free from maple mini.
I choose maple mini because I have some pieces available.
When I see that the pins are not enough, I will add some 74HC595 (serial to parallel) or some 74LS240 (octal buffer) to expand the output pins.
Fan: 2 pins (PWM!) – I’m sure you’ll need the extra one
SPI!!! for SD-card, maybe TFT
Serial: Hardware Serial – because you can easily attach a cheap bluetooth-dongle (BT-6) so you wont need a long cable
analoge Input pin: For buttons (via voltage divider, I always use this method)
As display I would recommend this one: ST7920 128×64 graphic big LCD: http://tinyurl.com/jgqg2mw Advantage: only two pins are needed (clock, data), big, bright, good viewing angle and I had wrote the driver for STM32duino already
Maybe an encoder?
Encoder (+ button)
buzzer
SD-Card holder
http://www.aliexpress.com/item/Free-shi … 64675.html
Not a bad deal!
<edit>: But I”m not sure if this st7920 display is driven in parallel mode (so much more pins)
I was planning to use a 20×4 I2C LCD but maybe it’s a better idea to use the 2.4″ ILI9341 with Touch screen I already have. That LCD includes an SD card holder too.
With the additional 6 pins (MISO, MOSI, SCK, SD_CS, LCD_CS, TOUCH_CS) I will solve the SD, LCD and buttons problem.
Plus 1 more pin for an extra fan.
24 + 7 = 31 pins total.
Only one pin is left free ![]()
<edit>: But I”m not sure if this st7920 display is driven in parallel mode (so much more pins)
I have also changed the position of the X axis step motor.
I am still waiting the pulleys and the belts to arrive ![]()

where’s me saw?
stephen
where’s me saw?
stephen
i meant to indicate that i wanted to go and get started with cutting the wood.
stephen
i meant to indicate that i wanted to go and get started with cutting the wood.
stephen
I am still waiting the pulleys and the belts to arrive
I got tons of eBay/AliExpress that I’m still waiting for …
One was kind much overdue, so I’ve open a “dispute”, the seller answer that is was arrived in Canada on Dec 19th, but I got the parcel only on Jan 6th !
Our National Post is ALSO often guilty !!!
I don’t know if they look what is the country source is and decide that it should go in the “Slow Truck” !!!
But, beware that China New year is coming !
So, do your new orders ASAP … ![]()
I don’t know if they look what is the country source is and decide that it should go in the “Slow Truck” !!!
Progress up today:
– I made the X,Y,Z axes NEMA17 step motor drivers to work
– I wrote the g-code command parser
The source code is written from the scratch, for Maple mini board. The source code is NOT based on any other 3D printer project (yeah… I would like to reinvent the wheel !).
Next step: Put the extruder step motor in the game!
[EDIT 1] I made some modifications to the source code a few minutes ago and the axes moving speed was increased.
[EDIT 2] I replaced the picture with the embed youtube video link.
…even if you start to reinvent the wheel (is the “wheel” really perfect as it is?)
I love the style of the printer, when ever IKEA would offer a printer, I think this would be the design
I’m really interested in the first test prints!
regards
Matthias
Congrat, Vassilis !
I was really impressed too !
Next step is to do CRC milling ?
This is a wow project and newly developed code, too. Very nice. Are you really using “wood” or maybe that dimensionally stable Trex stuff?
Ray
I am not sure who much it expands due to temperature changes, but it’s probably not enough to be noticeable on this sort of 3D printing on this size of machine.
@mrburnette My printer is dimensional stable enough as the printing area is too small (190 x 148 mm)
Of course, I need to make some more tests to see the accuracy after some layer printing cycles.
A few minutes ago I printed my first objects. Stay tune for Youtube videos!
Test print 2 (cubic container / vessel)
Its a very good start
I think you may be running your printer too fast
I don’t think my MendleMax runs this fast and its a stronger printer (metal A frame)
What speed settings did you use?
BTW. I use an old version of CURA software (I think version 13 or perhaps V14) it works well with reprap printers
Then I don’t need a separate slicer.
But to start with. Pronterface / PrintRun is good as it gives more control
Congrat, Vassilis !
@ Martin Thank a lot !
About extruder motor: Do you use a direct drive extruder (without gear between stepper and filament guide)? If yes, you really need a “potent” NEMA17 stepper like 42BYGHW609. If you get your printer working (nearly) correctly you can browse on thingiverse for extruder + gears and print out your own extruder
Steppers, extruder and heated bed ordered from Ali already.
Vassilis, could you open the source for maple, please?
Steppers, extruder and heated bed ordered from Ali already.
Vassilis, could you open the source for maple, please?

