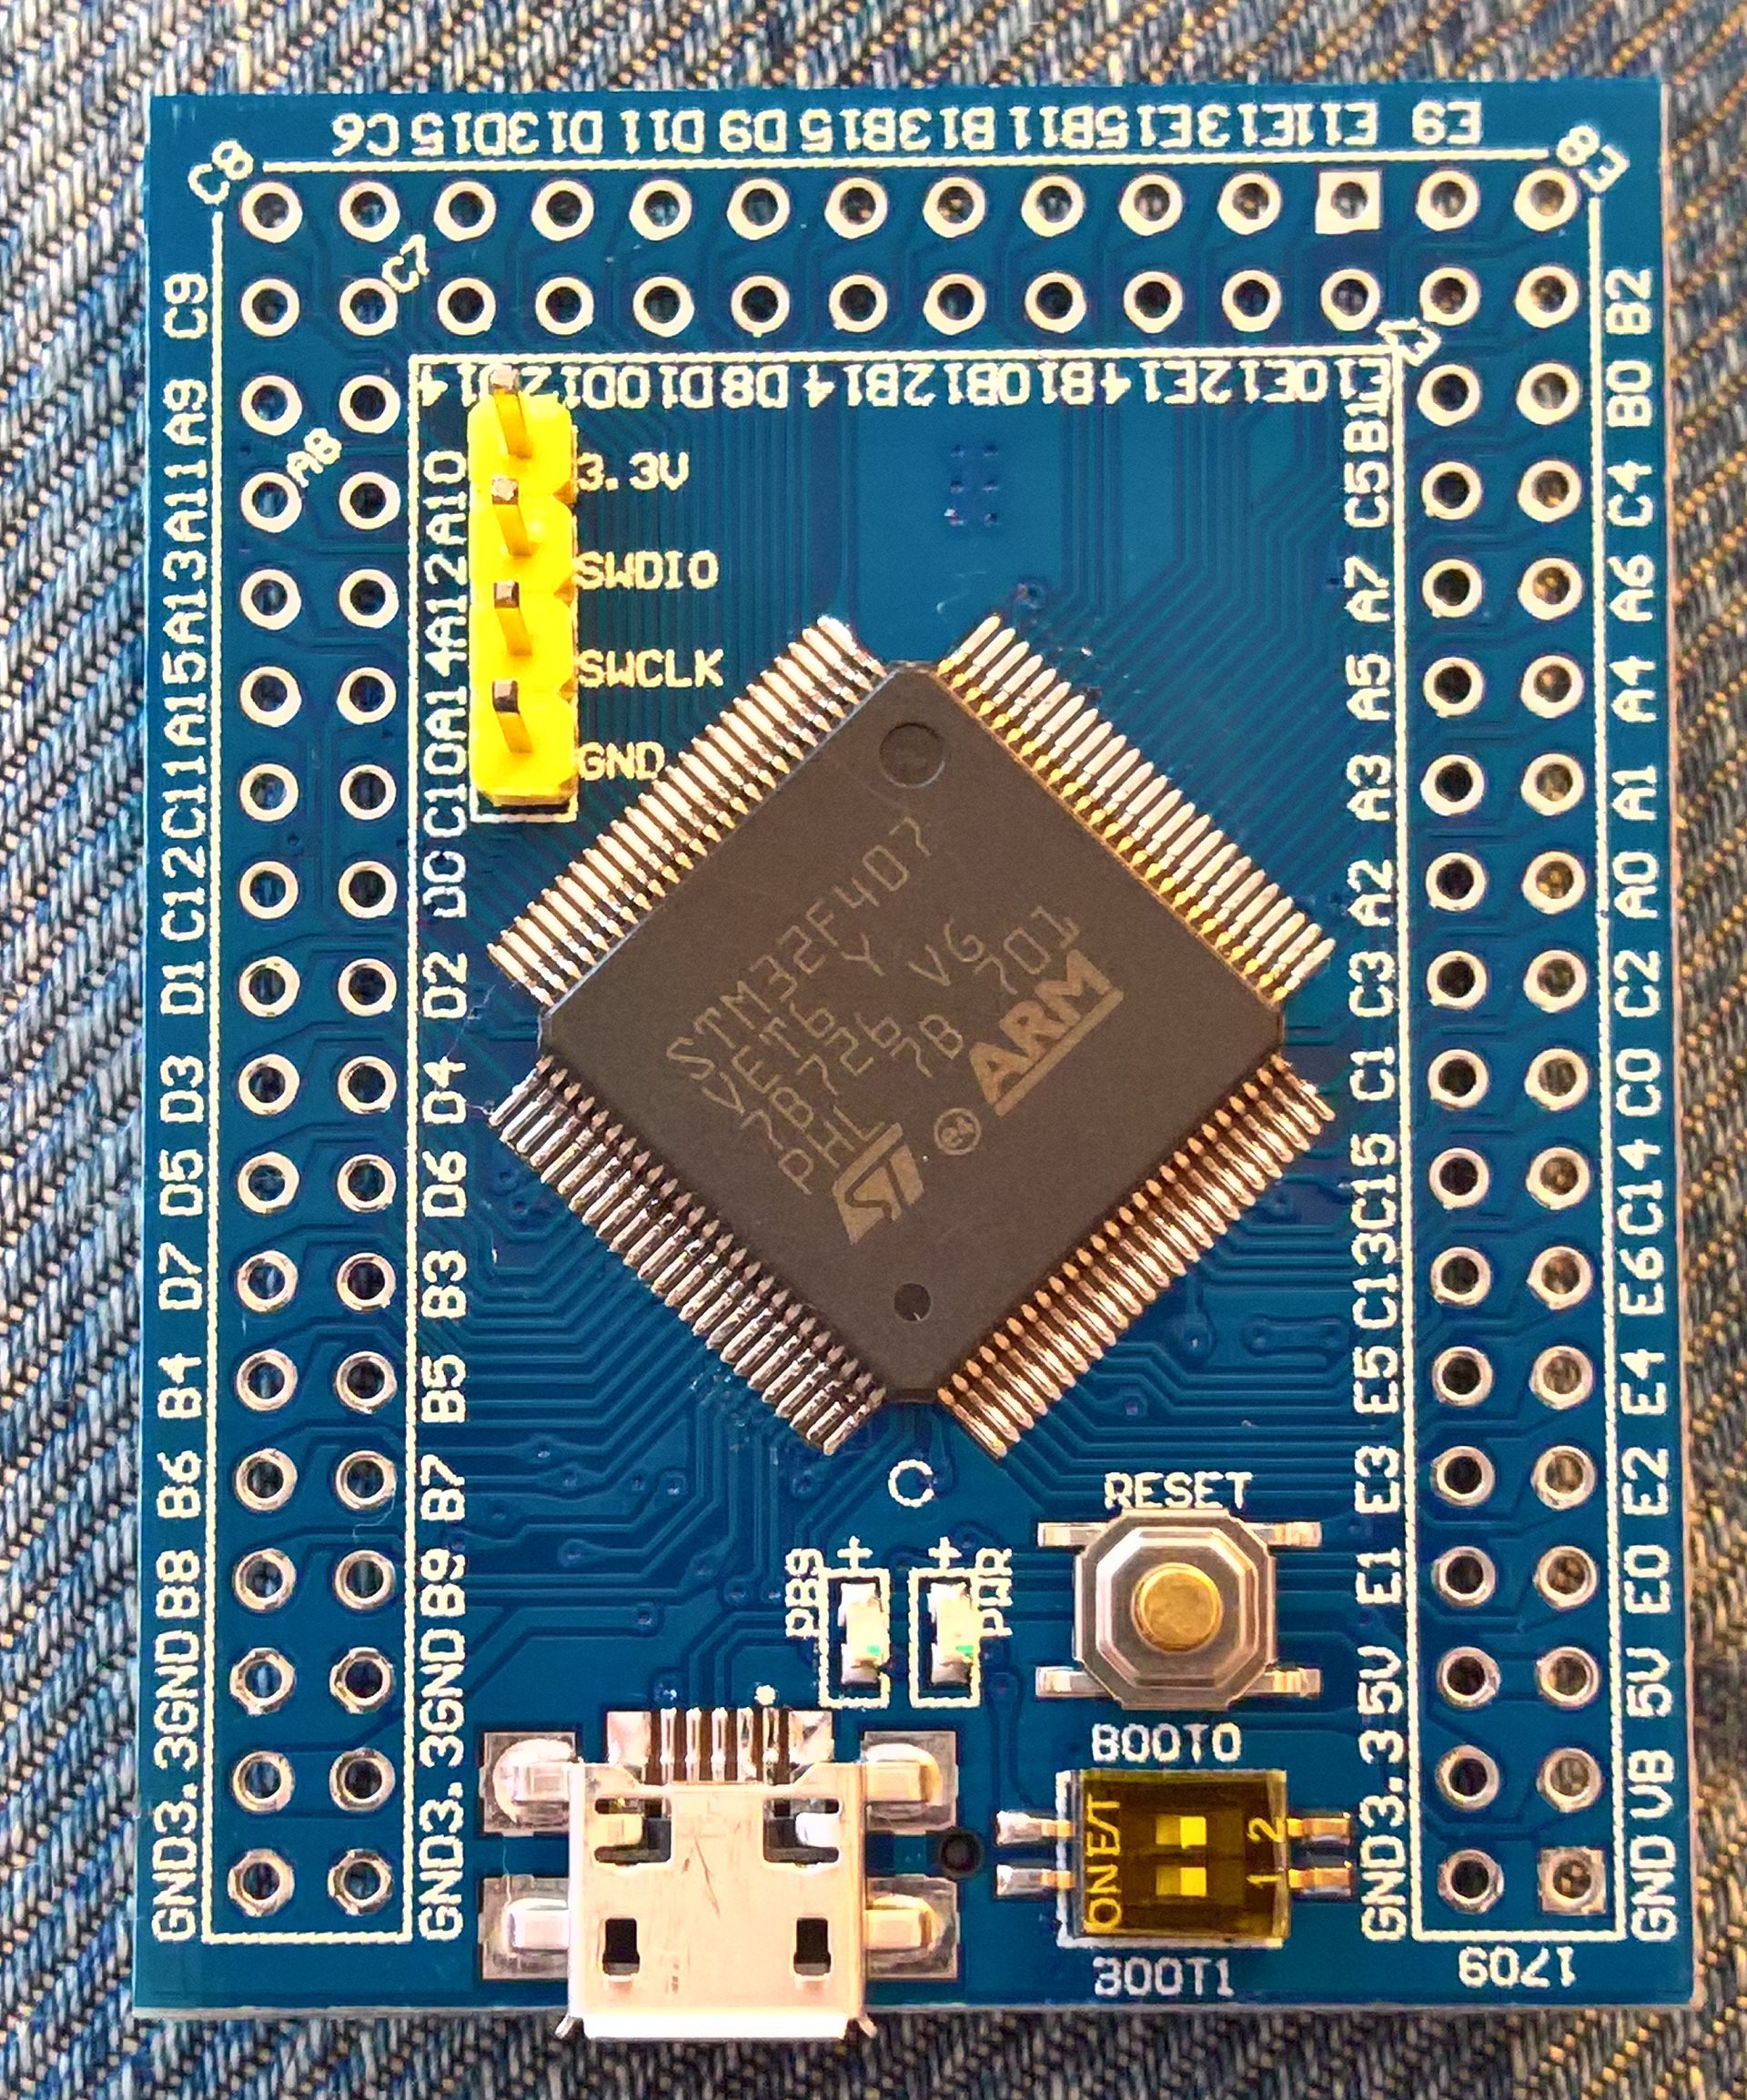
Supported board variants: generic F4 (tested), generic F4 mini (tested), disco F407 (compiles but not tested).
Some basic information about the board can be found on wiki: http://wiki.stm32duino.com/index.php?title=STM32F407
Currently working:
– GPIOs + LED toggle
– USB serial and serial 1,2,3. Evaluated USB serial speed, Tx: ~800kBps
– SPI (1,2,3) with DMA (also for SD cards using latest SdFat lib made by Greiman), extended DMA functions
– FSMC (adapted for driving 16 bit parallel LCDs) http://stm32duino.com/viewtopic.php?f=39&t=2298#p31037
– SDIO [non-HAL implementation] (for SD cards using latest SdFat lib made by Greiman) http://stm32duino.com/viewtopic.php?f=39&t=2215
– RTC – reworked, does not need any extra time library
– I2C (Wire) viewtopic.php?f=39&t=2804&p=37376#p37376
– supports W5500-based Ethernet modules (see viewtopic.php?f=13&t=503&p=32063#p32063)
– DAC, see viewtopic.php?f=39&t=1976&p=41564#p41564
– ADC, see http://stm32duino.com/viewtopic.php?f=3 … 720#p42720
– DCMI, see viewtopic.php?f=39&t=3414&p=43358#p43358
– CAN, see: http://stm32duino.com/viewtopic.php?f=3 … 239#p49235
Todo:
– port the new (faster) version of SDIO from Victor (https://github.com/rogerclarkmelbourne/ … 2/pull/474)
– check the on-board W25Q64 SPI flash, maybe add SPIflash lib to repo (where from?) https://github.com/LowPowerLab/SPIFlash
– check/add FPU (http://stm32duino.com/viewtopic.php?f=39&t=2001, http://stm32duino.com/viewtopic.php?f=3 … 048#p31040)
– add support for Seed Arch Max board
– add Ethernet lib (usable with Seeed Arch Max board)
EDIT – 2018.10.02
– added extended SPI DMA functions, see: viewtopic.php?f=15&t=3415
EDIT – 2018.09.12
– working CAN, see: http://stm32duino.com/viewtopic.php?f=3 … 239#p49235 (thanks to @michael_i!)
EDIT – 2018.03.19
– tested ADC, see: http://stm32duino.com/viewtopic.php?f=3 … 720#p42720
EDIT – 2018.02.18
– tested DAC, see: viewtopic.php?f=39&t=1976&p=41564#p41564
EDIT – 2018.01.16
– Added I2C (Wire), see: viewtopic.php?f=39&t=2804&p=37376#p37376
EDIT – 2017.07.10
– RTC lib reworked to be independent from other time libraries. Includes an example sketch to read and set the RTC time, as well as how to use the time elements.
It can be downloaded from here: viewtopic.php?f=39&t=775&p=31218#p31218
EDIT – 2017.06.18
– Implemented SDIO [non-HAL implementation] (for SD cards using latest SdFat lib made by Greiman)
viewtopic.php?f=39&t=2215
EDIT – 2017.06.02
Upload under windows currently only possible with STLink (V2).
When BOOT0=”1″(3.3V) and BOOT1=”0″(GND), the chip is recognized by Win10 as ‘STM Device in DFU mode’ (USB\VID_0483&PID_DF11).
However, there is no working DFU loader for Windows available, yet.
Comments & suggestions are welcome in this thread.
Any bug reports & PRs in Github, please.
————————————————————————————-
Hi all,
I know there is another thread on vet6 & zet6 boards, but there are at least 2 type of boards mixed, with partially different information.
And there is a lot of other information spread over other threads, like this generic implementation from danieleff.
Wiki has some basic stuff, too (thanks, Palmer!).
So, I got my black board today and I though it makes sense to open a separate thread only for the black VET6 board. The title can be edited later if needed, and the useful and tested information can (should) be added to wiki.
First of all, this is the current situation:
Both LEDs blink, but the USB device descriptor failed (VID 0x000 PID 0x0002).
On the serial port (115200Baud, 8N1) I receive after each reset: “LCD ID:ffff”
I can connect with the ST-Link probe, and I could read out the flash (I can attach here or to wiki if wanted). I assume writing would be also possible.
Now would like to start with the sw development.
The question is: how?
I know, there are a lot of alternative options (the official STM32 core, Start Otto github, Koduino, and so on).
But honestly, I like very much the existing Arduino_STM32 repo and I would like to use this for my future work.
I also know, it will be a hard way to go. But I think, with small steps I (we?) can achieve great results.
So, will the Arduino_STM32 provide the basic structure and functionality for a blinky example?
If anyone tried that already and had success, I would appreciate a short description of what and how to do.
For the beginning I intend to use the STlink upload method as the USB DFU seems not (yet?) to work.
Is there any working bootloader available for this board?
I have an F407 board and the led blink example works fine.
Most of the libmaple libraries are adapted. You may need to update things like stream and others. I would think a good start would be to run a diff between the F1 and the F4 cores to see what may be completely missing from the F4 side.
The SPI library files were copied from the F1 some time ago after we added the dmaSend and dmaTransfer functions, but those should not work in the F4 because the DMA controller is different, but we could rewrite those for both the F1 and F4 using the dmatubes leaflabs added to libmaple, because that API works on both F1 and F4.
Those are the things that come off my head about the F4 core.
i’m finding that danieleff’s stm32generic duino implementation that’s based on hal make sense, in particular as F4 is less resource constrained vs F1 codes compiled for f4 can easilly be re-compiled say for f1, f2, f3, f4, f7, l4 etc (just that on the more resource constrained f1 / f0 etc, the binaries may turn out to be ‘fat’ and eats more sram – could be a key difference for memory hungry sketches)
http://www.stm32duino.com/viewtopic.php?f=42&t=1966
some of the codes and initializers are apparently common, however, i think when we start to dig deeper into the ‘other peripherals’ e.g. USB, SPI, I2C, DMA etc, things may start to diverge, but i’d think ST has them catered in the hal
in a way in stm32duino we are sort of creating a ‘custom hal’, and arduino sketches connects through the stm32duino arduino / maple api
or perhaps we should after all have alternatives
My Jlink connected to the 20pin Jtag header, Jflash flashed (SWD) the .bin ok (from 0x08000000).
And it blinks with 2 leds ok.
Added Serial.println() (uart1 at pins PA9, PA10), ok.
Hello World from F407!

Hello World from F407!

Hello World from F407!This one:

- Compile.JPG (8.05 KiB) Viewed 5743 times
ok i dug up the benchmark thread
http://www.stm32duino.com/viewtopic.php?t=76
some of the old records seemed to be:
Kenjutsu wrote:Just for interest sake, here are some Whetstone benchmark results for my Nucleo F411RE and Blue Pill board:
// mbed online - F411RE

// Loops: 1000, Iterations: 1, Duration: 25 sec.

// C Converted Double Precision Whetstones: 4.0 MIPS
// gcc4mbed - F411RE
// Loops: 1000, Iterations: 1, Duration: 17 sec.
// C Converted Double Precision Whetstones: 5.9 MIPS
// gcc4mbed - F103RE (Blue Pill)
// Loops: 1000, Iterations: 1, Duration: 34 sec.
// C Converted Double Precision Whetstones: 2.9 MIPS
// STM32duino Blue Pill
// Loops: 1000 Iterations: 1 Duration: 19838 millisec.
// C Converted Double Precision Whetstones: 5.04 MIPS
Black F407 Math Test by Pito 4/2017

x= 3444444444445555555555666666.6666677777777788888889

y= -56666666666677777777777788.888888888111111111112222
z=x+y= 3387777777778877777777888877.7777788896666677777767

3.387777777778878e+27

elapsed: 20 us
z=x-y= 3501111111112233333333444455.5555566658888900000011

3.501111111112233e+27

elapsed: 15 us
z=x*y= -1.9518518518528641975309276666666672819753092717704E+53

-1.951851851852864e+53

elapsed: 46 us
z=x/y= -60.784313725497885428683223790246606967299291272272

-6.078431372549789e+01

elapsed: 162 us
z=cos(0.7)= 0.76484218728448842625585999019186490926821055037373

7.648421872844884e-01

elapsed: 3843 us
I didnt even mange to flash a blinky…
This thread should clarify startup issues, not the exponential part of a floating point value.
I will try to set the Arduino board to the only one available F4 board and then see if it works on the black F4.
Your LEDs are at PA6, PA7.
Serial pins at PA9, PA10.
The biggest problem is to find the .bin.
Erase the chip and upload the blink .bin from 0x08000000..
Disconnect your flasher (Stlink?) EDIT: soft disconnect
Reset.
It must work.
And… I don’t even have to disconnect the STLink probe to work
Next, I will setup a new Black_VET6 variant and make some customization.
viewtopic.php?f=39&t=1001&p=12094&hilit=pwm+pito#p12046
Not sure it has been added already..
Why we set
discovery_f407.build.core=maplediscovery_f407.build.extra_flags=-DMCU_STM32F406VG
I didnt even mange to flash a blinky…
This thread should clarify startup issues, not the exponential part of a floating point value.
I will try to set the Arduino board to the only one available F4 board and then see if it works on the black F4.
1) set BOOT0
2) *just press reset won’t do, pull out the usb cable and reconnect again*
dmesg

[ 5955.084223] usb 3-4: new full-speed USB device number 9 using xhci_hcd

[ 5955.248859] usb 3-4: New USB device found, idVendor=0483, idProduct=df11

[ 5955.248861] usb 3-4: New USB device strings: Mfr=1, Product=2, SerialNumber=3

[ 5955.248862] usb 3-4: Product: STM32  BOOTLOADER

[ 5955.248863] usb 3-4: Manufacturer: STMicroelectronics

[ 5955.248864] usb 3-4: SerialNumber: 338334803335
On win10 x64 machine a new USB device is detected, first as “STM32 BOOTLOADER”, then after a while it becomes “STM device in DFU mode”.
However, I think this mode is not practical, since the user has to change the BOOT0 jumper by each upload.
The STLink is more practical, I don’t even have to remove the connection wires after uploading new software. The STLink probe re-flashes the device on the fly (tried with the STM32 ST-Link Utility).
I have to unplug and reinsert the usb plug in order to flash again. It flashes about 5kB/sec.
I have to reinstall Boot jumper to run the code. Maybe there is a dfu command to run the code.
It works here on Black ZET6, but it seems the st-link/j-link is a better alternative.
i think the stock dfu-util v0.7 works just as well, just that i’ve compiled my dfu-util from source
http://dfu-util.sourceforge.net/
and i’d think we could port the bootloader as well, that’d make it simpler to install a sketch. but it would be less ‘urgent’ as there is an existing solution
http://www.stm32duino.com/viewtopic.php?f=3&t=1941
it is noted that the on board SPI flash may possibly be wired to a SPI1 port, the spi flash is suspected to be patched to PB3 SPI1_SCK, PB4 SPI1_MISO, PB5 SPI1_MOSI. however, SPI1 and SPI3 shares this port, hence, we could possibly configure SPI3 on PB3-PB5 if indeed the spi flash is hardwired to this port. the spi flash cs is pulled up to 3.3v, making it not possible to ‘switch off’ this in software
as noted in the early thread the schematics:
for VET6 the leds are on PA6 and PA7
http://wiki.stm32duino.com/images/5/5c/ … EMATIC.PDF
while on ZET6 the leds are on PF9 and PF10
http://wiki.stm32duino.com/images/4/4f/ … _sch-1.pdf
we’d then need to find another place to configure SPI1 on
i think F4 has hardware support for SDIO, but we could leave that as an ‘enhancement’ as we could literally try to use the hardware sdio for this, then transfers may reach those >10MBps speeds, i think SDIO needs more pins than just 4 for SPI
On ZET6 the flash /CS is pulled via 10k to Vcc and driven by PB14. Mind the /CS is usually active low with memory devices. Wiring /CS high will disable the chip.
You can wire many devices to an SPI provided their /CSelects are different.
we’d then need to find another place to configure SPI1 on
On ZET6 the flash /CS is pulled via 10k to Vcc and driven by PB14. Mind the /CS is usually active low with memory devices. Wiring /CS high will disable the chip.
You can wire many devices to an SPI provided their /CSelects are different.
http://www.stm32duino.com/viewtopic.php … 391#p17878
stephen
As I think the scope of this thread has been reached (blinky works ![]() ), further software developments can be continued in this other thread from victor.
), further software developments can be continued in this other thread from victor.
Intermediate results can be still posted here, if necessary.
this is the exported files and reports of my srp4.ioc for the Black STM407VE
i believe it is fairly complete and matches the schematic, only issue is i don’t know how to handle PB3.
it’s TDO and also what they label as SPI1_SCK (actually spi3 alternate)
I2C2 is available.
stephen
it is a nice pdf doc as well, but I still cannot see how this should easy our life in this libmaple-based F4 structure.
As I said, I already re-worked some files, the pin mapping is also a bit clarified.
Maybe at a later point I will realize why this will be usable.
thanks for posting that, the pdf is in effect a pin mapping?
there is a little discussion in the st core http://www.stm32duino.com/viewtopic.php … 256#p26256
about the pin conflicts for PB3-PB5
and danieleff has posted his point of view
http://www.stm32duino.com/viewtopic.php … =10#p26147
in the schematic
http://wiki.stm32duino.com/images/5/5c/ … EMATIC.PDF
PB3-PB5 SPI1_SCK, SPI1_MISO, SPI1_MOSI is shared by the onboard spi flash and the NRF24 connector (hence the SPI1 header is in the NRF24 connector)
PB6, PB7 I2C1_CLK and I2C1_SDA is also routed to the NRF24 connector to NRF_CE or NRF_CS (hence I2C1 can be found in the NRF24 connector as well)
if we take a look at the NRF24 specs NRF_CS is SPI chip select and NRF_CE is chip enable activates RX or TX mode
https://www.nordicsemi.com/chi/content/ … n_v2_0.pdf
hence PB6, PB7 would need to be GPIO pins if a NRF24 is actually used
we could select another sets of pins for I2C (e.g. PB10 i2C2_SCL, BP11 i2C2_SDA) and yet another for UART (e.g. PA8 USART1_CK / PA9 USART1_TX, PA10_USART_RX) as there are a large number of pins that’s broken out on the STM32F407{V,Z}E_black boards
and for the analog pins we could possibly simply select PA1-PA6 as their arduino counterparts
you need to use/view the CubeMX ioc file.
there is not a problem sharing the clock and data lines on SPI, interfaces. I am pretty sure if you took/read the SPI1 labels as SPI3, then it makes sense. Even the cpu pin label lists SPI3 ![]() Actually if they labelled I2C2 as I2C1, it would still be just an I2C interface.
Actually if they labelled I2C2 as I2C1, it would still be just an I2C interface.
i’m confused with PB3 as it’s TDO & also the SCK, it’s also a JTAG socket pin. it maybe that the start up sets the debug as SWD releasing all debug pins bar SWD_CLK & SWD_DAT.
Additionally I’ve got the FSMC and SDIO peripherals mapped without conflicts. I had to play with CubeMX and do quite a lot getting the FSMC mapped, mainly configuring alternates. To me that suggests the layout is pretty much as it was originally designed.
i
Those alternates will need to be seto uo as a board variant, either in the sketch or in the core, i’ve seen use of alternates in a post using lib maple.
stephen
Also sent a PR for Roger.
as for PB3
while i’m not too familar with Jtag, PB3 is JTDO/ TRACESWO/SPI3_SCK / I2S3_CK /TIM2_CH2 / SPI1_SCK/EVENTOUT
if i understand it correctly SWO is mainly used with SWD for the board to send messages to the host pretty much like a serial console (i.e. print statements)
while SWD debug mainly uses 3 pins PA13 SWDIO, PA14 SWCLK and a ground pin
if we could make do with SWD debug with just 3 pins, it means we’d not have conflict with PB3
and if need be for various circumstances we could probably use usb-serial or a uart to send console messages (print statements) back to the host
agreed with the SPI3 assignments in PB3-PB5 (i.e. the default SPI port for arduino) as well as it seemed it may help to reduce some conflicts, otherwise the alternative to map SPI is to use PA5-PA7 as SPI1 and we could use that as a default spi port for arduino, just that it’d overlap some of the analog pins (if we define PA1-PA6 as arduino analog pins)
I’ve been doing some work to see if we can harmonize the Black F4VET6 boards across all the code streams. We’ve got the new STM32duino F4 branch happening, DanielEff has his GenericSTM32 code, and Avik’s Koduino is going strong.
I’ve just updated my repo with a bunch of updated info for the Black F4VET6 (STM32duino) – including a pin allocation rationale (discussed with Daniel and others) and some AF mappings that seem to make sense. The rationale is in the excel spreadsheet in the /documents folder.
The only change on the schematic is that it seems better to map the NRF/flash SPI to SPI3 instead of SPI1, to allow SPI1 to be available with a full set of NSS pinse for SPI-DMA.
The repo’s at https://github.com/palmerr23/Black-F407VET6-cube and is built against the STM32duino “cube” F4 code base.
Happy to hear if there is a better layout / AF mapping available, but also keen for us to tie something down ASAP for this board.
Richard
// Pins reserved for the on-board hardware

#define FLASH_CS_PIN	PB0

#define FLASH_CLK_PIN	BOARD_SPI3_SCK_PIN	// PB3

#define FLASH_DO_PIN	BOARD_SPI3_MISO_PIN	// PB4

#define FLASH_DI_PIN	BOARD_SPI3_MOSI_PIN	// PB5
#define NRF24_CLK_PIN	BOARD_SPI3_SCK_PIN	// PB3

#define NRF24_DO_PIN	BOARD_SPI3_MISO_PIN	// PB4

#define NRF24_DI_PIN	BOARD_SPI3_MOSI_PIN	// PB5

#define NRF24_CE_PIN	PB6

#define NRF24_CS_PIN	PB7

#define NRF24_IRQ_PIN	PB8
// SD card, SDIO mode

#define SD_DAT0         BOARD_SDIO_D0	// PC8

#define SD_DAT1         BOARD_SDIO_D1	// PC9

#define SD_DAT2         BOARD_SDIO_D2	// PC10

#define SD_DAT3         BOARD_SDIO_D3	// PC11

#define SD_CLK          BOARD_SDIO_CK	// PC12

#define SD_CMD          BOARD_SDIO_CMD	// PD2

// SD card, SPI mode, only usable with software SPI

#define SD_DI           BOARD_SDIO_CMD	// PD2

#define SD_DO           BOARD_SDIO_D0	// PC8

#define SD_CS           BOARD_SDIO_D3	// PC11

#define SD_SCLK         BOARD_SDIO_CK	// PC12
That matches with my reading of the correct pinouts.
I’ll have to trust your judgement on the SPI-SDIO allocations as it’s outside my experience!
I’m working on a pinout diagram today as requested in earlier the thread.
Richard
What repo should I use for this board? I just got it.
the hardware is not mapped as you would perhaps expect, the CubeMX allows each interface to be re-mapped and to where / wanted as long as the actually pin is capable of performing the function e.g. miso or i2c sda.
you can modify the ‘spi1 interface’ to actually use the spi3 pins, i2c1 is moved as well, CubeMX generates code as it is told to.
you need to see the distinction made between the cpu datasheet pins names/description and ‘how and where’ they map to the actual hardware.
the easiest way to see the mapping is to use CubeMX and the ioc file for the variant. actually that’s how learnt CubeMX albeit lightly.
i’m working towards bare metal using hal and compiling for myself, a long if i take it slow curve, so not as steep as it could be if i wasn’t retired
sorry it’s badly explained.
stephen
My Board had no boot loader. I used it with a ST-Link-V2
>What repo should I use for this board? I just got it.
I use the STM32GENERIC and I’ve made examples for it.
What repo should I use for this board? I just got it.
the development branch for libmaple core is currently on steve’s repository on the “black f4 variant” branch
https://github.com/stevstrong/Arduino_S … F4_variant
the others are stm32generic
http://www.stm32duino.com/viewtopic.php?f=42&t=1966
and the core from stm itself
http://www.stm32duino.com/viewtopic.php?f=48&t=2098
palmerr has made an stm’s core for this board
https://github.com/palmerr23/Black-F407VET6-cube
as for stm’s core try palmerr’s version instead, that’s sort of tailored for the stm32f407 black board
stm32generic accordingly has got quite a bit of developments done for it recently, e.g. some SDIO stuff is being tested,
and pito achieved a whopping 14MB per secs to a sammy class 10 sd card recently. it is worth checking out
http://www.stm32duino.com/viewtopic.php … 058#p28977
Please replace that line 6 in variant.h by:
#define digitalPinToBitMask(P) ( BIT(P&0x0F) )Please replace that line 6 in variant.h by:
#define digitalPinToBitMask(P) ( BIT(P&0x0F) )I just checked out the Black_F4 branch, and I compiled the blink sketch, without any error/warning.
Which IDE are u using?
I just checked out the Black_F4 branch, and I compiled the blink sketch, without any error/warning.
Which IDE are u using?
vitor, if you still have problems, please post here the Arduino build output.
Which sketch do you try to build? As I told, it builds fine for me (on Win10 64b).
vitor, if you still have problems, please post here the Arduino build output.
Which sketch do you try to build? As I told, it builds fine for me (on Win10 64b).
check here: https://github.com/stevstrong/Arduino_S … e/libmaple
Please do a clean install (download & extract) of the mentioned branch.
One last question, what library is used on PlatformIO?
edit: Blink sketch uses 11904 bytes of RAM, is that right? maple mini uses 8K
check here: https://github.com/stevstrong/Arduino_S … e/libmaple
Please do a clean install (download & extract) of the mentioned branch.
IDE 1.8.2 , you have the library installed stevestrong has the libraries for 16 bit parallel display and https://github.com/stevstrong/Adafruit_ … 6bit_STM32 https://github.com/stevstrong/Arduino_S … F4_variant . example Graphisctest. error
In file included from C:\Users\VIC\ Documents\Arduino\\libraries Adafruit_TFTLCD_16bit_STM32-master\examples\graphicstest\graphicstest.ino:7:0:
C:\Users\VIC\Documents\Arduino\libraries\Adafruit_TFTLCD_16bit_STM32-master\src/Adafruit_TFTLCD_16bit_STM32.h in the void writeCommand function '(uint16_t)':
C:\Users\VIC\Documents\Arduino\libraries\Adafruit_TFTLCD_16bit_STM32-master\src/Adafruit_TFTLCD_16bit_STM32.h:64:22: error: 'fsmcCommand' was not declared in this area
#define lcdCommand (*fsmcCommand)
^
C:\Users\Виктор\Documents\Arduino\libraries\Adafruit_TFTLCD_16bit_STM32-master\src/Adafruit_TFTLCD_16bit_STM32.h:68:27 note: in expansion of macro 'lcdCommand'
#define writeCmd(d) { lcdCommand = d; } //(l&0x00FF); }
^
C:\Users\VIC\Documents\Arduino\libraries\Adafruit_TFTLCD_16bit_STM32-master\src/Adafruit_TFTLCD_16bit_STM32.h:200:2 note: in expansion of macro writeCmd"
writeCmd ();
C:\Users\51FB~1\appdata\local\temp\arduino_modified_sketch_882808\graphicstest.Ino:1:28: fatal error: libmaple/FCSM.h: no such file or directory
#include <libmaple/FCSM.h>
And please do a clean extract of the downloaded ZIP files (both Adafruit 16 bit parallel lib and generic_f4 branch), delete any existing previous files/folders.
The library just now installed.
#include <libmaple/fsmc.h> more not prescribed
#include <libmaple/FCSM.h> ???? true name ???
FSMC.h ???
As I told, you do not have to include any additional header file, the graphic test should run out of the box with FSMC activated.
If you want to disable it, then comment out line 15 of the graphics lib header file.
It worked !
Super !
THANK you !
SdFat examples are available in the original SdFat source directory of Bill Greiman on github, please search for it and download it, then place it to library folder of the Arduino working directory.
Currently only the SPI interface is working with SD-cards, you have to choose one SPI port and connect an extra SD-card module to it.
For that please check the SdFat help, it provides information how to use it with STM32.
The on-board SD card slot usage is only possible when using the SDIO interface.
Which is currently under evaluation phase, basically is working very stable, but I need to make more tests to be sure that it works under any circumstance.
We expect from You information about the testing
Your library on the STM32F407VET6 wonderful ! Now I work and display and SD CARD (SDIO)!!!
But I can not deal with the internal rtc for this Board.
Please give a simple working example for this Board.
I really need time and date for the my project.
You could check this library already in the repository:
https://github.com/rogerclarkmelbourne/ … es/RTClock
Some examples can be found here:
https://github.com/rogerclarkmelbourne/ … k/examples
I will wait for your news about the black F4 RTC Board battery on Board.
library already in the repository, and I’ll try to check.
#if (__ARM_PCS==1 || __ARM_PCS_VFP==1) //using FP on code?

#if defined (__FP_FAST_FMAF) //mfloat-abi=hard or mfloat-abi=softfp

#warning enabling harware fpu

__asm volatile

(

"  ldr.w r0, =0xE000ED88    \n"  /* The FPU enable bits are in the CPACR. */

"  ldr r1, [r0]             \n"  /* read CAPCR */

"  orr r1, r1, #( 0xf << 20 )\n" /* Set bits 20-23 to enable CP10 and CP11 coprocessors */

"  str r1, [r0]              \n" /* Write back the modified value to the CPACR */

"  dsb                       \n" /* wait for store to complete */

"  isb"                          /* reset pipeline now the FPU is enabled */

);

#else

#warning software or no floating point

#endif

#endifJust insert those lines on wirish_math.h on line 36
#include <stdint.h>Can you show an example for the RTC in your library
If I connect the library #include <RTClock.h> error
The maintainer is missing from libraries C:\Users\Admin\Documents\Arduino\hardware\Arduino_STM32-master\STM32F4\libraries\RTClock
This lib works on STM32GENERIC, with yours I’m getting no lucky.
EDIT: Default EEPROM is W25Q16, I have to replace mine because was return wrong numbers, now is W25Q64.
EDIT – 2017.07.10
RTC lib reworked to be independent from other time libraries. Tested on balck F4V board. Includes an example sketch to set the RTC time.
Whether it is possible to add to Your library ?
time_t tt;
tm_t tm;
int hh; // hour
rtc.getTime(tm);
hh = tm.hour();
error: expression cannot be used as a function
Wrong did.
hh = tm.hour;
So right and works !
Thank you !
[acronis – Tue Jul 11, 2017 7:14 am] –
rtc.getTime(tm);
hh = tm.hour();
This way you get the time elements as variables in the tm structure.
As alternatives you can use:
rtc.getTime(tm);

hh = tm.hour;

// or

hh = rtc.hour(); // pay attention to the object "rtc" instead structure "tm"
Thank You very much ! My project perfectly works thanks to You !!!
It remains only to wait for the implementation of I2C
Prompt, please, can I use FreeRTOS 9.0.0 with Your library ?
[acronis – Wed Jul 12, 2017 9:20 am] –
Hello.
Prompt, please, can I use FreeRTOS 9.0.0 with Your library ?
I don’t know, I have never used, nor tested it.
You can try it, but I cannot give you support of any kind in this case.
I’ll try and write here.
I need to connect a RFID reader module RDM6300-UART with your library for the STM32F407 black.
As you can try to make ?
If the module uses SPI, it should run out of the box.
I just realized it uses normal serial Rx/Tx. So it should work with one of the serial interfaces.
https://github.com/garfield38/RDM6300/t … er/arduino
SoftwareSerial only works on a STM32f103.
STM32F407VET6 on SoftwareSerial gives error.
Use Serial1, 2 or 3 in the code.
You could insert:
#define SoftwareSerial Serial1 // or Serial2, or Serial3PB6 – TX1
Ok ?
Thank you very much !
It worked through physical serial port (serial1) !
Tell me how your business integration W5500 library ?
As soon as you can try out ?
Doing a project in which I need a fast ADC.
Took example code https://github.com/arpruss/stm32scope-e … /scope.ino .
It is compiled on the Board STM32F1* great.
But the Board STM32F407VET6 error
error: cannot convert 'const adc_dev' to 'const adc_dev*' for argument '1' to 'void adc_set_sample_rate(const adc_dev*, adc_smp_rate)'
adc_set_sample_rate(ADC1, ADC_SMPR_1_5); // ADC_SMPR_13_5, ADC_SMPR_1_5
adc_set_sample_rate(&ADC1, ADC_SMPR_1_5);This error is gone , but there were other
dc_read:412: error: base operand of ‘->’ has non-pointer type ‘const adc_dev’
on line
dataPoints[j+1] = ADC2->regs->DR & ADC_DR_DATA;
void fetch() {
// const adc_dev *dev = PIN_MAP[analogInPin].adc_device;
int channel = PIN_MAP[analogInPin].adc_channel;
adc_set_sample_rate(&ADC1, ADC_SMPR_1_5); // ADC_SMPR_13_5, ADC_SMPR_1_5
adc_set_sample_rate(&ADC2, ADC_SMPR_1_5); // ADC_SMPR_13_5, ADC_SMPR_1_5
adc_set_reg_seqlen(&ADC1, 1);
adc_set_reg_seqlen(&ADC2, 1);
ADC1->regs->SQR3 = channel;
ADC2->regs->SQR3 = channel;
ADC1->regs->CR1 |= 0x70000; // ADC_CR1_FASTINT;
ADC1->regs->CR2 |= ADC_CR2_CONT | ADC_CR2_SWSTART;
ADC2->regs->CR2 |= ADC_CR2_CONT | ADC_CR2_SWSTART;
ADC2->regs->CR1 |= 0x70000; // ADC_CR1_FASTINT;
nvic_globalirq_disable();
// uint32_t t = micros();
// .584 uS
for (int j = 0; j < maxSamples ; j+=2 )
{
while (!(ADC1->regs->SR & ADC_SR_EOC))
;
dataPoints[j] = ADC1->regs->DR & ADC_DR_DATA;
while (!(ADC2->regs->SR & ADC_SR_EOC))
;
dataPoints[j+1] = ADC2->regs->DR & ADC_DR_DATA;
}
nvic_globalirq_enable();
}
The ideal solution would be to change the ADC module of F4 to be compatible with F1.
Till then, you can replace ADCx by (&ADCx).
I hear You.
You did a great job by adding support STM32F4.
I really hope that You will be able to add support for ADC on this Board.
Rewrote all the code in &ADCx, but the error persists
dataPoints[j+1] = &ADC2->regs->DR & ADC_DR_DATA;
base operand of ‘->’ has non-pointer type ‘const adc_dev’
In this line, correct the code ?
dataPoints[j+1] = (&ADC2)->regs->DR & ADC_DR_DATA;I was able to do as you told me.
The error no longer exists.
But ADC is not working correctly, the values are constantly jumping (subject to change).
I tried to connect the ADC pin to GND and VCC, the values still vary over a wide range.
Tried using analogRead () all the same – value jump from the lower to the upper limit.
Why doesn’t ADC ?
It is possible as that to solve ?
[acronis – Fri Oct 20, 2017 11:54 am] –
It is possible as that to solve ?
Very probable that it can be solved.
Just the necessary time is missing…
You have so much done !!!
You’re probably only ADC !
We will wait for a quick solution.
Thank You again.
It worked on another pine !
Not if You managed to adapt the I2C for this Board?
Only time is missing…
I don’t have enough I2C to connect various sensors to the Board STM32F4 BLACK….
You are amazing !
I hope that You will eventually make !
Thank YOU !
Thanks to You I have a lot of things connected to this boards: ADC,RTC,display (FCSM LCD-16bit), Ethernet (W5500), SD card (sdio), NRF24L01 , sensors on SPI and others…
there is only I2C…..
while(!Serial);[stevestrong – Tue Nov 14, 2017 7:55 pm] –
Short update: I managed to implement the USB serial connection status detection, so that
while(!Serial);
Can’t you simply merge from my patch?
I will try to merge the patch
[acronis – Wed Nov 08, 2017 1:54 pm] –
Thanks to You I have a lot of things connected to this boards: ADC,RTC,display (FCSM LCD-16bit), Ethernet (W5500), SD card (sdio), NRF24L01 , sensors on SPI and others…there is only I2C…..
I2C (Wire) is finally working, see http://stm32duino.com/viewtopic.php?f=3 … 379#p37376
WOW !
SUPER !!!
Steve – thank you so much !
However, the main issue I have here is while yes this is a combersom way to upload firmware when your doing loads of debugging and constant reuploads…
How is one meant to use the serial monitor to read the readouts of my debugging if the chip doesnt do the virtual com port?
Should I just stick to using the hardware serial and a usb serial adaptor? If so, can i upload firmware via that?
– USB inactive (unfortunately on first place),
– USB serial (CDC), or
– USB MSC (not implemented).
Please check your option.
I usually enable USB serial and upload with STLink, not USB DFU, I find cumbersome to switch the BOOT1 jumper all over again to different position.
And STLink does not work as USB serial interface, you need an extra USB cable between the micro USB socket and PC.
Anyway, if you debug with STLInk, the USB serial will most probably not work when you stop the program, the USB protocol is sensitive on breaks longer than 20ms and will stop the interface communication.
But you could generate a new board variant, if you want.

Select “Generic STM32F407V mini series” in the Arduino IDE menu board selector. ![]()
It only works with my repo: https://github.com/stevstrong/Arduino_STM32
Thanks for all the work you’ve done for this board. I’ve been using the STMF103CBT6 for some time now and was looking to “trade-up” to something with more ram, found this board on ebay… and now I’m here.
I noticed that there was a post for the W5500 being ported, so this morning I freshly downloaded Arduino_STM32 and Ethernet_STM32 and then tried this sketch:
#include <Ethernet_STM32.h>
SPIClass mSpi(1);
void setup() {
Serial.begin(115200);
delay(500);
Serial.print("initialising ethernet... ");
Ethernet.init(mSpi, PA4);
Serial.println("done");
uint8_t mac[6] = {0x00,0x01,0x02,0x03,0x04,0x05};
Serial.print("initialising ethernet with DHCP... ");
if (Ethernet.begin(mac) == 0) {
Serial.println("failed");
} else {
Serial.println(" DHCP assigned IP ");
Serial.println(Ethernet.localIP());
}
}
Please check it out again.
what changes are needed for getting the 25Mhz resonator working ?
Go through the code and search for HSE_Value. It can be changed in the code or via the ide preprocessor – st isn’t consistent on that.
You may also look through PLL settings to make sure that you don’t exceeded it’s max frequency.
Btw, did they really use a resonator and not a crystal? Shame on them if so.
Please check it out again.
Thanks for the fast response, I’ve just done a fresh download and it now compiles.
Of course it doesn’t do anything else, ha ha, but I’m new to the W5500, so I’ll make sure I’ve got everything set up correctly.
Regards.
Make sure that your router supports DHCP and allows new connections.
Also, be aware that not any MAC addresses are valid, so the router could refuse the connection based on that being invalid.
Make sure that your router supports DHCP and allows new connections.
Also, be aware that not any MAC addresses are valid, so the router could refuse the connection based on that being invalid.
Thanks Steve.
My main project last year involved Christmas lights panels on the windows. The panels of WS2812B leds were controlled by STM32F103(C8T6) modules and the PC sent the control information via WiFi to a ESP8266 which then passed on the data to the STM32F103 via serial. (9 panels of leds with 5 ESP8266->STM32F103 modules.)
This worked very well, but this year I want to do more, and the 20kB ram on the STM32F103 was getting to be a bit of a restriction.
So I wanted a board that had more ram, but was still easy to program, preferably by Arduino IDE. I have used STMCube + IAR but it it WAYYYY more complicated.
This black F407VET6 looks like a very promising replacement, and so this may also be a good time to consider removing the Wifi ESP8266 and connect the F407 directly to the LAN. Hence my interest.
I will look into your suggestion. As I am new to the W5500 I think I will maybe go back to the Uno, get this to work with the W5500, then progress to the F407VE, possibly via the F103…
Firstly, the W5500 module works fine with the Uno and Ethernet library, so I know the pin connections are correct and the module functions.
Secondly, I ran this to check the SPI pin allocations:
#include <SPI.h>

#include <Ethernet_STM32.h>
void setup()
{
Serial.begin(115200);
delay(500);
Serial.println("SPI default");
Serial.print("nss: "); Serial.print(SPI.nssPin()); Serial.print(" sck: "); Serial.print(SPI.sckPin()); Serial.print(" miso: "); Serial.print(SPI.misoPin()); Serial.print(" mosi: "); Serial.println(SPI.mosiPin());
Serial.print("nss: "); Serial.print(PA15); Serial.print(" sck: "); Serial.print(PB3); Serial.print(" miso: "); Serial.print(PB4); Serial.print(" mosi: "); Serial.println(PB5);
SPI.setModule(1);
Serial.println("SPI 1");
Serial.print("nss: "); Serial.print(SPI.nssPin()); Serial.print(" sck: "); Serial.print(SPI.sckPin()); Serial.print(" miso: "); Serial.print(SPI.misoPin()); Serial.print(" mosi: "); Serial.println(SPI.mosiPin());
Serial.print("nss: "); Serial.print(PA4); Serial.print(" sck: "); Serial.print(PA5); Serial.print(" miso: "); Serial.print(PA6); Serial.print(" mosi: "); Serial.println(PA7);
SPI.setModule(2);
Serial.println("SPI 2");
Serial.print("nss: "); Serial.print(SPI.nssPin()); Serial.print(" sck: "); Serial.print(SPI.sckPin()); Serial.print(" miso: "); Serial.print(SPI.misoPin()); Serial.print(" mosi: "); Serial.println(SPI.mosiPin());
Serial.print("nss: "); Serial.print(PB12); Serial.print(" sck: "); Serial.print(PB13); Serial.print(" miso: "); Serial.print(PB14); Serial.print(" mosi: "); Serial.println(PB15);
SPI.setModule(3);
Serial.println("SPI 3");
Serial.print("nss: "); Serial.print(SPI.nssPin()); Serial.print(" sck: "); Serial.print(SPI.sckPin()); Serial.print(" miso: "); Serial.print(SPI.misoPin()); Serial.print(" mosi: "); Serial.println(SPI.mosiPin());
Serial.print("nss: "); Serial.print(PA15); Serial.print(" sck: "); Serial.print(PB3); Serial.print(" miso: "); Serial.print(PB4); Serial.print(" mosi: "); Serial.println(PB5);
you might have to play with remapping them.
stephen
PB4 is SPI3_MISO, not SPI1_MISO. Hence, SPI1 should actually mean (be) SPI3. I think we had already a discussion about this at an earlier time.
SPI3 pins overlap with the SPI1 alternative configuration, but the default declared SPI instance is 3, inline with your pin test.
this fails immediately
What does it mean?
The sketch will hang when the connections are wrong.
I will check this again.
I have tested the SPI3 with the same results, But I then checked everything again and I have realised that the chip on my ethernet module is a W5100 not a W5500. It was an unused one that I had in a drawer, I must have got confused about which it was.
Apologies if this makes a difference.
I was just thinking what else can be wrong in your case because everything works for me
But now it’s clear.
OTOH, my lib is restricted to W5500, no other variants are supported.
W5500 is more powerful than W5100, and has the same price, so it worth to have it.
Good! We now know what the problem is!
I have just ordered 2 x W5500. If I only ordered 1 it would be faulty! ![]()
Sorry for wasting your time.
I’ve been doing a bit of PWM investigation. According to STM32CubeMX there are 32 PWM pins available, and with a bit of jiggery-pokery, I’ve got them all working.

The above image shows the pin allocations for each timer.
The colouring shows the default frequency when using pwmWrite. Timers 1, 8, 9, 10 & 11 are attached to ABP2 which runs at 84MHz, and the others are attached to APB1 which runs at 42MHz, When using pwmWrite the count runs from zero to 65535 and so the frequency should be 84,000,000 / 65536 for timers on on APB1, and 42,000,000 / 65536 for timers on on APB2. The equate to 1282Hz and 641Hz respectively, which are remarkably close to the measured values (or a complete coincidence).

The above image shows those pins that work without changing anything (I basically set a different frequency for each timer by setting the prescaler value and the ARR, and then set a different duty cycle for each channel, so every pwn pin had a unique signature).
(Note that PB4 is accessible via the “bottom right” pin of the NRF24L01 interface taking J-TAG as the “top” of the board.)
Firstly, I think there’s a bit of confusion over PA5 (timer 2 channel 1) as this appears in various places as PA15. If PA15 is indeed an alternative, I could not get it to work. However, after changing the details in Arduino_STM32\STM32F4\variants\generic_f407v\pin_map.c from PA15 to PA5 the pin sprang to life.
Similarly, the entries for PB10, PB11 and the pins for timers TIM10 – TIM14 were simply missing from pin_map.c, after adding in the timer and channel for each of these pins, they all started working too.
Of course, I don’t know whether adding in these entries will adversely affect anything else.
Regards…
PA15 is reserved for SPI3 NSS.
Timer 2 ch 1 is not mapped to PA5 to allow to be used as SPI1 SCK.
In the same context, PB10 and PB11 are reserved for (SPI2_SCK or I2C2_SCL or UASRT3_TX) and (I2C2_SDA or USART3_RX), respectively.
So Timer 2 was given lower prio versus I2C2/USART3, because there are plenty of other timers available on other pins.
Same applies for other pins you mentioned, in favor of SPI, I2C and USART.
Take a look into generic_f407v.h for reserved pins and what are they reserved for.
To activate TIMER2_CH1 on PA15, PA15 must be mapped to the respective alternate function AF1, which is not done in the current version of the repo.
You can use the function gpio_set_af_mode() using my repo.
gpio_set_af_mode(PA15, GPIO_AFMODE_TIM1_2);
I wasn’t expecting you to change anything, I just wanted to explain what to do in order to get all 32 PWM channels working for anyone that wanted to know, because I have a project that plans to use them all.
As an aside, my W5500 modules arrived yesterday and, late last night, I got a 407VE connected to the LAN, so thanks again for your work.
Please tell me how to do calibration of ADC ?
  int channel = PIN_MAP[analogInPin].adc_channel;

adc_set_sample_rate(&ADC1, ADC_SMPR_1_5);

adc_set_reg_seqlen(&ADC1, 1);

(&ADC1)->regs->SQR3 = channel;

(&ADC1)->regs->CR1 |= 0x70000;

(&ADC1)->regs->CR2 |= ADC_CR2_CONT | ADC_CR2_SWSTART;
The result is a sketch which generates either a sine wave (using a lookup table) or a triangle wave (using the internal wave generator of the F4 chip).
Configurable with some defines in the beginning of the sketch.
As usual, my repo gives the necessary utility functions.
This example allows to configure the output frequency (and amplitude in case internal triangle wave generator).
The example sine wave has 210 samples and 8 bit resolution, with 3.3Vpp.
The generated 20 kHz frequency is quite precise and the signal has a nice shape
Now the next step is ADC.
[stevestrong – Tue Feb 20, 2018 7:54 pm] –
This is another wave form generation example using DMA now.
This example allows to configure the output frequency (and amplitude in case internal triangle wave generator).
The example sine wave has 210 samples and 8 bit resolution, with 3.3Vpp.
The generated 20 kHz frequency is quite precise and the signal has a nice shape
Now the next step is ADC.
Very nice code, I’m not a skilled programmer like you guys but I have an idea to reduce #ifdefs
#elif GEN_WAVE==TRIANGLE

#if   WAVE_AMP==3

const int WAVE_RES   = 8192;

#elif WAVE_AMP==2

const int WAVE_RES   = 4096;

#elif WAVE_AMP==1

const int WAVE_RES   = 2048;

#endif

#endif
I happened to find it at the bottom of my pile, and browsing around I see that F4 boards are cheap now, and there is STM32duino support for F4… so I might be able to finish it after all ![]()
The only thing I’m confused, is that the F4 seems to have a complex memory map, with 112k + 16k + 64K, the latter CCM memory and not DMA enabled. If I were using a different toolchain, I know I could use the proper memory allocators and use all that memory. How about the STM32duino toolchain?
I had a quick look here https://github.com/stevstrong/Arduino_S … eric_f407v and it seems both ram (128k) and ccram (64k) are defined, but not sure how those are made available
If I had a board, it would be easy to test… but before I order (and wait for the slow boat from China), can someone here please help me understand how much free RAM can I reasonably expect to have for my code?
BTW: would this code work on your branch? https://github.com/mpflaga/Arduino-Memo … ryFree.cpp
And it looks as if eBay/Aliexpress F407 boards are the cheapest you can get, at sub-$10… STM32F405 is not any cheaper, actually costs more. F411 has less RAM, slower and single (slow) ADC, so wouldn’t work for me, even if cheaper. Love seeing open hardware and smaller form factors, but for my project it’s not critical. Since I don’t even know if it will ever work, might as well go cheap. But, to be honest, I’m not sure I see the point of custom-designing an F405 or F411 board, given where the market is at
But ccmram cannot be used with dma, like the rest of ram.
Regarding the board selection, i find the generic vet6 mini gives a very good starting point including slot for sd cards and i2c flash on board.
If you don’t need those extra hw pieces, any simplier “generic” type would make it, like that one in your other post (named “discovery”).
[Pito – Mon Feb 19, 2018 12:28 am] –
Any example for a simultaneous regular ADC sampling (2 ADCs sample a channel at the same exact time, no channel’s scan – scan disabled)?
You cannot have that, see note in RM0090 chapter 13.9.2.
[stevestrong – Sun Mar 04, 2018 8:23 am] –
In my repo the stack has been mapped to ccmram, and an example how to map your varibles there is one of the usb buffers. Search the code for that.
But ccmram cannot be used with dma, like the rest of ram.Regarding the board selection, i find the generic vet6 mini gives a very good starting point including slot for sd cards and i2c flash on board.
If you don’t need those extra hw pieces, any simplier “generic” type would make it, like that one in your other post (named “dicovery”).
That’s great, thanks. I thought I saw the stack mapped to ccram, that was very smart of you, since it frees up more user RAM. Didn’t notice the USB, which is also a great idea. And, yes, I understand the ccram limitations (and I will rely heavily on DMA for a portion of the ADC code), on the other hand it’s faster than the rest of the RAM, so mapping stack and frequently used variables there speeds things up
So I should be able to, in effect, use more than 128Kb RAM in my code, once I figure out how to allocate some variables to ccram. Even (in theory) convert my ADC channels to almost 128Kb RAM using DMA, and stuffing every other variable in ccram. Awesome ![]()
- You can place everything in it by default, and specify when you want to use normal RAM with an attribute.
- Or you can place everything in normal RAM, and only place things in CCMRAM with an attribute.
I beleive we discussed it on some threads and the PRs, and decided to better leave normal RAM as default, since there is no restrictions on that one (for DMA, or to run code on it), and use CCM RAM only when the attribute is used.
This thread has some of the details:
http://stm32duino.com/viewtopic.php?f=5 … ccm#p32607
Steve would know for sure if the attribute he kept is the one we discussed in that thread, __CCMRAM__, if so, you only need to declare variables with that attribute to place them in CCM RAM, i.e:
uint16_t __CCMRAM__ buffer[256];
It’s definitely nice to have the ability to decide where the variables are stored, and if speed is a concern, ccram should be used preferentially for anything not dependant on DMA. But I still believe that using normal RAM as default is safer, otherwise people would run into problems with libraries/code relying on DMA and would be very hard to troubleshoot
Since I use ADC with DMA, at a minimum the buffers used by the A/D conversion must be in normal RAM, but I need to see if I can get a faster execution by having some of the cross correlation code using ccram variables
At this point I’m confident that it’s worth starting to experiment with an F407 board. Just will need to wait for the slow boat from China to get here with my board ![]()
If you need the ultimate performance while doing 2 things in normal RAM at the same time (2DMA transfers or 1 transfer+cpu access), you could do the same we did with the CCMRAM and create a separate region for the top 16KB of ram, that way you can direct the compiler to place some buffer there, and know the DMA can access that region at the same time CPU or another DMA channel are accesing the other normal RAM region without any stalls.
I believe that’s why STM designed the normal RAM in 2 separate blocks.
You could also place some code in that top region, and could execute without being affected by any RAM access, if all other access goes to the other blocks.
Thanks for the info. Luckily my needs are pretty simple: high speed DMA ADC into a buffer (4 channels), then process the buffer as a single high speed task, sequentially. As such I don’t think that my code would benefit much from wringing out the extra perf of those 16k, since I’m pretty much serializing everything. I can see how it would benefit if I were using real time processing and a circular ADC buffer, processing the ADC buffer while the DMA transfer is active
The ADC has been reworked and extended with a library, see this patch, which required to change quite a few files.
The ADC device instances are moved to flash, while the ISR tables are kept in RAM.
This required to change the pin_map table which now contains an index to ADC device instead of its address.
Hope that it did not break anything else … ![]()
There are 3 examples: multi-channel non-DMA, single channel DMA and multi-channel DMA, both DMA versions using single-buffer (split in two, however) and timer generated acquisition rate.
EDIT
I just realized that dual ADC mode is not covered by any example, I will make an example for that, too.
I have updated to your last library and the code that I used to work gives such an error
adc_set_sample_rate(&ADC1, ADC_SMPR_1_5);
‘ADC_SMPR_1_5’ was not declared in this scope
if project #include “SdioF4.h”
to error:
C:\Users\Documents\Arduino\hardware\Arduino_STM32-master\STM32F4\libraries\SPI\src\SPI.cpp:116:28: error: invalid conversion from ‘const dma_dev*’ to ‘dma_dev*’ [-fpermissive]
_settings[0].spiDmaDev = DMA2;
How to fix it ?
– use:
adc_set_sampling_time(ADC1, ADC_SMPR_144); // 1 µs sampling+conversion timeC:\Users\Documents\Arduino\hardware\Arduino_STM32-master\STM32F4\libraries\SPI\src\SPI.cpp:116:28: error: invalid conversion from ‘const dma_dev*’ to ‘dma_dev*’ [-fpermissive]
_settings[0].spiDmaDev = DMA2;
[acronis – Tue Mar 20, 2018 3:17 pm] –
This error when connecting “SdioF4.h ” remainedC:\Users\Documents\Arduino\hardware\Arduino_STM32-master\STM32F4\libraries\SPI\src\SPI.cpp:116:28: error: invalid conversion from ‘const dma_dev*’ to ‘dma_dev*’ [-fpermissive]
_settings[0].spiDmaDev = DMA2;
Try:
_settings[0].spiDmaDev = (dma_dev*)DMA2;
Or actually, shouldn’t line 141 be like this instead?
dma_dev * const spiDmaDev;
However, the error in SPI.cpp:116:28: should have been fixed by my first suggestion.
I just tested the current repo and got no error now.
Please rebuild the whole project after you pull the latest version.
Today updated the library and checked – now the error does not give !
Great!
Thank you!
i have some Linker-Problems while Compiling with “VisualMicro”. I think it worked some Days ago, but i tryed some other Cores and now i woul’d like to use this, because i need the RTC.
The Compiler-Output, for the “bare minimun” Sketch:
Compiling 'STM32F407_Test' for 'Generic STM32F407V series'
rccF4.c: In function SetupClock72MHz
rccF4.c: 264:3: warning: this 'while' clause does not guard... [-Wmisleading-indentation]
while ((RCC->CFGR & (uint32_t)RCC_CFGR_SWS ) != RCC_CFGR_SWS_PLL)
^~~~~
rccF4.c:265: note ...this statement, but the latter is misleadingly indented as if it is guarded by the while
rccF4.c: In function SetupClock120MHz
rccF4.c: 355:3: warning: this 'while' clause does not guard... [-Wmisleading-indentation]
while ((RCC->CFGR & (uint32_t)RCC_CFGR_SWS ) != RCC_CFGR_SWS_PLL)
^~~~~
rccF4.c:356: note ...this statement, but the latter is misleadingly indented as if it is guarded by the while
rccF4.c: In function SetupClock168MHz
rccF4.c: 456:3: warning: this 'while' clause does not guard... [-Wmisleading-indentation]
while ((RCC->CFGR & (uint32_t)RCC_CFGR_SWS ) != RCC_CFGR_SWS_PLL)
^~~~~
rccF4.c:457: note ...this statement, but the latter is misleadingly indented as if it is guarded by the while
rccF4.c: In function rcc_clk_init2
rccF4.c: 554:5: warning: this 'while' clause does not guard... [-Wmisleading-indentation]
while ((RCC->CFGR & RCC_CFGR_SWS ) != RCC_CFGR_SWS_PLL)
^~~~~
rccF4.c:555: note ...this statement, but the latter is misleadingly indented as if it is guarded by the while
arm-none-eabi-g++*: error: C:\Users\user\AppData\Local\Temp\VMBuilds\STM32F407_Test\Arduino_STM32-master_generic_f407v\Debug\core\libmaple\syscalls.c.o: No such file or directory
Error linking for board Generic STM32F407V series
Build failed for project 'STM32F407_Test'
Just compare the Arduino build (verbose) messages with that of VM and you will see the difference which will explain the root cause and thus you will get a hint how to solve your problem.
Btw, the warning for [-Wmisleading-indentation] for while()… I think I solved with the latest commit.
I’ve upgraded your library to the latest.
  timer.pause();

timer.setPeriod(500);

timer.setChannel1Mode(TIMER_OUTPUT_COMPARE);

timer.setCompare(TIMER_CH1, 1);

timer.attachCompare1Interrupt(timer_interrrupts);

timer.refresh();

timer.resume();
I took the step to remove them from my repo.
Sorry if I caused trouble with that.
So please use instead the recommended functions under the given link.
Meaning:
timer.setMode(TIMER_CH1, TIMER_OUTPUT_COMPARE);

timer.attachInterrupt(TIMER_CH1, timer_interrrupts);
So everything is fine !
Please tell me how to set the parameters config ?
for example SERIAL_8O2
Serial.begin(speed, config)
Serial.begin(baud_rate);Thank You
void usart_set_parity(usart_dev *dev, uint16_t odd); // odd: 0=even, 1=odd

void usart_set_stop_bits(usart_dev *dev, uint16_t stop_bits); // stop_bis: 0=1bit, 1=0.5bits, 2=2bits, 3=1.5bits
You work incredibly fast !!!
Your great specialist !!!
I thank you for your help !
Just compare the Arduino build (verbose) messages with that of VM and you will see the difference which will explain the root cause and thus you will get a hint how to solve your problem.
Btw, the warning for [-Wmisleading-indentation] for while()… I think I solved with the latest commit.
Hi,
for the notes:
i have downloaded the files yesterday. Today i downloaded them freshly some minutes ago, and the notes are gone!? No Idea.
Also no idea what to do with the verbose Messages ![]()
That of the Arduino IDE is clarly longer than that of VisualMicro: 141 vs. 30 lines.
In that of VisiualMicro it will probably be interesting from the Line 24:
Linking it all together ...

"C:\Users\user\AppData\Local\arduino15\packages\STM32\tools\arm-none-eabi-gcc\6-2017-q2-update/bin/arm-none-eabi-g++" -Os -Wl,--gc-sections -mcpu=cortex-m4 "-TD:\Eigene Dateien\Eigene Dokumente\Arduino\hardware\Arduino_STM32\STM32F4\variants\generic_f407v/ld/jtag.ld" "-Wl,-Map,C:\Users\user\AppData\Local\Temp\VMBuilds\STM32F407_Test2\Arduino_STM32_generic_f407v\Debug/STM32F407_Test2.ino.map" "-LD:\Eigene Dateien\Eigene Dokumente\Arduino\hardware\Arduino_STM32\STM32F4\variants\generic_f407v/ld" -specs=nosys.specs -specs=nano.specs -o "C:\Users\user\AppData\Local\Temp\VMBuilds\STM32F407_Test2\Arduino_STM32_generic_f407v\Debug/STM32F407_Test2.ino.elf" "-LC:\Users\user\AppData\Local\Temp\VMBuilds\STM32F407_Test2\Arduino_STM32_generic_f407v\Debug" -lm -lgcc -mthumb -Wl,--cref -Wl,--check-sections -Wl,--gc-sections -Wl,--unresolved-symbols=report-all -Wl,--warn-common -Wl,--warn-section-align -Wl,--warn-unresolved-symbols -Wl,--start-group "C:\Users\user\AppData\Local\Temp\VMBuilds\STM32F407_Test2\Arduino_STM32_generic_f407v\Debug/core/libmaple/syscalls.c.o" "C:\Users\user\AppData\Local\Temp\VMBuilds\STM32F407_Test2\Arduino_STM32_generic_f407v\Debug\STM32F407_Test2.cpp.o" "C:\Users\user\AppData\Local\Temp\VMBuilds\STM32F407_Test2\Arduino_STM32_generic_f407v\Debug\variant\generic_f407v.cpp.o" "C:\Users\user\AppData\Local\Temp\VMBuilds\STM32F407_Test2\Arduino_STM32_generic_f407v\Debug\variant\pin_map.c.o" "C:\Users\user\AppData\Local\Temp\VMBuilds\STM32F407_Test2\Arduino_STM32_generic_f407v\Debug\core.a" -Wl,--end-group
arm-none-eabi-g++*: error: C:\Users\user\AppData\Local\Temp\VMBuilds\STM32F407_Test2\Arduino_STM32_generic_f407v\Debug\core\libmaple\syscalls.c.o: No such file or directory
Error linking for board Generic STM32F407V series
Build failed for project 'STM32F407_Test2'
First make sure that syscalls.c can be found in folder:
Arduino_STM32\STM32F4\cores\maple\libmaple
At build time Arduino outputs this file to his own temp/core/libmaple/ folder. So please check if your output folder contains this
Arduino_STM32_generic_f407v\Debug\core\libmaple\syscalls.c.o
thank you for the help
First make sure that syscalls.c can be found in folder:
Arduino_STM32\STM32F4\cores\maple\libmaple
You mean at \hardware\?
Yes, is there.
You have to force VM to rebuild the whole target.
Done.
At build time Arduino outputs this file to his own temp/core/libmaple/ folder.
There is one verbose massage like this:
"C:\Users\user\AppData\Local\arduino15\packages\STM32\tools\arm-none-eabi-gcc\6-2017-q2-update/bin/arm-none-eabi-ar" rcs "C:\Users\user\AppData\Local\Temp\VMBuilds\STM32F407_Test2\Arduino_STM32_generic_f407v\Debug\core.a" "C:\Users\user\AppData\Local\Temp\VMBuilds\STM32F407_Test2\Arduino_STM32_generic_f407v\Debug\core\syscalls.c.o"
[da_user – Sun Mar 25, 2018 3:45 pm] –
But there is no \core\libmaple\ directory. VM Search in the wrong dir or put the file in the wrong dir.
Well, please check this by yourself, sorry but I cannot help you with VM, I have no experience at all.
I know that in Eclipse you have to check the directory settings of the project and adjust it to be identical as handled by Arduino IDE.
No Problem. You helped a lot!
You say mostly the problems are options of platform.txt and boards.txt? Well, STM32_Generic runs, maybe i found the correct difference. And i will ask in the Forum of VM.
And last exit: testing Visual Studio Code ![]()
Again: thank you for your help!
[da_user – Sun Mar 25, 2018 5:48 pm] –
You say mostly the problems are options of platform.txt and boards.txt?
Nope. They are the solution ![]()
[stevestrong – Sun Mar 25, 2018 5:54 pm] –
Nope. They are the solution
Yes, they are!
VM can’t help: http://www.visualmicro.com/forums/YaBB. … 1522079538
But i have looked at my own. I have changed Arduino_STM32\STM32F4\plattform.txt Line 78 to:
recipe.c.combine.pattern="{compiler.path}{compiler.c.elf.cmd}" {compiler.c.elf.flags} -mcpu={build.mcu} "-T{build.variant.path}/{build.ldscript}" "-Wl,-Map,{build.path}/{build.project_name}.map" {compiler.c.elf.extra_flags} -o "{build.path}/{build.project_name}.elf" "-L{build.path}" -lm -lgcc -mthumb -Wl,--cref -Wl,--check-sections -Wl,--gc-sections -Wl,--unresolved-symbols=report-all -Wl,--warn-common -Wl,--warn-section-align -Wl,--warn-unresolved-symbols -Wl,--start-group "{build.path}/core/syscalls.c.o" {object_files} "{archive_file_path}" -Wl,--end-group
I use the Steve core (downloaded 18-04-24)
My first attempt is a conversation of “our” ILI9341 F1 library:
First error was – more or less – easy:
C:\Users\Administrator\Documents\Arduino\hardware\Arduino_STM32_18_03_06\STM32F4\libraries\Adafruit_ILI9341_STM\Adafruit_ILI9341_STM.cpp:69:13: error: invalid conversion from 'volatile uint32* {aka volatile unsigned int*}' to 'volatile uint32_t* {aka volatile long unsigned int*}' [-fpermissive]
csport = portSetRegister(_cs);[stevestrong – Tue Apr 24, 2018 9:28 pm] –
Use SPI_DATA_SIZE_8BIT
Thanks Steve!
As we say in German “Den Wald vor lauter Bäumen nicht mehr sehen” (something like “to miss the forest for the trees”)…compiling is now ok (with warnings) Results will follow!
First test is negative.
No screen output and hangs up somewhere (just a quick Serial debug test).
I need to dig further. Maybe the library is too much STM32F1 optimized, maybe I roll back to an earlier version without the whole DMA stuff until I found the critical code.
I think it is good that there is the same phrase in different countries
It’s something like
“I could not see the wood, for the trees”
Meaning I could not see the wood because of the trees obscuring it.
Same as in German ![]()
Ok, some further progress:
The “old” library works.
One problem I found: The SPI pins definitions are on alternate pins
So for SPI1:
SCK1 and MOSI1 is on: PA5 and PA7 and ALSO
(alternate) PB3, PB5
found it out in generic_f407v.h
#define BOARD_NR_SPI            3

#define BOARD_SPI1_NSS_PIN      PA4

#define BOARD_SPI1_SCK_PIN      PA5

#define BOARD_SPI1_MISO_PIN     PA6

#define BOARD_SPI1_MOSI_PIN     PA7

#define BOARD_SPI1A_NSS_PIN     PA15

#define BOARD_SPI1A_SCK_PIN     PB3

#define BOARD_SPI1A_MISO_PIN    PB4

#define BOARD_SPI1A_MOSI_PIN    PB5
disabling
//#define SPI1_ALTERNATE_CONFIG 1 // use alternate SPI1 on SPI3 pinsI did that define in SPI.h because I needed 42MHz SPI clock on PB3 to achieve ~26fps, see my project attached here: http://stm32duino.com/viewtopic.php?f=39&t=3414#p43358, and at least one of PA5-7 is reserved for DCMI.
Do you test the graphicstest sketch?
Working on the (little modified) “old” library (#include “Adafruit_ILI9341.h”) works without problem on the alternate SPI pins, but not on standard SPI1
The new DMA library crashes after drawing some white blocks
Please test the ILI9341 lib from the link above.
Meanwhile I will double-check the graphic test.
So SPI.write() will try to write on SPI3.
[stevestrong – Wed Apr 25, 2018 8:41 am] –
Are you really sure that it is the DMA which crashes?
Please test the ILI9341 lib from the link above.
Meanwhile I will double-check the graphic test.
Steve: Even with your library the same symptoms: crashes after a while (same config as with the standard non DMA library)
Even without owning a OV7670 I tried out your code and the screen is working.
So there must be a problem with some functions within the ILI9341 library getting the MCU to crash. I’ll try out the basic functions to define the problem.
Edit updates:
I lowered the frequency (both, safe and freq) to 1200000, also using the shortest jumper cables I own, took another ILI9341 display, but no changes.
I inserted:
 tft.setRotation(1); // rotate 90° for landscape

tft.setAddrWindow(0, 0, screen_h, screen_w);OK, some pixel groups are displayed wrongly in two of rectangle tests but the most important thing is that it does not hang.
ILI9341 Test!

Display Power Mode: 0x9C

MADCTL Mode: 0x48

Pixel Format: 0x5

Image Format: 0x9C

Self Diagnostic: 0xC0
Read single pixel test
------------------------------
Write pixel: 0x1234
Read pixel: 0x1234
Read multiple pixel test
------------------------------
Write pixels: 0x1234, 0x5678, 0x9012, 0x3456
Benchmark Time (microseconds)
Screen fill 142065
Text 20827
Lines 91022
Horiz/Vert Lines 16827
Rectangles (outline) 12483
Rectangles (filled) 4718
Circles (filled) 66692
Circles (outline) 69433
Triangles (outline) 24135
Triangles (filled) 114242
Rounded rects (outline) 30803
Rounded rects (filled) 341549
Done!
Strange thing.
I downloaded your repo again, installed the linked ILI-lib blank, same results.
which adafruit_gfx do you use (the one without _AS) – getting some wiring_private missing errors (ok, I disabled the line, cause we don’t need I2C)
Do you select this port from the ide?
“GenericSTM32F407V series” – usb serial (CDC)?
I tested also the “mini” one, but this crashes immediately.
To be sure, I use this board:
https://www.aliexpress.com/item/Free-sh … 84907.html
#define TFT_CS  PA1

#define TFT_DC  PA2

#define TFT_RST PA3Update: all I needed to do, was to use this path instead: C:\arduino-1.8.5\portable\packages\stm32duino\hardware\STM32F4\2018.5.11, like the F1 boards cores
I’m trying to get a generic F4 board like this to work https://www.ebay.com/itm/STM32F4Discove … 2366085094
I installed a new copy of Arduino 1.8.5, installed the SAM board package, then added http://dan.drown.org/stm32duino/package … index.json to preferences and installed the F1 boards.
I was told that https://github.com/stevstrong/Arduino_STM32/ is the best core to use for my board, so I downloaded the ZIP file of that project, then copied just the STM32F4 folder under C:\arduino-1.8.5\portable\packages\stm32duino\hardware\STM32F4, as I did in the past pre-boards manager (at the time, I copied both STM32F1 and other cores manually from the ZIP file). And I’m using a portable Arduino installation, hence the path
Now under boards I see the Yun and the F1 boards, but none of the F4 boards. What am I missing? Do I need to edit some file to have Arduino recognize the STM32F4 directory as a valid one?
Still trying to get my F4 board to work. I successfully compiled Blink and uploaded it to my board (https://www.ebay.com/itm/STM32F4Discove … 2366085094) using STLink. everything works well
I now wanted to use the USB port, so I set “USB Serial (CDC)”, and STM32duino bootloader, but it always fails with:
C:\arduino-1.8.5\portable\packages\stm32duino\tools\stm32tools\2018.5.11/win/maple_upload.bat COM16 2 1EAF:0003 C:\Users\Roberto\AppData\Local\Temp\arduino_build_80506/BlinkF4.ino.bin {upload.dfuse_addr}

java.lang.UnsupportedClassVersionError: CliTemplate/CliMain : Unsupported major.minor version 51.0

at java.lang.ClassLoader.defineClass1(Native Method)

at java.lang.ClassLoader.defineClassCond(Unknown Source)

at java.lang.ClassLoader.defineClass(Unknown Source)

at java.security.SecureClassLoader.defineClass(Unknown Source)

at java.net.URLClassLoader.defineClass(Unknown Source)

at java.net.URLClassLoader.access$000(Unknown Source)

at java.net.URLClassLoader$1.run(Unknown Source)

at java.security.AccessController.doPrivileged(Native Method)

at java.net.URLClassLoader.findClass(Unknown Source)

at java.lang.ClassLoader.loadClass(Unknown Source)

at sun.misc.Launcher$AppClassLoader.loadClass(Unknown Source)

at java.lang.ClassLoader.loadClass(Unknown Source)

Could not find the main class: CliTemplate.CliMain. Program will exit.

Exception in thread "main"
So F4 uploads are only via STLink
I don’t know how you are attempting to do a bootloader upload to the F4 unless you are doing it manually, as its not an option in the menu in the IDE precisely because its not possible
[RogerClark – Tue May 15, 2018 12:31 am] –
Bootloader upload only works on the F1, we don’t have a bootloader for the F4 as its a completely different MCUSo F4 uploads are only via STLink
I don’t know how you are attempting to do a bootloader upload to the F4 unless you are doing it manually, as its not an option in the menu in the IDE precisely because its not possible
Got it, thanks. I guess I got confused by this viewtopic.php?t=1215 and assumed that it was somehow possible to flash via USB using DFuse… Definitely can use STlink, usb would just be more convenient given how my board is setup (and not sure how I got the IDE option, I must have messed things up playing with the configuration)
I also thought there was ongoing work on a DFuse option viewtopic.php?f=3&t=2508
So, USB on F4 can only be used as USBSerial, right?
but this doesn’t use the same drivers as the F1 DFU or the same version of DFU Util
You need the driver and the version of DFU which supports DFUSe (STM’s own extensions)
I think a few people have tried to use it, but if you have STLink that will be far easier
Do you know if an STLink flashed with Black Magic Probe can be used to flash like an STLink from the Arduino IDE? I only have one STLink (another on the way from China), and don’t want to flash it until I’m sure. Would be nice to be able to use a single dongle to program, debug and receive serial communication
Otherwise I’ll use 2 STLinks, one with the original firmware to flash, another with BMP to debug (and, yes, I know I can use OpenOCD with STLink, but BMP seems to offer much more with native GDB). Or I might jump to Eclipse with CDT Arduino, which I think allows the use of BMP to flash
[robca – Tue May 15, 2018 12:19 am] –
One more question, sorryStill trying to get my F4 board to work. I successfully compiled Blink and uploaded it to my board (https://www.ebay.com/itm/STM32F4Discove … 2366085094) using STLink. everything works well
I now wanted to use the USB port, so I set “USB Serial (CDC)”, and STM32duino bootloader, but it always fails with:
C:\arduino-1.8.5\portable\packages\stm32duino\tools\stm32tools\2018.5.11/win/maple_upload.bat COM16 2 1EAF:0003 C:\Users\Roberto\AppData\Local\Temp\arduino_build_80506/BlinkF4.ino.bin {upload.dfuse_addr}

java.lang.UnsupportedClassVersionError: CliTemplate/CliMain : Unsupported major.minor version 51.0

at java.lang.ClassLoader.defineClass1(Native Method)

at java.lang.ClassLoader.defineClassCond(Unknown Source)

at java.lang.ClassLoader.defineClass(Unknown Source)

at java.security.SecureClassLoader.defineClass(Unknown Source)

at java.net.URLClassLoader.defineClass(Unknown Source)

at java.net.URLClassLoader.access$000(Unknown Source)

at java.net.URLClassLoader$1.run(Unknown Source)

at java.security.AccessController.doPrivileged(Native Method)

at java.net.URLClassLoader.findClass(Unknown Source)

at java.lang.ClassLoader.loadClass(Unknown Source)

at sun.misc.Launcher$AppClassLoader.loadClass(Unknown Source)

at java.lang.ClassLoader.loadClass(Unknown Source)

Could not find the main class: CliTemplate.CliMain. Program will exit.

Exception in thread "main"
bkp_enable_writes ();
bkp_write (5, 0x5);
bkp_disable_writes ();
bkp_read (5) returns 0.
Any register returns 0
/**
* @file libmaple/include/libmaple/bkp.h
* @brief Backup register support (STM32F1 only).
*/
from F4
/**
* @file bkp.h
* @brief Backup register support.
*/
is there another function that allows you to use these registers?
But you are welcome to make a pull request which solves your issue.
https://github.com/rogerclarkmelbourne/ … 79ad2b2721
Now backup RAM works on STM32F407 too
Another question about CAN driver. Any chance that could be integrated (based on work of others in this forum for STM32F103) into F4 ? I’d be happy to give that a try but I need some guidance on how to approach it and I can test that also.
I guess the first interesting question is that can CAN hardware in F4 (one is enough for me) work together with USB serial ?
However, I never worked with CAN, and have no HW to test, so you are on your own with that, sorry.
[stevestrong – Thu Aug 30, 2018 3:06 pm] –
I could not find any restriction in F4 manuals regarding simultaneous use of USB and CAN.However, I never worked with CAN, and have no HW to test, so you are on your own with that, sorry.
Ok, thanks for the information. I’ll give it a shot in near future !
[michael_l – Tue Sep 04, 2018 5:07 pm] –[stevestrong – Thu Aug 30, 2018 3:06 pm] –
I could not find any restriction in F4 manuals regarding simultaneous use of USB and CAN.However, I never worked with CAN, and have no HW to test, so you are on your own with that, sorry.
Ok, thanks for the information. I’ll give it a shot in near future !
Stevestrong: need some help in adapting this function:
  * @brief  Set CAN to GPIO mapping

*/

CAN_STATUS can_gpio_map(CAN_Port* CANx, CAN_GPIO_MAP map_mode)

{

//rcc_clk_enable(RCC_AFIO);
status = CAN_INIT_FAILED;
if( CANx == CAN1_BASE)
{
switch(map_mode)
{
case CAN_GPIO_PB8_PB9:
rcc_clk_enable(RCC_GPIOB);
afio_remap(AFIO_MAPR_CAN_REMAP_PB8_PB9);
gpio_set_mode(GPIOB, 8, GPIO_INPUT_FLOATING);
gpio_set_mode(GPIOB, 9, GPIO_AF_OUTPUT_PP);
break;
#if NR_GPIO_PORTS >= 4
case CAN_GPIO_PD0_PD1:
rcc_clk_enable(RCC_GPIOD);
afio_remap(AFIO_MAPR_CAN_REMAP_PD0_PD1);
gpio_set_mode(GPIOD, 0, GPIO_INPUT_FLOATING);
gpio_set_mode(GPIOD, 1, GPIO_AF_OUTPUT_PP);
break;
#endif
default:
return status;
}
status = CAN_OK;
}
return status;
}
