I still use film and have a home minilab, a Jobo ATL 1500.
This machine allows me to develop colour film at home.
About a year ago the machine failed mid process, basically the main motor which rotates the drum containing the film ground to a halt, then the 7 segment displays dimmed. Left off for a few minutes it would then function normally again until failing again sometime mid process, but usually sooner than the prior time.
I took the machine apart thinking it would just be capacitor failure (the machine was made over 20 years ago) and replaced all the electrolytic caps because a couple looked a little swollen.
The machine worked great since then, although only used in winter – ie not this very warm English summer.
I’ve just tried to develop a big batch of film and the machine has failed the same way halfway through the 2nd chemical stage of the first run of it’s C41 process – it seems to fail when the machine is doing multiple control options eg. drum rotation motor running, the vac pump running to draw chemicals into the drum, couple with it heating the water bath to 38C.
I’ve pulled it apart again and checked all the PSU caps that I replaced, they are all fine.
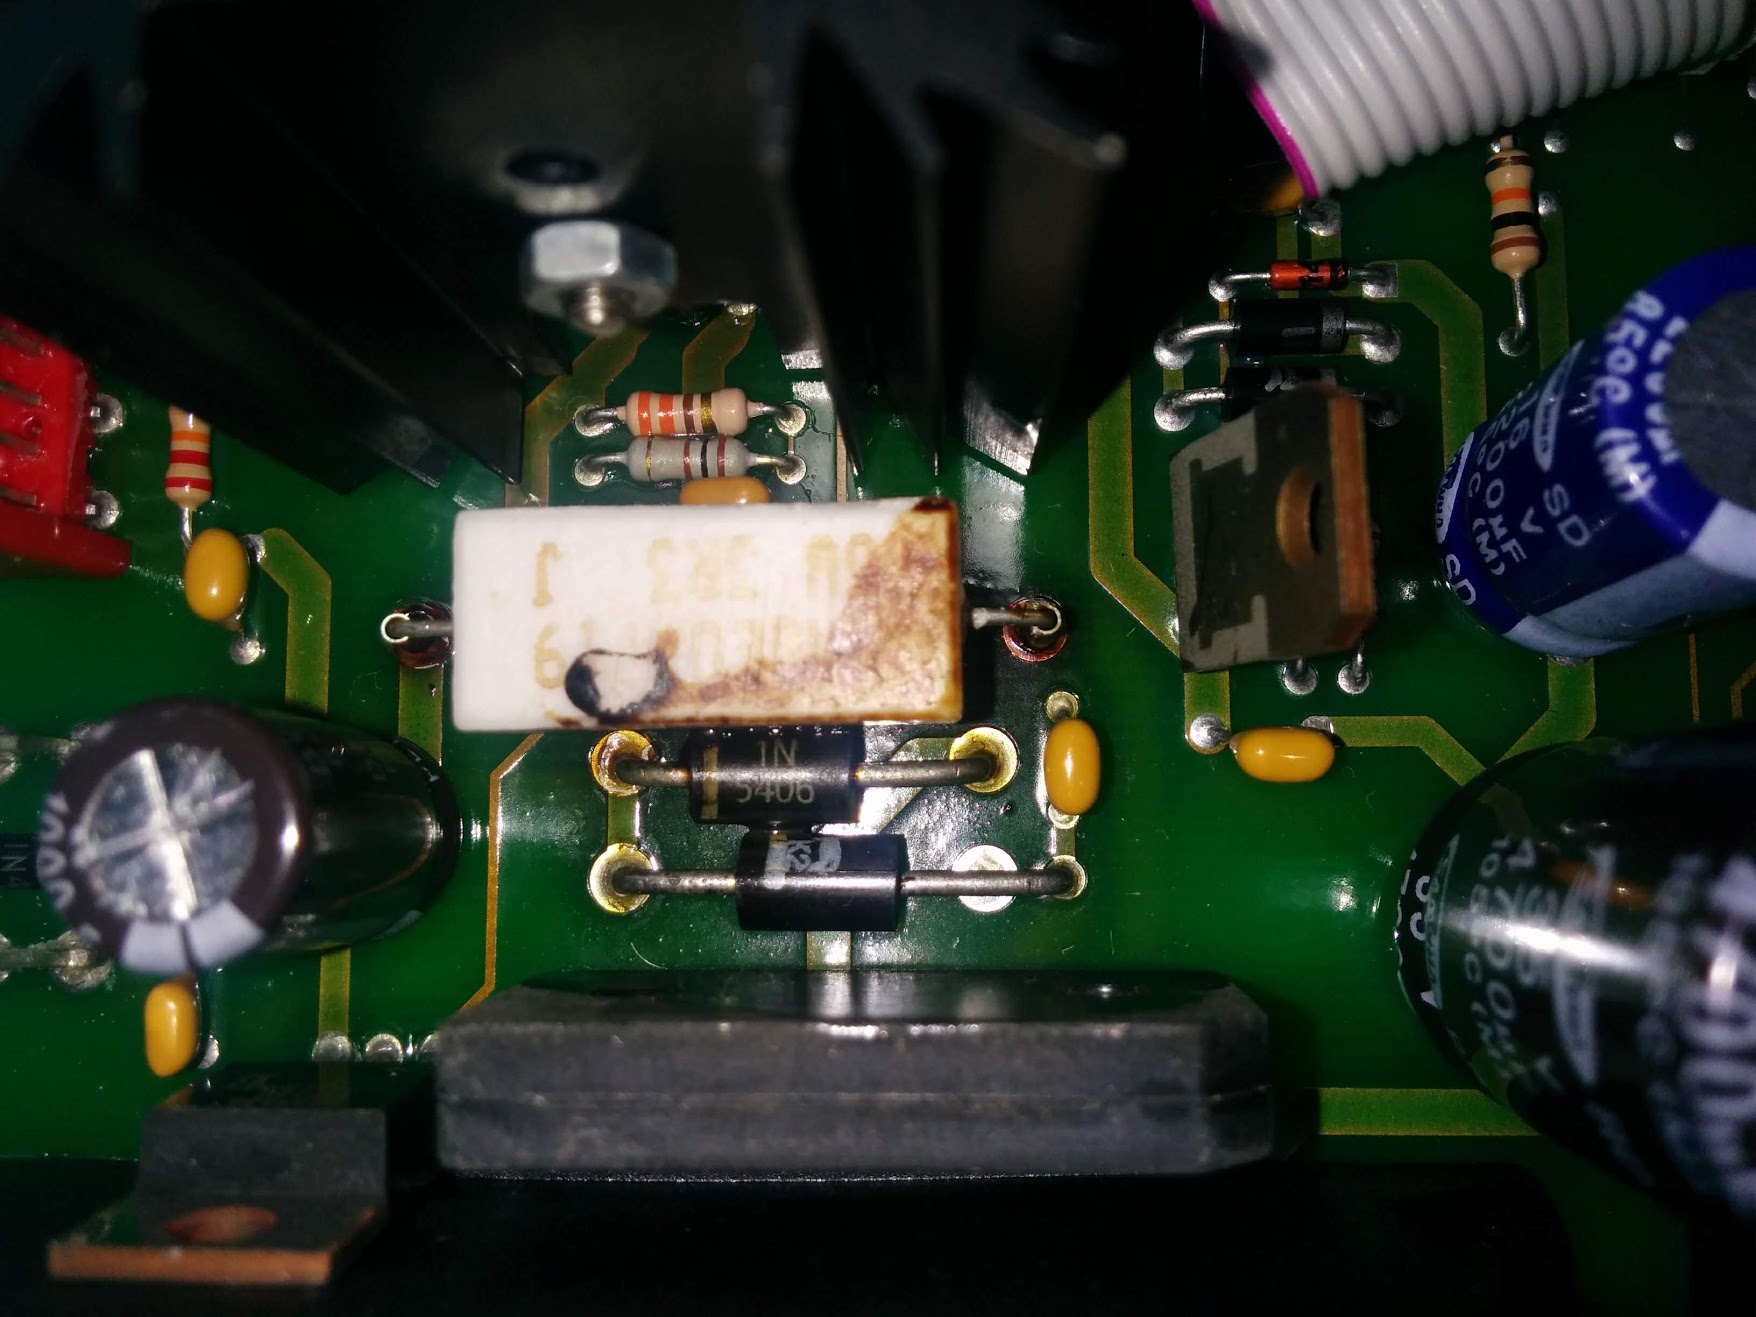
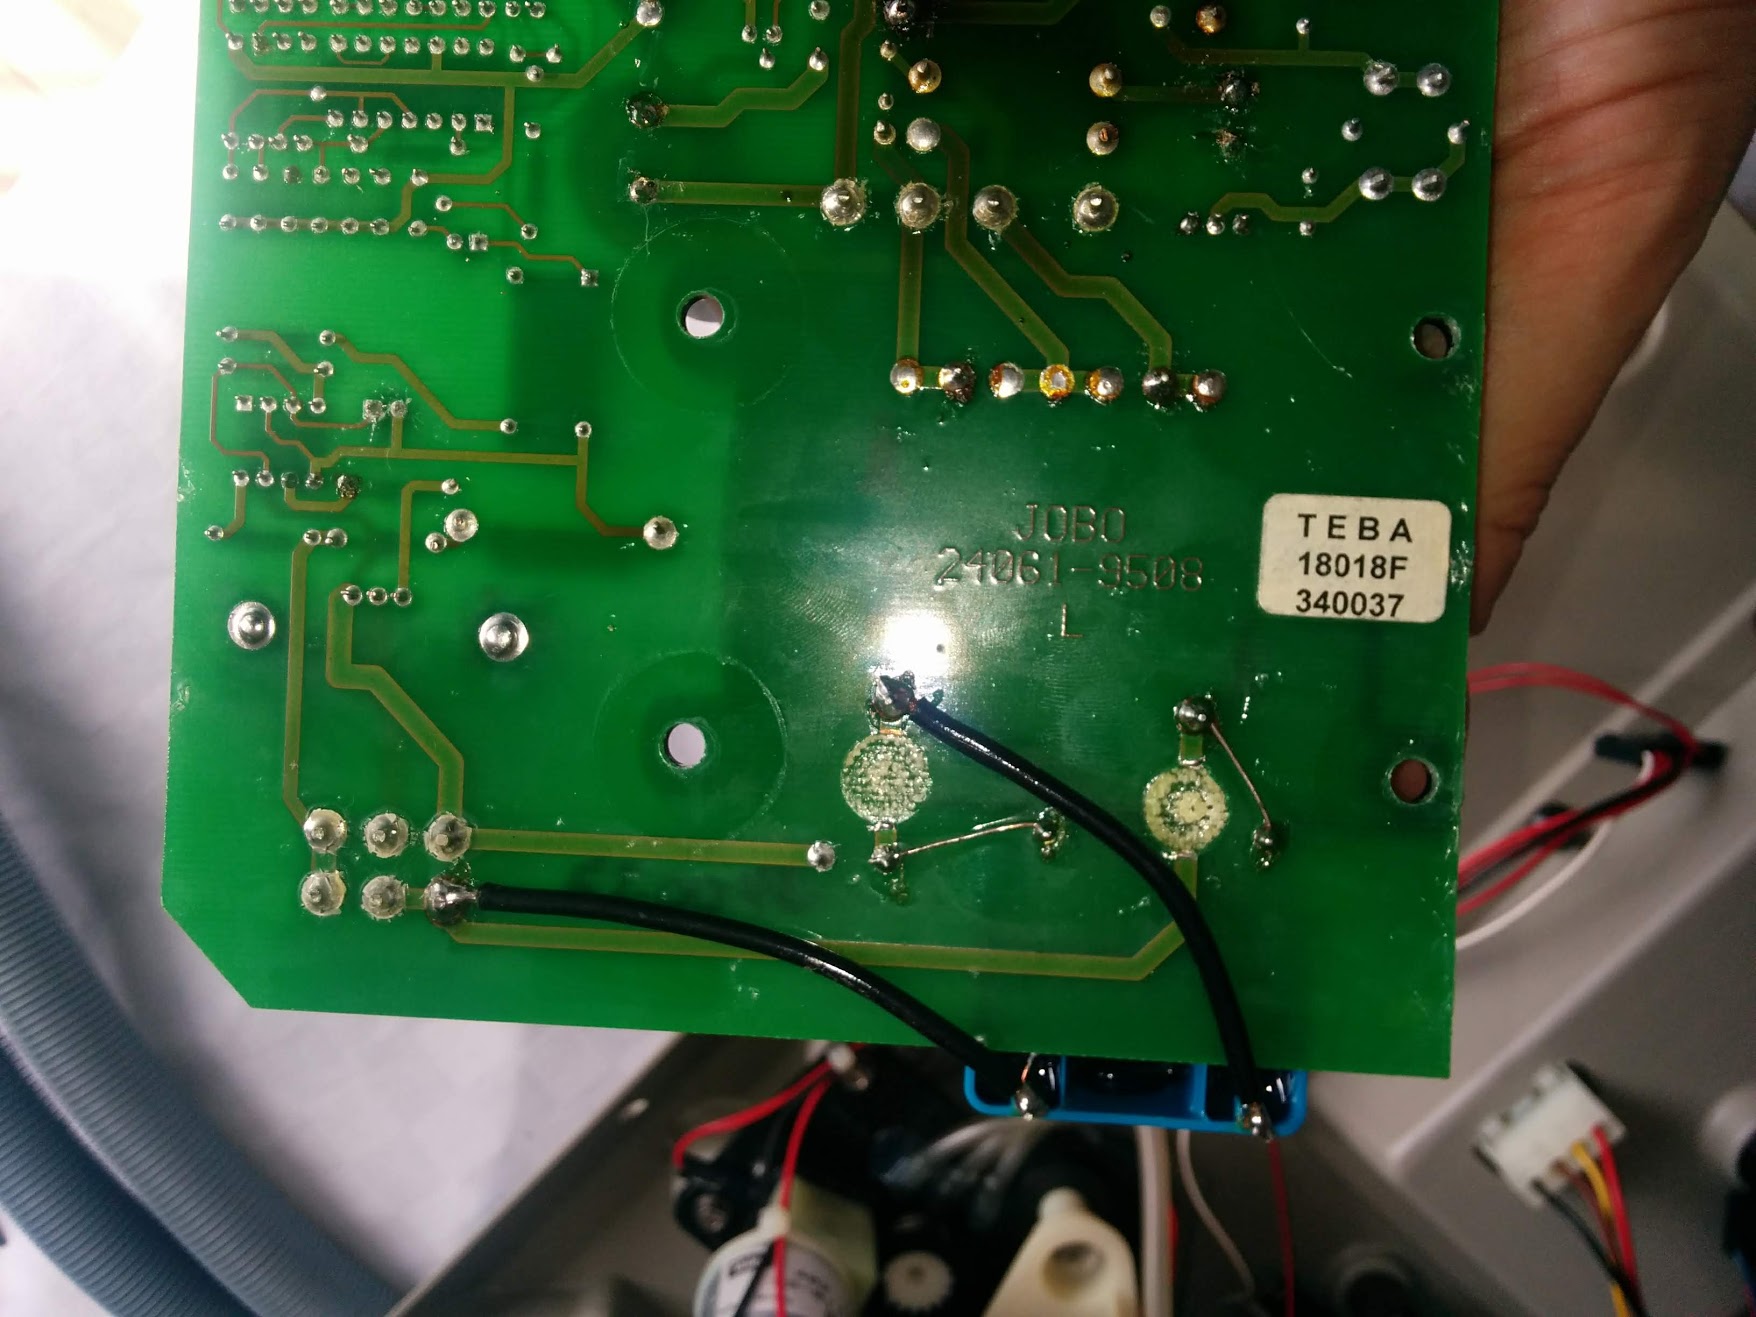
There’s a cement resistor that looks a bit worse for ware – I can’t seem to get a reading off it in situ – I suppose I need to desolder a leg?
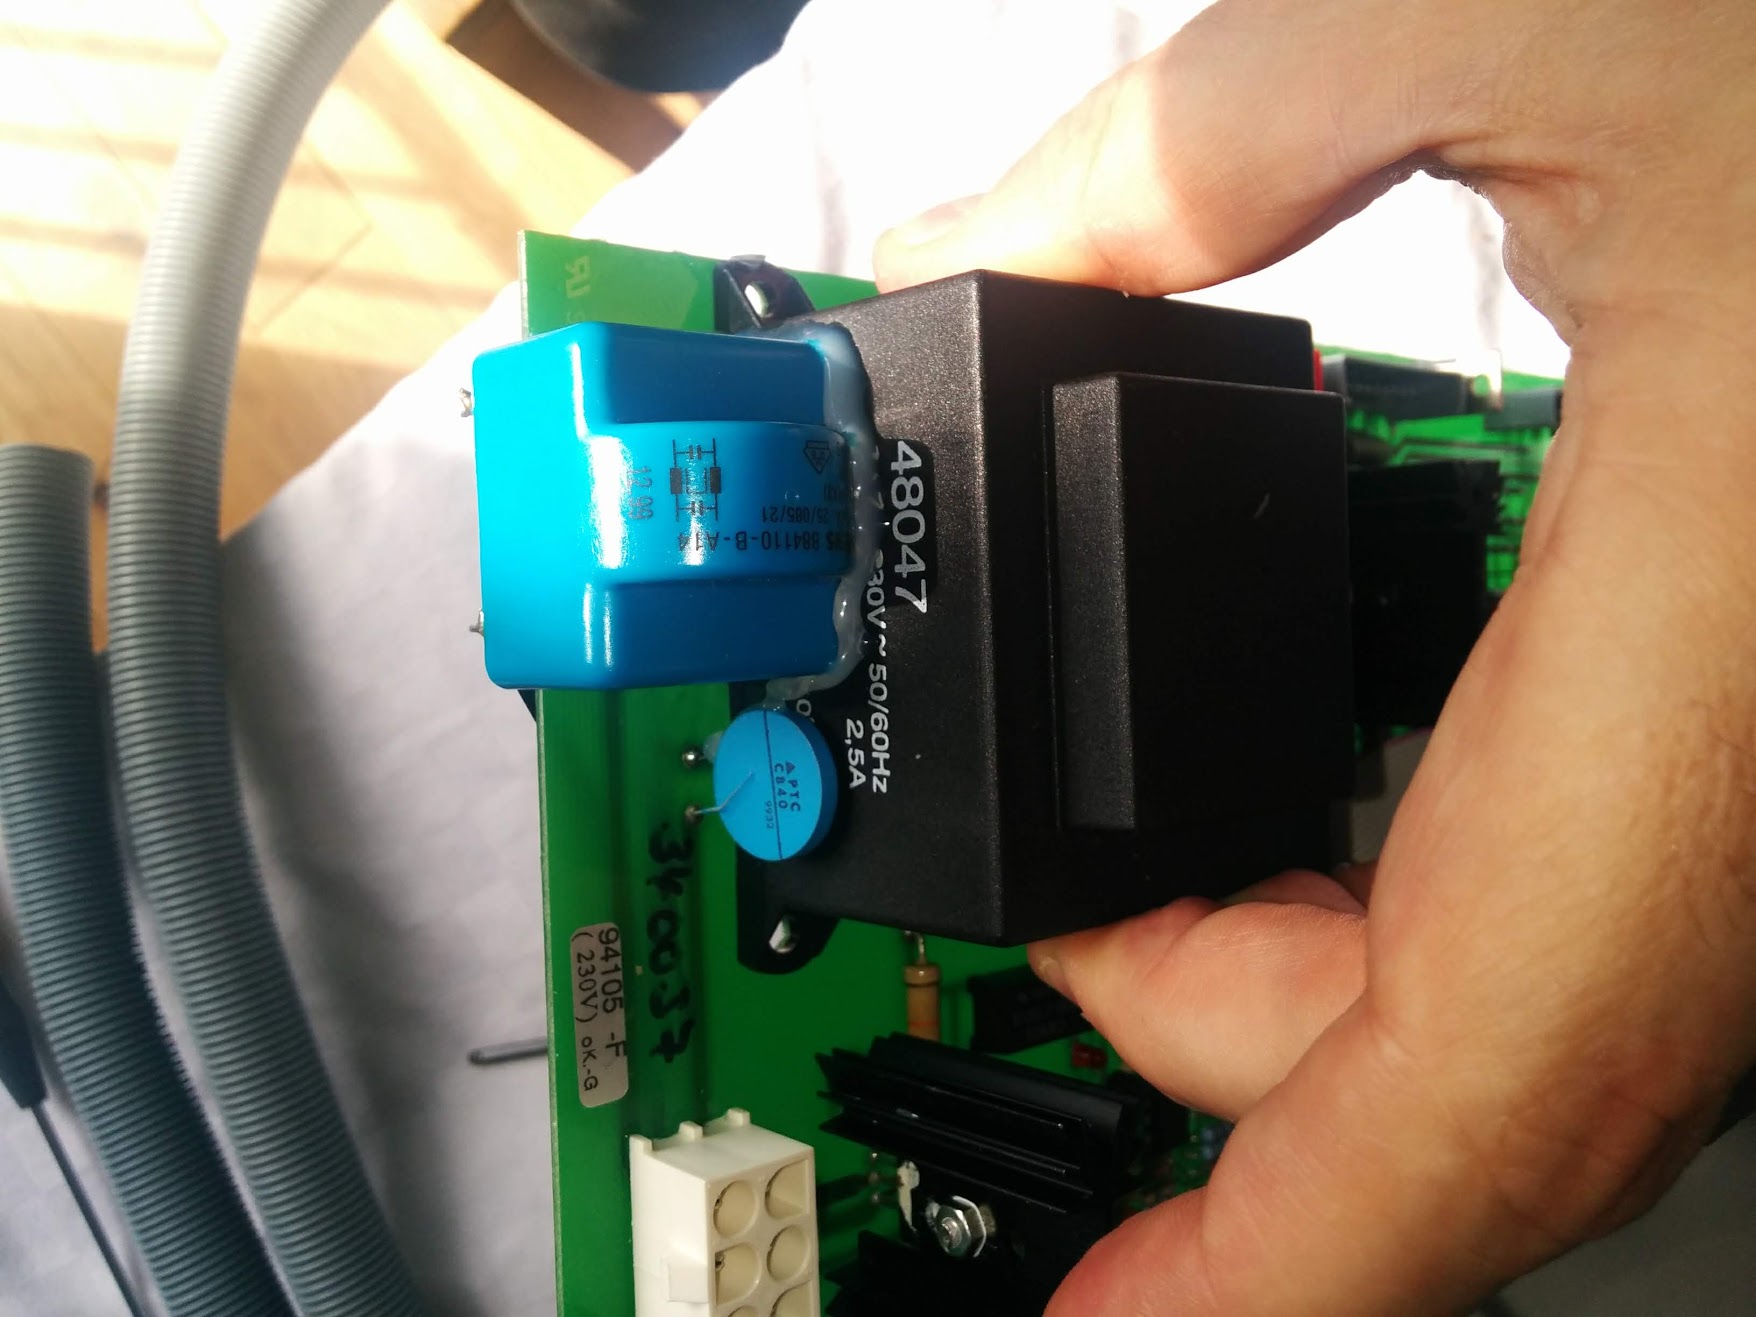
Also it looks like someone repaired the transformer/rectifier previously, I’m no expert on this stuff but the main black transformer was quite warm (not hot though).
Any suggestions on what else I can do to try and fix this?
Also, should I retouch all the soldering in case of any dry/aged joints?
I can only get it repaired professionally if I ship it to Germany which will cost a fortune – but that said, these machines still sell for about 1500 GBP when working.
Any help/thoughts appreciated.
Some photos:
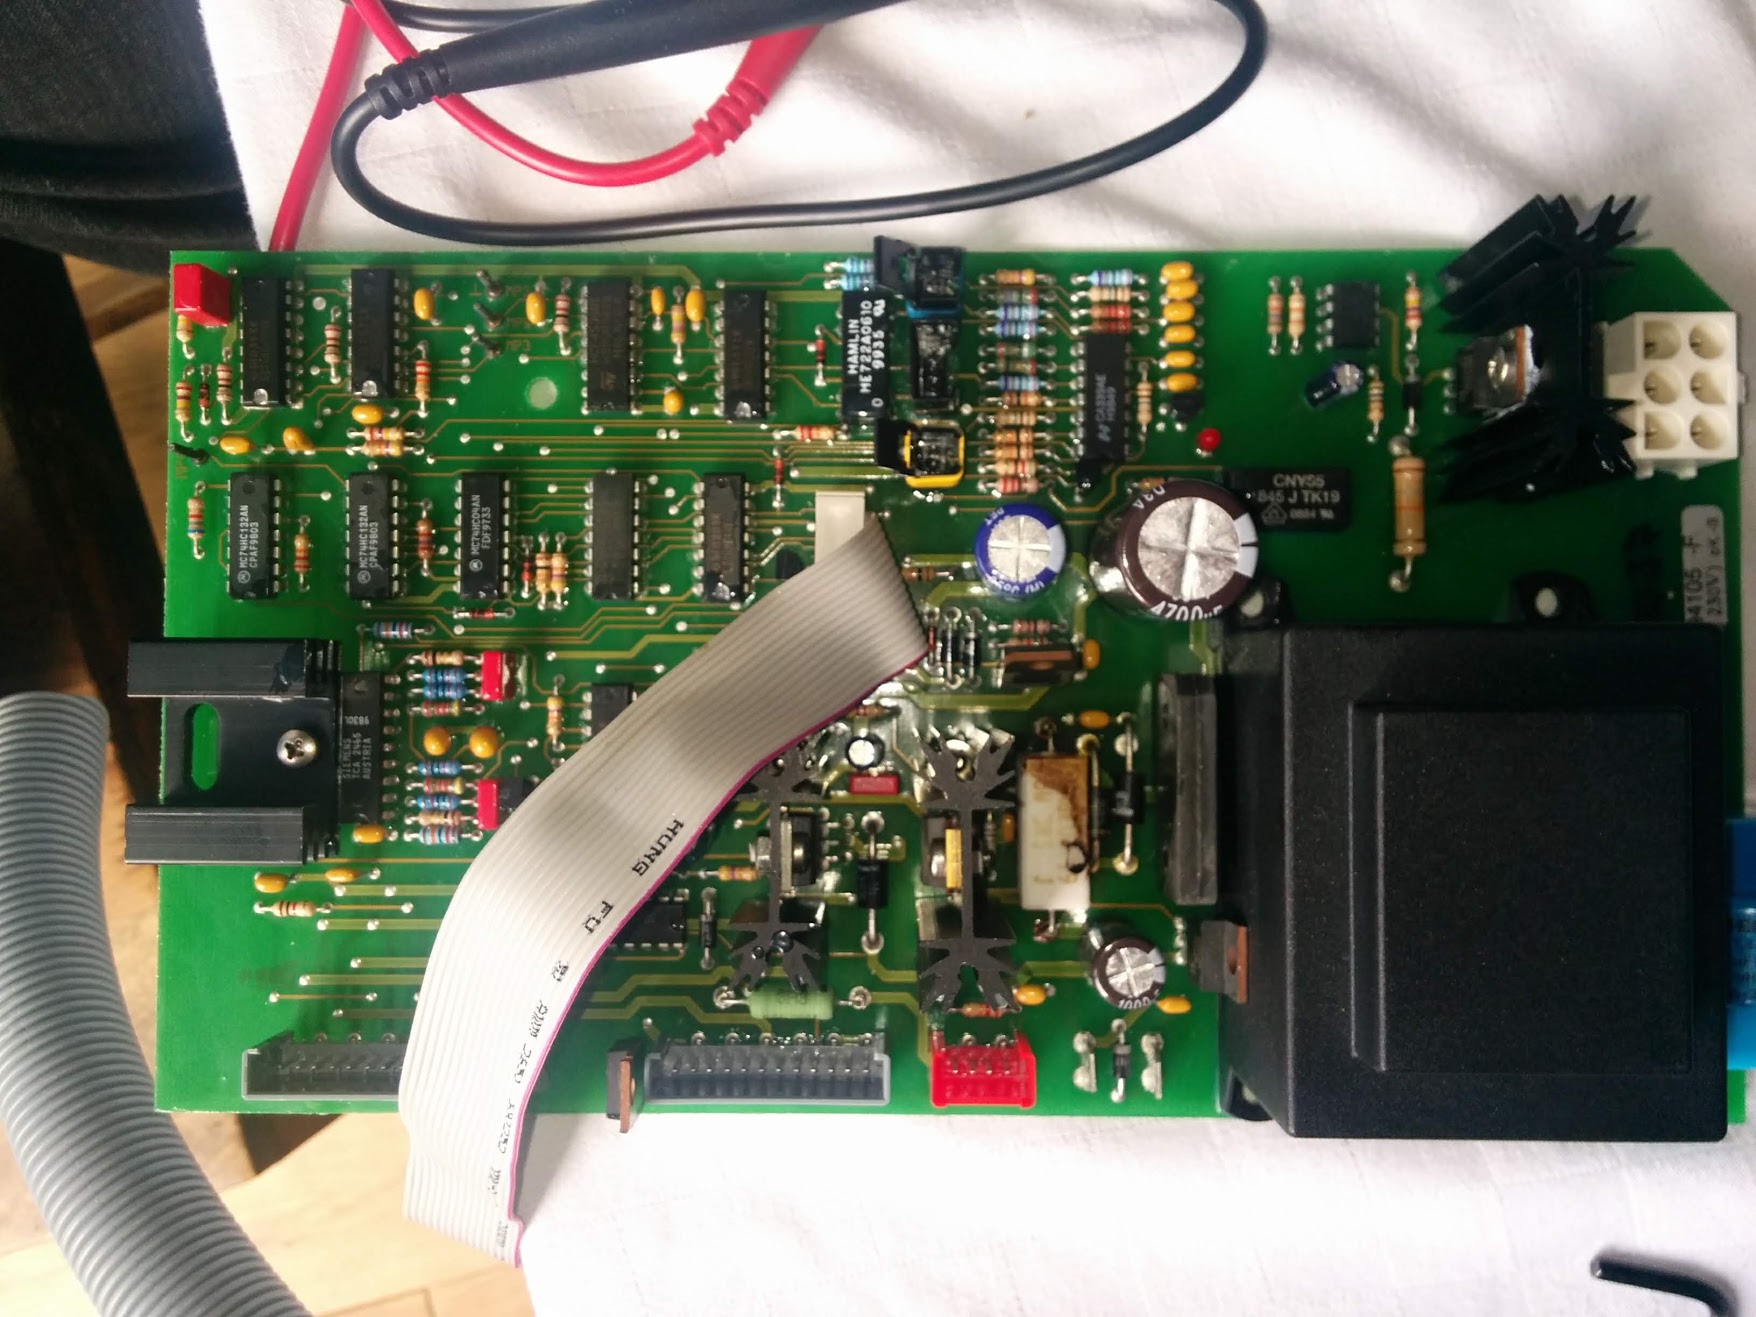
The diode next to the cement resistor looks to have melted a bit…. replace?
Reverse side of the resistor
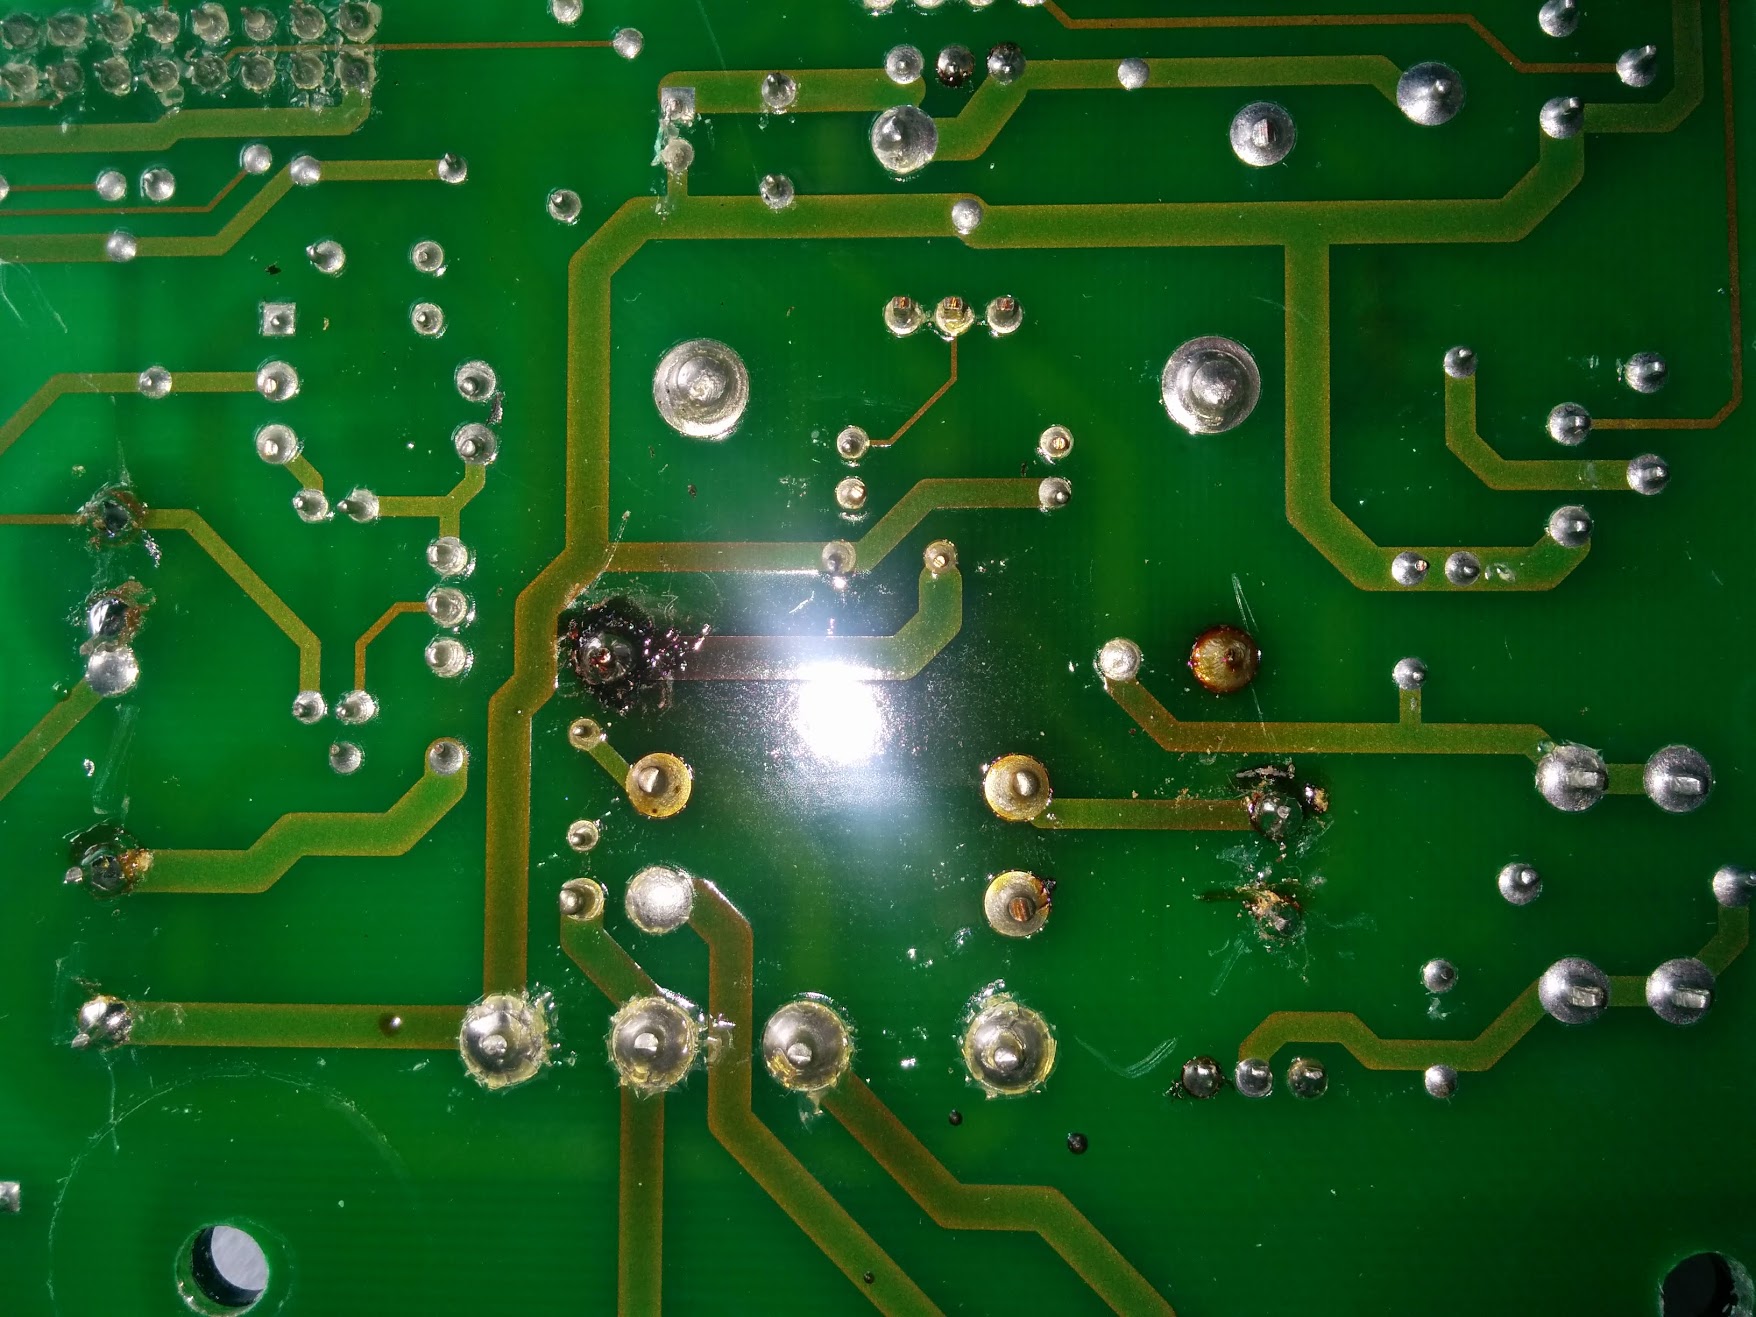
Coil/rectifier bodge
And reverse side
HOPEFULLY FIXED THE IMAGE NOW
the other way to approach it is to replicate its functionality with a new board – powered by a mcu. i assume most of this is nothing but timing then a lowly 8-bitter will do.
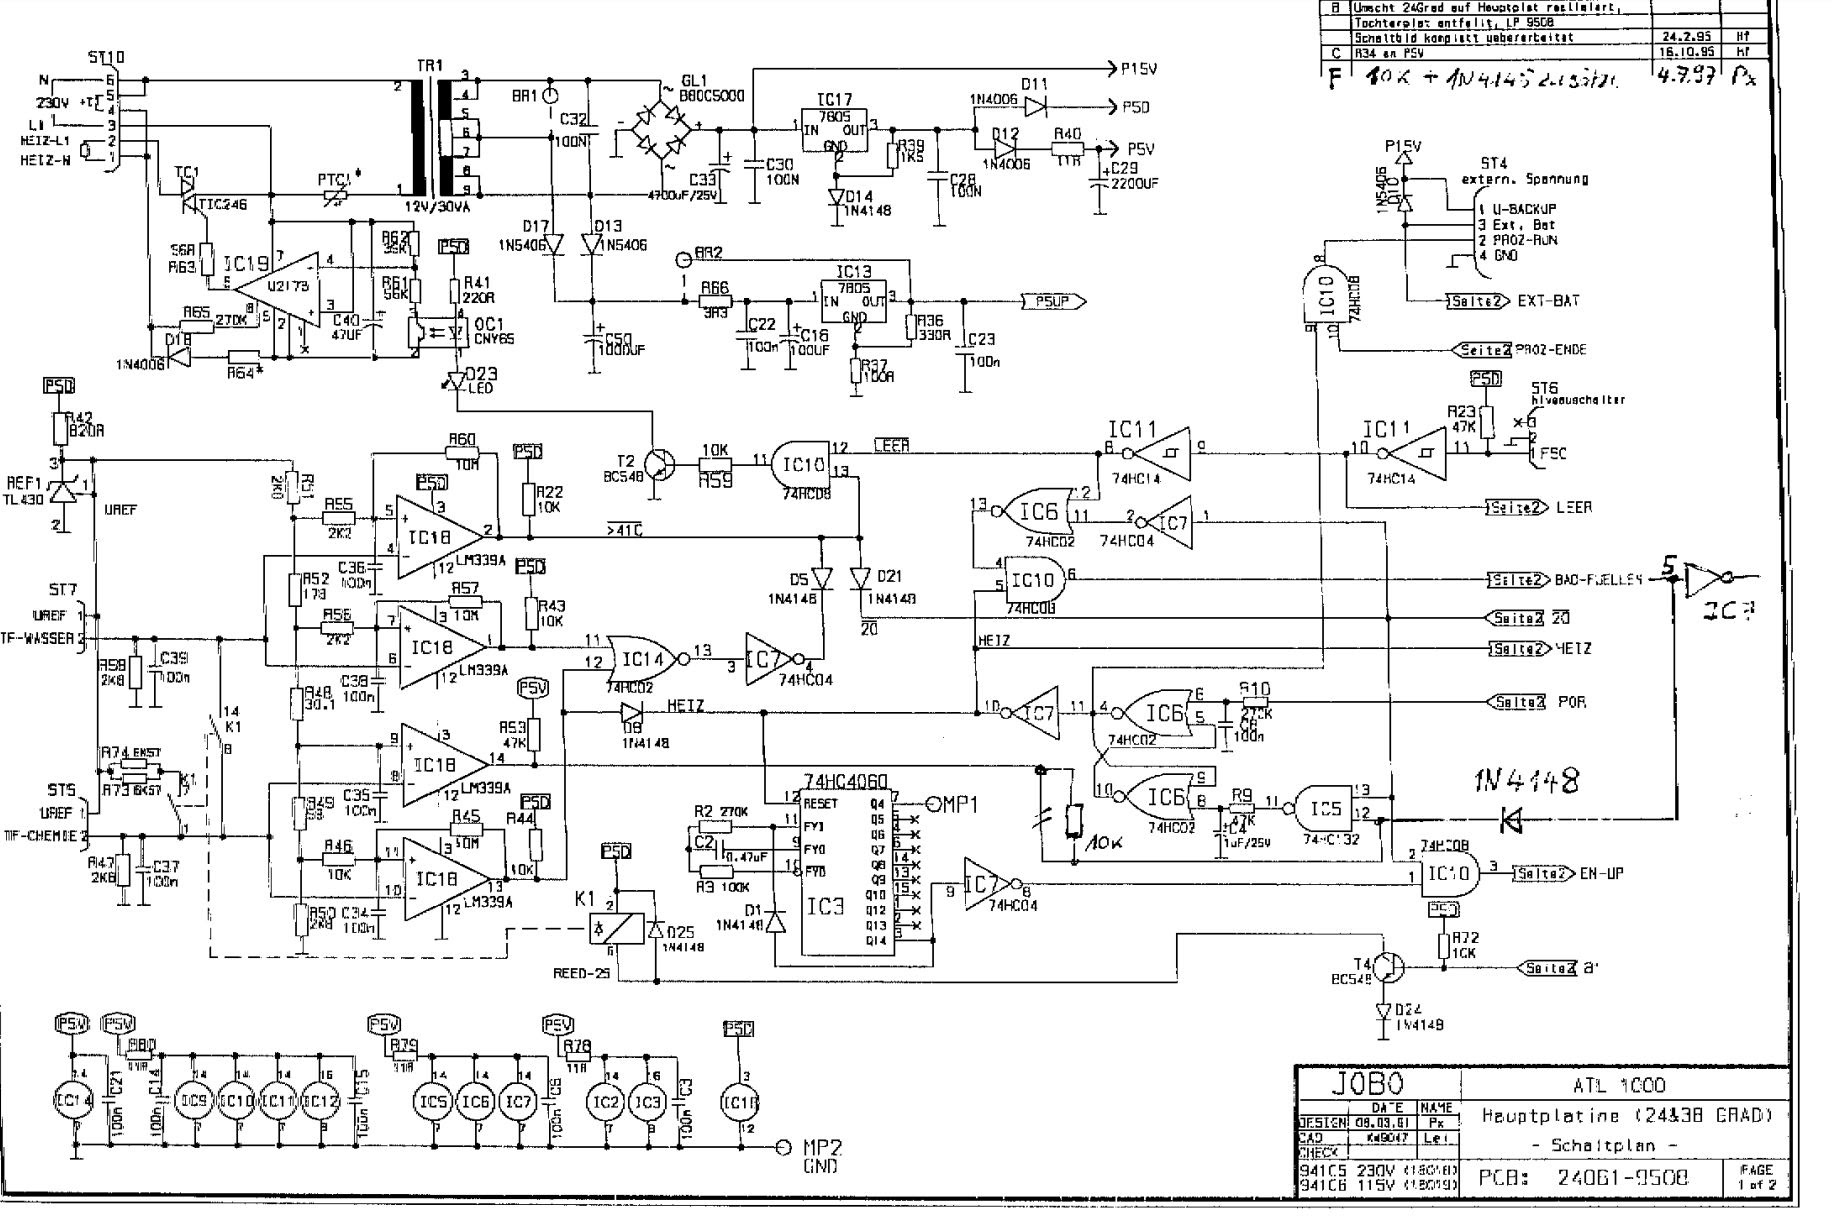
Then… first rule of fault finding electronicals… thou shalt check voltages. If you can get hold of the service manual, ( I cant see the schematic in the post above) check all of the voltages, carefully, if possible while it is running a test run, rather than sitting idle. Don’t zap yourself or short things out obviously.
The bodged on blue carbuncle looks like a filter, possibly a design rethink following complaints from customers that the thing was bleeding all over the radio spectrum.
The white 3R3 ceramic/cement resistor (probably 5 watt) should measure 3.3 Ohms, in circuit, unless there is a whopping great capacitor in parallel with it. The solder joints round it and the resistor itself look suspect. Clean the legs with a little emery paper and try measuring it again. If you can’t get a reading, try it out of circuit. I would doubt that it has failed open, as I suspect that would have killed the power supply, but you never know.
Also check the diodes next to it, which looks to have had a pretty sweaty life due to their proximity to the resistor. The resistor is only going to cost a couple of dollars, and the diodes probably a few cents each.
If we have a schematic we can probably offer more accurate advice.
“11.1 Overload reset
The AutoLab ATL-1500 does not contain any replaceable fuses. In case of overload an internal circuit breaker will automatically
switch off power to the unit. To reset the circuit breaker switch the ATL-1500 off with ON/OFF switch (#10) and wait a few
minutes. The unit can then be switched back on. If the ATL-1500 continues to blow the circuit breaker, unplug the unit and contact JOBO service.”
.. so it could be that the circuit breaker is kicking in, which might indicate a mechanical issue, something like this perhaps -> https://www.photo.net/discuss/threads/j … ts.389116/
They always struck me as being very expensive, even second hand, and “spares or repair” units show up very rarely on ebay (and also go for way more than I’m willing to splash out on something I may only use a few times).
I’m curious to know how the thing works.
I know it has a pump or pumps, some sort of agitator, and the ability to heat the chemicals relatively precisely, but how exactly does it operate at the mechanical level.
Could the technology of today, be used to build an open source film processor? Does such a project already exist I wonder?
We have access to all this cheap stuff from China in the form of dirt cheap microcontrollers, low cost stepper motors, and peristaltic pumps (of dubious quality and capacity no doubt), silicon heaters and 3d printers, so what is the secret sauce that makes the whole thing so expensive? It doesn’t even have any optics in it.
The fact the market for such stuff is shrunk. Any such device will be/is considered unique..
Try to buy a 10hp steam engine..
[Pito – Tue Jul 31, 2018 7:46 pm] –
Try to buy a 10hp steam engine..
Don’t encourage me in such acts of folly ![]() Now I’m tempted to look on ebay for one, but if I ever found one, and the price was right, I suspect I’ll be in the divorce court mere milliseconds after I clicked the “Pay Now” button.
Now I’m tempted to look on ebay for one, but if I ever found one, and the price was right, I suspect I’ll be in the divorce court mere milliseconds after I clicked the “Pay Now” button.
In this case, you may be lucky and just replacing the resistor will fix it.
As motor seizure seems to be a common problem, you could also fit some inline fuses in series with the motors, as it would prevent this sort of burn out happening again.
[RogerClark – Wed Aug 01, 2018 5:45 am] –
When I see high wattage resistors on PCBs, I’m always a bit concerned, as they are a common point of failure, even if they are not overloaded.In this case, you may be lucky and just replacing the resistor will fix it.
As motor seizure seems to be a common problem, you could also fit some inline fuses in series with the motors, as it would prevent this sort of burn out happening again.
Nailed it here, the actual fault is a tiny pump which circulates the water in the ‘water bath’ over the heating element – this had seized totally so the water was effectively getting overheated causing tehe thermal protection switch to trip out.
New pump on order.
Regarding how this thing actually works, effectively it’s relatively simple, an air pump forces air into sealed containers of chemicals, this forces the chemicals into a tank, this tank is constantly alernatively rotated, at time intervals it is lifted to empty the chemicals out of a drain. between ‘steps’ the unit can rinse the tank from supplied water (and lift and drain). Up to 6 chemical stages can be used, so there are 6 chemical containers all sat in the water bath which also has the lower third of the tank rotating within it – this is kept at the desired process temperature and various sensors trigger process start when the chemicals achieve the desired figure.
The control board includes an EEPROM which is divided into 16 blocks (there are 16 programs), a rotary switch selects the program, the machine reads in a ‘command’ from the appropriate memory block every 2.2 seconds and initiates the appropriate action….
There’s a really good description over here -> https://www.photo.net/discuss/threads/r … om.478141/
That refers to the lower specced version of the machine that I have where the stages cannot be user programmed.
An MCU replacement would be superb and offer much greater versatility, but the amount of effort required to make it happen would be prohibitive – a 3D printer control board could be a possible starting option however.
Try not to laugh too much at my wife telling off the kids in the background ![]()
![]()
having a photo developing machine i’d guess is a pretty good thing as it saves one from having to setup a darkroom, the process can be automated and controlled within the safelights chambers which prevents accidentally incorrectly exposing the photos and timing can be controlled
but these days i’d guess film is becoming very much a rather niche domain and i’d guess the chemicals won’t be as easy / cheap to get as they used to be
these days for the low volume digital to prints, i’m making do with an inkjet printer, there is the nagging concern that even that (inkjet printing) may become harder to get as more and more, photos are not printed but simply stored
I have a few questions…
How does the pumping system chose which tank to pump from and to?
In other words, how does the “rotary valve system” work?
Is there both an air pump and a water pump?
How many motors are there?
How does the tank rotator work?
Does the system recycle the chemicals or simply rinse them out as waste?
What film sizes and developing chemistry can it cope with?
Do you need to load the film into the tank in a dark room or bag, like you would in a manual system, or is this done by some other means.
Does the film tank look like a typical developing tank, or is there something unique in its design?
Regarding “The code has been burned into a double size eprom (27c512 instead of the original 27c256)..” from the description you linked to..
Have you thought of emulating the eprom with a bluepill or Arduino and perhaps some CMOS ram chips rather than trying to replace the whole shebang?
[ag123 – Wed Aug 01, 2018 8:42 pm] –
this is pretty cool
having a photo developing machine i’d guess is a pretty good thing as it saves one from having to setup a darkroom, the process can be automated and controlled within the safelights chambers which prevents accidentally incorrectly exposing the photos and timing can be controlled
but these days i’d guess film is becoming very much a rather niche domain and i’d guess the chemicals won’t be as easy / cheap to get as they used to bethese days for the low volume digital to prints, i’m making do with an inkjet printer, there is the nagging concern that even that (inkjet printing) may become harder to get as more and more, photos are not printed but simply stored
Actually the main benefits are cost and quality.
To develop a sheet of 4×5 film at a lab cost at best ~ 5GBP, I can develop them for about 15p each. And I have complete control over the process.
Film usage is actually on the increase these days, granted it dipped significantly as professionals moved over to digital but things are definitely on the up, Kodak has even introduced new films in the last few years.
[ahull – Wed Aug 01, 2018 11:02 pm] –
So in essence we have six plastic bottles/tanks, a water bath to heat them to set temperatures and a pumping system to move the chemicals and water around between the tanks and the developing tank. That all seems relatively simple.I have a few questions…
How does the pumping system chose which tank to pump from and to?
In other words, how does the “rotary valve system” work?
The rotary valve is multideck, so one deck connects the target liquid feed to the tank, the other connects the air supply to pump the liquid out – I think there’s a rotary encoder in there perhaps so the machine can determine current state (or a potentiometer etc). At power on everything always cycles back to a known state.
[ahull – Wed Aug 01, 2018 11:02 pm] –
Is there both an air pump and a water pump?
There are several pumps, air pump to move chemistry, water pump to agitate the water bath, and in my case an external water pump to inject rinse water from an external tank – the device can also be connected directly to a tempered mains supply where it controls inflow with a magnetic valve.
[ahull – Wed Aug 01, 2018 11:02 pm] –
How many motors are there?
rotary drum motor
lift motor
air pump motor
rotary valve motor
bath agitation motor
another motor which moves the waste outlet between water & chemical hose
[ahull – Wed Aug 01, 2018 11:02 pm] –
How does the tank rotator work?
I’m not sure, I think it simply supplys alternate polarity feed to swicth direction – I’ll attach the service manual.
[ahull – Wed Aug 01, 2018 11:02 pm] –
Does the system recycle the chemicals or simply rinse them out as waste?
It has a waste chemical outlet & a waste water outlet, a motor moves a directing channel depending on what’s happens – the down side of this is the tubing has to be manually rinsed between chemicals to ensure no cross contamination. This is a modern ‘side use’ case however, the principal behind the waste outlet was for silver reclamation.
[ahull – Wed Aug 01, 2018 11:02 pm] –
What film sizes and developing chemistry can it cope with?
The machine with non aftermarket reels can develop aything from 4×5 sheet film size and down, so 135 film, 120 film, 4×5, and other more esoteric sizes where rarer reels can be obtained (think now defunct reel film types like 110 etc). With aftermarket reels I’m able to develop 8×10 sheet film quite comfortably. This saves me a fortune in labs costs.
It can cope with B&W, C41, E6, & RA4 chemistry – all the timings are programmable.
[ahull – Wed Aug 01, 2018 11:02 pm] –
Do you need to load the film into the tank in a dark room or bag, like you would in a manual system, or is this done by some other means.
Yes. I use a ‘Harrison Film Changing Tent’.
[ahull – Wed Aug 01, 2018 11:02 pm] –
Does the film tank look like a typical developing tank, or is there something unique in its design?
It’s the same principal, light tight, chemistry is poured in through the top and out the same way, the main difference is that the drums are all the same circumference so that the lift/rollers can always accommodate them, and the top of the drum has a ‘cog’ on it so it can engage with the rotation motor – older less capable systems from Jobo used a magnetic attachment system.
[ahull – Wed Aug 01, 2018 11:02 pm] –
Regarding “The code has been burned into a double size eprom (27c512 instead of the original 27c256)..” from the description you linked to..Have you thought of emulating the eprom with a bluepill or Arduino and perhaps some CMOS ram chips rather than trying to replace the whole shebang?
No, my system, the 1500 is programmable, I linked to that article because it illustrates the principal behind which the system controls the hardware.
I would like to be able to introduce the acetic stop bath and chemical spillway cleaning from water in the other chemical bottles however as it would make cross contamination chances more slim when re-using the chemistry. However, in practice I’ve not really had any problems, and since the receiving receptacle for the spat out chemistry has to be manually changed, it’s not much more bother to also rinse out the pipe.
A 5l kit of C41 chemistry cost about 47GBP at the moment. This kit with reclamation will develop ~100 rolls of film. In reality it can be pushed to around double this amount (I don’t though).
1 roll is equivalent surface area to 4 x 4×5 sheets or 1 x 8×10 sheet.
Labs charge ~£5 per roll or 5×4 sheet, and up to £15 for an 8×10 sheet.
PS the service manual was too large to attach, search for SATL1500.pdf to obtain.
I had a read through the service manual, but it disappointingly doesn’t give a full hardware breakdown. It is sufficient to figure out how it works though.

Completely off topic, but which hill is this? ![]()
Slightly less off topic, you might like this -> https://hackaday.com/2018/08/02/the-pho … -the-moon/
[BennehBoy – Wed Aug 01, 2018 2:55 pm] –
. . . Regarding how this thing actually works, effectively it’s relatively simple, an air pump forces air into sealed containers of chemicals, this forces the chemicals into a tank, . . .
This is the same approach used in Keurig single cup coffee machines in the event one were looking to source part for a home brew (see what I did there?) version. For what it’s worth, I did a lot of black and white darkroom work back in the day, but never worked up the courage/couldn’t afford the equipment to try color.
A chinese firm made their own system which I’m fairly confident was probably stm32 based – but I can’t find a link. Will update if I do.
Another non Chinese startup which looks like it’s actually going somewhere: https://www.popphoto.com/filmomat-autom … -microwave in my view it’s too form over function, and prone to cross contamination of the chemistry – particularly when the used chemistry is pumped back to storage. They have a facebook page with more detail. Also guessing this is Arduino/Stm/etc based.
so i stumbled into these web pages
A Beginner’s Guide to C-41 Developing at Home (It’s a Lot Easier Than you Think!) – Part One of Two
https://www.lomography.com/magazine/229 … -you-think
A Beginner’s Guide to C-41 Developing at Home (It’s a Lot Easier Than you Think!) – Part Two of Two
https://www.lomography.com/magazine/233 … two-of-two
the first part seemed somewhat ‘easier’ which involves working with an agitator/developing tanks. i’g guess it would still be possible to do this manually.
Tutorial: How to Print with a Photographic Enlarger
https://www.lomography.com/magazine/228 … c-enlarger
Printing RA4 Color Photos in a Darkroom
https://www.lomography.com/magazine/258 … a-darkroom
so as it turns out the second part after developing the film is the difficult part, making prints with an enlarger
for color prints it needs a darkroom and working in complete darkness
In the main people scan the film, colour correct, retouch, then have a ‘digital c-type’ print made – the beauty of this is that if you use careful colour management and soft proofing you can pretty much guarantee the print will look as you imagined it. It’s also considerably cheaper.
I have neither sense (at least, not of the common variety), nor money (who but an idiot buys a bunch of “spares or repair” dosimeters just for “fun” ![]() ), however I haven’t done any developing for probably the best part of fifteen years.
), however I haven’t done any developing for probably the best part of fifteen years.
Somewhere in the “archive” i.e. all the stored junk in the attic, there are some tanks, thermometers, chemical bottles etc., and no doubt a few well past their sell by date, undeveloped films. I may have to look in to this automation malarkey further.. possibly when the long dark winter days inevitably return.
[zoomx – Fri Aug 03, 2018 9:03 pm] –
When I used film I used most color slides and few color film. I didn’t imagine that it was possible to develop at home. Instead E6 for color slides was more difficult, I read this many years ago. I have about 10.000 color slides that, one day I will complete scan.
I just inherited 40 years of kodachrome slides that my grandfather shot – I’ve barely skimmed the surface but there are some real gems.
Anyhow, the machine is working again, I just developed 24 sheets of 5×4 and 3 rolls of 120 film.


