make all

Building file: ../testSTM32.cpp

Starting C++ compile

"D:/arduino-1.6.4-windows/arduino-1.6.4/hardware/tools/gcc-arm-none-eabi-4.8.3-2014q1/bin/arm-none-eabi-g++" -c -g -Os -DDEBUG_LEVEL=DEBUG_NONE -MMD -ffunction-sections -fdata-sections -nostdlib --param max-inline-insns-single=500 -fno-rtti -fno-exceptions -DBOARD_generic_stm32f103c -DVECT_TAB_ADDR=0x8000000 -DERROR_LED_PORT=GPIOB -DERROR_LED_PIN=1  -mcpu=cortex-m3 -DF_CPU=72000000L -DARDUINO=10604 -DARDUINO_GENERIC_STM32F103C -DARDUINO_ARCH_STM32F1     -DMCU_STM32F103CB  -mthumb  -march=armv7-m -D__STM32F1__  -DMCU_STM32F103CB  -mthumb  -march=armv7-m -D__STM32F1__  "-I/libmaple" "-I/libmaple/include" "-I/libmaple/stm32f1/include"                                                           "-I/libmaple/usb/stm32f1" "-I/libmaple/usb/usb_lib"    -I"D:\Documents\Arduino\hardware\Arduino_STM32\STM32F1\cores\maple" -I"D:\Documents\Arduino\hardware\Arduino_STM32\STM32F1\variants\generic_stm32f103c" -MMD -MP -MF"testSTM32.cpp.d" -MT"testSTM32.cpp.o" -D__IN_ECLIPSE__=1 -x c++ "../testSTM32.cpp"  -o  "testSTM32.cpp.o"   -Wall

In file included from D:\Documents\Arduino\hardware\Arduino_STM32\STM32F1\cores\maple/Arduino.h:30:0,

from ../testSTM32.cpp:39:

D:\Documents\Arduino\hardware\Arduino_STM32\STM32F1\cores\maple/wirish.h:51:28: fatal error: libmaple/stm32.h: No such file or directory

#include <libmaple/stm32.h>

^

compilation terminated.

make: *** [testSTM32.cpp.o] Error 1
I’m not familiar with Eclipse plugin, but there must be a variable, maybe “PLATFORM_PATH” or something similar that is not defined in you environment, so the compiler cannot concatenate proper INCLUDE path as see here :
"-I/libmaple" "-I/libmaple/include" "-I/libmaple/stm32f1/include" "-I/libmaple/usb/stm32f1" "-I/libmaple/usb/usb_lib"
Thanks for the response. However that didn’t do the job. There was an additional parameter needed so I hard coded that in the platform files. The mappings are correct, but maybe I am still missing a few paths
Kindest regards
Nico
Today I also was also very keen to use Jantje’s plugin under Eclipse (Mars.1 Release 4.5.1) on macosx for compiling to the Maple Mini target board using Arduino for STM32.
After installing the Jantje plugin, the first issue under Eclipse was that in usb_core.c, the compiler could not find the definitions for NULL. I had to add the following include at the top of this file:
#include <stddef.h>
There were various other compile errors for which I started to add additional include paths to the following sections based on the reported missing files:
Eclipse->Project->Properties->C/C++ Build->Tool Settings->Arduino C++ Compiler->Include Folders
Eclipse->Project->Properties->C/C++ Build->Tool Settings->Arduino C Compiler->Include Folders
I eventually added the following “Include Folders” to both the C++ and C compiler sections:
"${workspace_loc:/test_sketch/arduino/core}"

"${workspace_loc:/test_sketch/arduino/variant}"

/Applications/Arduino.app/Contents/Java/hardware/Arduino_STM32/STM32F1/system

/Applications/Arduino.app/Contents/Java/hardware/Arduino_STM32/STM32F1/cores/maple/libmaple

/Applications/Arduino.app/Contents/Java/hardware/Arduino_STM32/STM32F1/system/libmaple/stm32f1/include

/Applications/Arduino.app/Contents/Java/hardware/Arduino_STM32/STM32F1/system/libmaple/libmaple/stm32.h

/Applications/Arduino.app/Contents/Java/hardware/Arduino_STM32/STM32F1/system/libmaple

/Applications/Arduino.app/Contents/Java/hardware/Arduino_STM32/STM32F1/system/libmaple/usb/usb_lib

/Applications/Arduino.app/Contents/Java/hardware/Arduino_STM32/STM32F1/system/libmaple/usb/stm32f1
After my previous post I found that it is very useful in Eclipse to enable the method/function mappings for Arduino files by setting the following:
Eclipse->Preferences->C/C++->Filetypes->Add “*.ino” as “C++ Source File”.
Best Regards,
Martin T
Necessary were all these previous comments (thanks @electrozest!).
– set “*.ino” as C++ source file
– add an extra variable called “A.BUILD.COMPILER.PATH”, which in my case points to the compiler path used by Arduino 1.6.5:
C:/Users/[user]/AppData/Local/Arduino15/…
– 4 or 5 extra path entries for some not found headers, needed by the C++ compiler
– 2 extra path entries to enable assembly file compiling – these had to be included in the Arduino assembler call parameter list directly.
Additionally I am trying to upload and debug with STlink V2 (ali clone), is not working at the moment and this needs some additional effort.
I think we should put these infos on the wiki.
EDIT
I just realized that I was not using the Jentje’s plugin, but the Eclipse project Eclipse C++ IDE for Arduino from marketplace.
I tried enabling creation of wiki accounts by users, but got spam-botted with hundreds of fake users and pages, so I had to disable account creation again ![]()
I’ll create one now.
You will get some emails from the wiki, as I use MediaWiki and its not possible to disable these
You may need to validate your email address (I’ll go into the admin on the forum and grab the email address that you used to register here)
A few months ago I also wanted to use STlink V2 to upload to the Maple Mini via the jtag/swd pins and debug directly from Eclipse, but at the time did not work out how to do so.
I just had a look again and noticed that there is a build variable which selects the linker script. By default this is configured to bootloader_20.ld which I assume creates the binary .elf file with the addresses aligned for use by the bootloader via the USB upload method:
Project-Explorer -> Properties -> C/C++ Build -> Environment -> A.BUILD.LDSCRIPT = ld/bootloader_20.ld
I notice that the arduino/variant/ld directory contains the following possible linker script variants:
bootloader_20.ld
flash_c8.ld
jtag_c8.ld
ram_c8.ld
flash.ld
jtag.ld
ram.ld
I assume to use the ST Link v2, before compiling, you need to switch the selected linker script in Eclipse by changing the A.BUILD.LDSCRIPT variable possibly to one of the jtag ones? Some of these linker options might possibly create a binary .elf which directly overwrites the bootloader?
Regards,
Martin T
Of course, USB serial stops working during debugging, but i think one have to live with it.
I think i say farewell to Arduino IDE…
Next step is to write a wiki topic regarding this setup, unless someone else wants to write more professionally…
Re: USB Serial
You are probably better off using an external USB to serial adaptor.
If you use a Blackmagic probe this performs as both the SWD and the USB to Serial.
You just need to connect to USART1 PA9,PA10
You just need to connect to USART1 PA9,PA10
Or I just didn’t search at the right place?
EDIT
OK, I found this thread, I have to go through 22 pages…
I think Rick uses the BMP but I”m not sure if he uses it with Eclipse. I guess its best to ask him
I tried today and found following issues:
– standard Arduino core: the gcc compiler toolchain have not been automatically installed
– don’t know how to install the stm32duino core
I also tried version v2 but that requires an Arduino installation <=1.6.5, mine is 1.6.11
(I’m using Neon.1 (v4.6.1))
Thanks and bye, E.
Also, the link I attached (Eclipse marketplace plugin) points to V2, which I consider safe.
I am not sure whether it is very strict regarding the Arduino version, I have both 1.6.9 and 1.6.5 installed (extracted portable directories), and I pointed to 1.6.5 for the Eclipse plugin, but I am normally using the 1.6.9 with Arduino IDE.
[…] I have both 1.6.9 and 1.6.5 installed (extracted portable directories), and I pointed to 1.6.5 for the Eclipse plugin, but I am normally using the 1.6.9 with Arduino IDE.
http://wiki.stm32duino.com/index.php?ti … th_Eclipse
Any comment/suggestion is welcome.
$ arm-none-eabi-g++ … all regular args, then … -include “Arduino.h”
This flag allows you to use .ino files without modification. I’m not sure how that would interact with the Arduino plugin as I haven’t tried it.
From https://gcc.gnu.org/onlinedocs/gcc/Prep … or-Options
-include file
Process file as if #include “file” appeared as the first line of the primary source file. However, the first directory searched for file is the preprocessor’s working directory instead of the directory containing the main source file. If not found there, it is searched for in the remainder of the #include “…” search chain as normal.
If multiple -include options are given, the files are included in the order they appear on the command line.
-rick
I can select Maple Mini and try with a simple sketch.
#include "Arduino.h"
//The setup function is called once at startup of the sketch

void setup()

{

// Add your initialization code here

Serial.begin(9600);

}
// The loop function is called in an endless loop

void loop()

{

//Add your repeated code here

Serial.println("Hello World");

}
In subdir.mk:
# Each subdirectory must supply rules for building sources it contributes

.ino.cpp.o: ../.ino.cpp

@echo 'Building file: $<'

@echo 'Starting C++ compile'

"/bin/arm-none-eabi-g++" -c -g -Os -Wall....  ..   ...o=%.d)" -MT"$@" -D__IN_ECLIPSE__=1 -x c++ "$<"  -o  "$@"

@echo 'Finished building: $<'

@echo ' 'In subdir.mk:
# Each subdirectory must supply rules for building sources it contributes

.ino.cpp.o: ../.ino.cpp

@echo 'Building file: $<'

@echo 'Starting C++ compile'

"/bin/arm-none-eabi-g++" -c -g -Os -Wall....  ..   ...o=%.d)" -MT"$@" -D__IN_ECLIPSE__=1 -x c++ "$<"  -o  "$@"

@echo 'Finished building: $<'

@echo ' 'http://www.stm32duino.com/viewtopic.php?f=41&t=1790
so I have installed the SAM M3 compiler via Sloeber’s manager and removed the links to my original eabi I set somewhere in Eclipse (and pointing to /arduino15/.. M3 toolchain used with Arduino IDE). So it seems unless you install eabi within Sloeber you get “/bin/arm-none-eabi-g++” only..
17:37:43 **** Incremental Build of configuration Release for project Test1 ****

"C:\\PrgFiles\\sloeber\\arduinoPlugin\\tools\\make\\make" all

'Building file: ../.ino.cpp'

'Starting C++ compile'

"C:\PrgFiles\sloeber\/arduinoPlugin/packages/arduino/tools/arm-none-eabi-gcc/4.8.3-2014q1/bin/arm-none-eabi-g++" -c -g -Os ....... -x c++ "../.ino.cpp"  -o  ".ino.cpp.o"

'Finished building: ../.ino.cpp'

' '
Starting upload

using arduino loader

Starting reset using DTR toggle process

Toggling DTR

Continuing to use COM14

Ending reset
LaunchingC:/Users/pito/MyCode/Arduino/hardware/Arduino_STM32SerBuff/tools/win/maple_upload.bat COM14 2 1EAF:0003 C:\Users\pito\MyCode\Sloeber\Test1/Release/Test1.bin

Output:

maple_loader v0.1

Resetting to bootloader via DTR pulse

Searching for DFU device [1EAF:0003]...

Found it!
Opening USB Device 0x1eaf:0x0003...

Found Runtime: [0x1eaf:0x0003] devnum=1, cfg=0, intf=0, alt=2, name="STM32duino bootloader v1.0  Upload to Flash 0x8002000"

Setting Configuration 1...

Claiming USB DFU Interface...

Setting Alternate Setting ...

Determining device status: state = dfuIDLE, status = 0

dfuIDLE, continuing

Transfer Size = 0x0400

bytes_per_hash=256

Starting download: [##################################################] finished!

state(8) = dfuMANIFEST-WAIT-RESET, status(0) = No error condition is present

Done!

Resetting USB to switch back to runtime mode

C:/Users/pito/MyCode/Arduino/hardware/Arduino_STM32SerBuff/tools/win/maple_upload.bat finished

upload done
19:16:59 **** Clean-only build of configuration Release for project Test1 ****

"C:\\PrgFiles\\sloeber\\arduinoPlugin\\tools\\make\\make" clean

del   .\core\start_c.c.d .\core\syscalls.c.d  .\core\util_hooks.c.d  .\core\usb_core.c.d ......... .\core\wirish_shift.cpp.d .\core\wirish_time.cpp.d

Invalid switch - "Users".

makefile:100: recipe for target 'clean' failed

make: [clean] Error 1 (ignored)

' '
19:16:59 Build Finished (took 120ms)
Cannot complete the install because of a conflicting dependency.

Software being installed: GNU ARM C/C++ J-Link Debugging 4.1.3.201702251311 (ilg.gnuarmeclipse.debug.gdbjtag.jlink.feature.group 4.1.3.201702251311)

Software currently installed: Sloeber, the Eclipse Arduino IDE 4.0.0.201701171403 (io.sloeber.product 4.0.0.201701171403)

Only one of the following can be installed at once: 19:16:59 **** Clean-only build of configuration Release for project Test1 ****
"C:\\PrgFiles\\sloeber\\arduinoPlugin\\tools\\make\\make" clean
del .\core\start_c.c.d .\core\syscalls.c.d .\core\util_hooks.c.d .\core\usb_core.c.d ......... .\core\wirish_shift.cpp.d .\core\wirish_time.cpp.d
Invalid switch - "Users".
makefile:100: recipe for target 'clean' failed
make: [clean] Error 1 (ignored)
' '
19:16:59 Build Finished (took 120ms)
file_x86="./io.sloeber.product/target/products/io.sloeber.product/linux/gtk/x86/opt/sloeber/sloeber-ide"

file_x86_64="./io.sloeber.product/target/products/io.sloeber.product/linux/gtk/x86_64/sloeber/sloeber-ide"

#file_x86_64="./io.sloeber.product/target/products/io.sloeber.product/linux/gtk/x86_64/opt/sloeber/sloeber-ide"

file=""
Yes, it asks for donation with a big banner screen from time to time. To get rid of that you have to donate $5 a month..
There is the j-link plugin available from the repo, but I cannot install it (not only that plugin) because of some dependencies mess. Most of the issues I found are already discussed on the github, the j-link one too, but no fix it works here.. A pity as otherwise I would not install 1GB+ just to get a better editor..
https://oss.sonatype.org/content/reposi … -SNAPSHOT/
The Sloeber installs (Win7 64b here) the j-link plugin then.
PS: a guide for example:
http://gnuarmeclipse.github.io/debug/jlink/
After entering the eclipse’s debug mode and starting to debug the jlink loads itself, starts, connects, but hangs in various ways based on debug settings. The sketch compiles, it starts the jlink control panel apps (you can open it from task bar – show hidden icons), jlink is alive and connected to target, waiting on something, it does not upload the binary into the target..
For Example (Hello World, compiled for none-bootloader with chip erased, MMini):
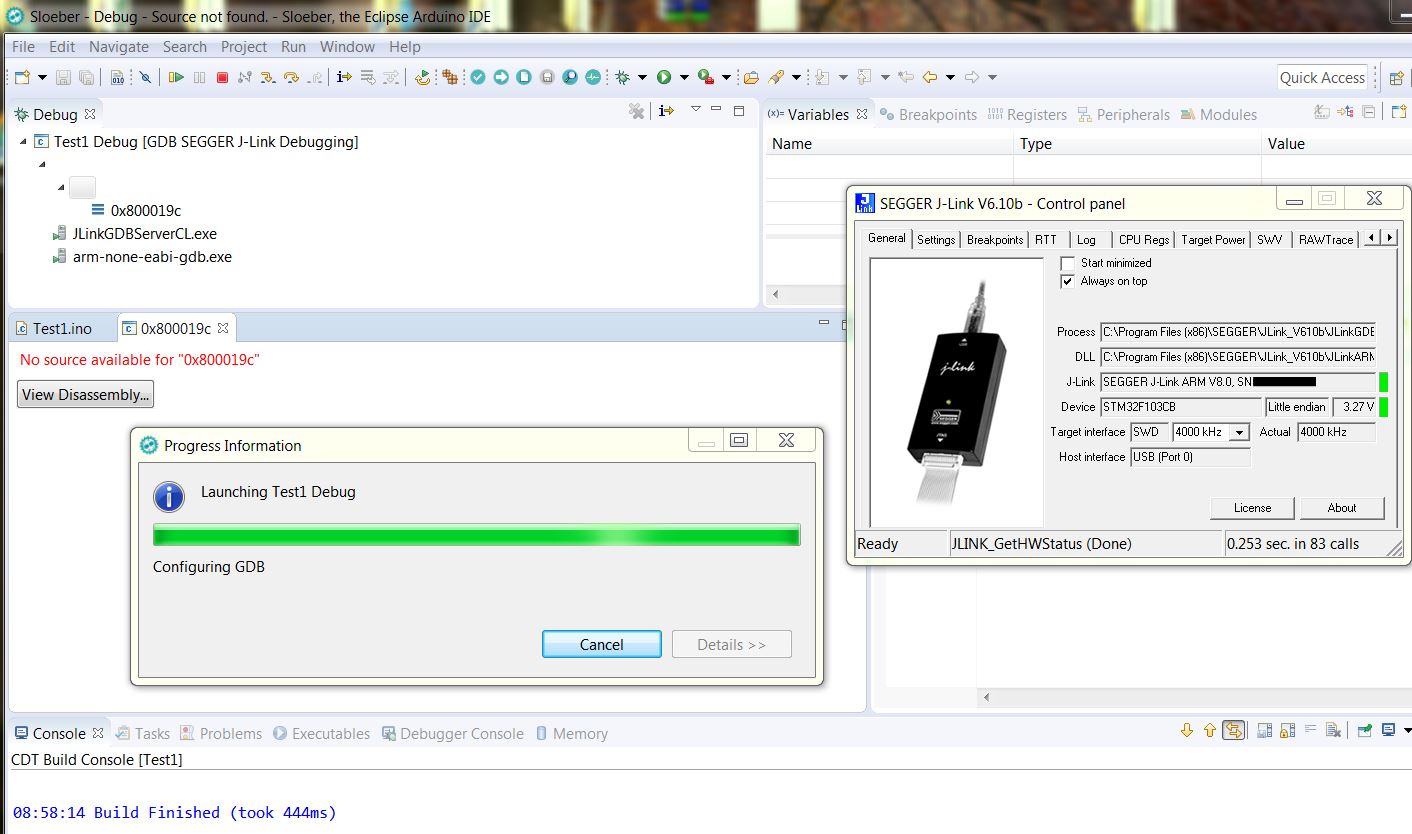
- Sloeber V4 nighty snd Segger Jlink issue.JPG (161.26 KiB) Viewed 724 times
It seems there is an issue while starting both Jlink-GDB-server and GNU GDB from the plugin..
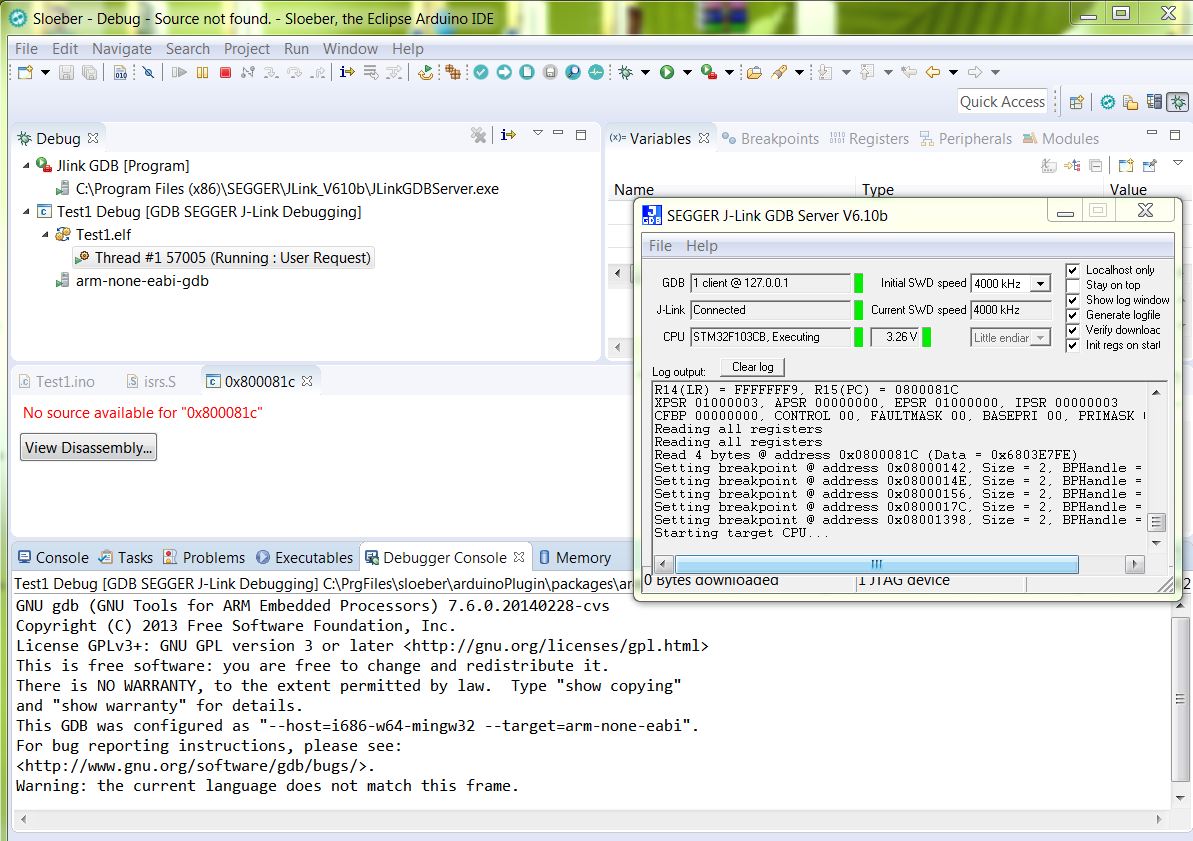
- jlink and gdb issues 2.JPG (218.01 KiB) Viewed 694 times
Currently messing with __libc_init_array() issue
While stepping through the setup_c.c (compiled for bare metal, 103CB) I get a crash when executing
    /* Run initializers. */

__libc_init_array();
I’ll probably setup Jlink first to work with GNU Arm Eclipse plugins and then try Arduino IDE plugin. Just for the reference. I wonder if Does Ozone works with J-Link EDU ? It seems like a nice IDE for debugging but not sure if it offers anything more that Eclipse IDE.
I read that GNU Arm Eclipse J-Link plugin is re-written and it uses plugin model instead of GDB Hardware Debugging plug-in. Here’s more info http://gnuarmeclipse.github.io/debug/jlink/. Does Arduino IDE plugin use this plugin system ?
The Ozone worked with my Jlink and ZET6.
The Ozone works with the basic jlink so it will with EDU, I guess (victor uses it).
The __libc_init_array() issue above – the compiled and Jflashed bare metal code works on MapleM, but while debugging I get the sigtrap.
When I comment out the __libc_init_array() the debugger steps fine through main() into the sketch, however I get sigtrap at Serial.begin() as the libc has not been init.
@victor: could you try with EDU?
PS:
My current experience with the Sloeber and Jlink plugin:
=======================================================================
0. Prerequisites: Jlink debugger (any black or gray box ![]() ) and Segger’s Jlink sw pack installed and working with your hw fine (!)
) and Segger’s Jlink sw pack installed and working with your hw fine (!)
https://www.segger.com/downloads/jlink
J-Flash works identically as the ST-Link utility, so you may verify..
This is the front view at the Jlink box.
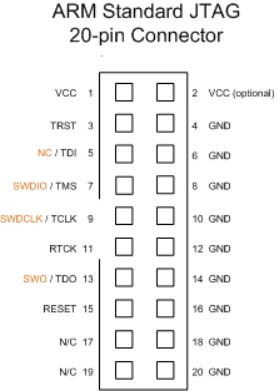
- Jlink header.JPG (22.89 KiB) Viewed 815 times
The Ozone worked with my Jlink and ZET6.
The Ozone works with the basic jlink so it will with EDU, I guess (victor uses it).
The __libc_init_array() issue above – the compiled and Jflashed bare metal code works on MapleM, but while debugging I get the sigtrap.
When I comment out the __libc_init_array() the debugger steps fine through main() into the sketch, however I get sigtrap at Serial.begin() as the libc has not been init.
@victor: could you try with EDU?
PS:
My current experience with the Sloeber and Jlink plugin:
=======================================================================
0. Prerequisites: Jlink debugger (any black or gray box ![]() ) and Segger’s Jlink sw pack installed and working with your hw fine (!)
) and Segger’s Jlink sw pack installed and working with your hw fine (!)
https://www.segger.com/downloads/jlink
J-Flash works identically as the ST-Link utility, so you may verify..
This is the front view at the Jlink box.
Jlink header.JPG
Except the SWDIO and SWDCLK and GND you must connect VCC(1) to 3.3V (it does not power the chip but detects the chip’s voltage only)!
Your board must be powered.
I connected the RESET(15) too..
1. Install the latest Sloeber IDE from:
https://oss.sonatype.org/content/reposi … -SNAPSHOT/
2. Update Sloeber and install Segger’s Jlink plugin, GNU GDB and Packs support plugin (and others..) via “Install new software” into the Sloeber from:
http://eclipse.baeyens.it/update/V4/nightly
3. Install Packages for STM32F103 (or others when needed):
http://gnuarmeclipse.github.io/plugins/packs-manager/
4. Configure the project and debug environment (select STM32F103 in Setting>Devices):
http://gnuarmeclipse.github.io/debug/jlink/
Note: the guide tells you you have to start JLinkGDBServerCL.exe, here it works with JLinkGDBServer.exe
5. Here I have to start the jlink gdb server manually as External tool first (add the “Jlink GDB Server” into “External tools configuration”). When the Jlink GDB Server apps starts, just click ok. Only after that I click on my debug_project under the Bug Icon.. (what is the trick to get it running according to the books??).
The “Start Jlink GDB server locally” is disabled here (Debug configuration).
6. When the package for stm32f103 is installed in Sloeber you may mess with peripherals as the package includes the F103 .SVD file with registers’ and peripheral’s defs for you:
http://gnuarmeclipse.github.io/debug/pe … registers/
Outstanding issues:
==============================================
1. How to start the Jlink GDB server and then the GNU GDB from the debug session
2. Why __lib_init_array() shoots the sigint
..Sloeber4 Jlink GDB.jpg
The call to __libc_init_array() is called from start_c.c and called before main(). How it could be related to your I2S code?
The call to __libc_init_array() is called from start_c.c and called before main(). How it could be related to your I2S code?
My code is a “Hello World” with Serial.begin(), Serial.println(). So most probably there is in the arduino libs..
int i = 0;

void setup()

{ i = 100000;}

void loop()

{ i++; }I checked my latest i2s library, and I still left in the constructor the part that assigns a variable the value of “*this”, and I can’t find a very initial version of the code when it crashed, so I dont remember what else was that I had to take out of the constructor.
Now what you are describing as crashing is way simpler than my code, I don’t see how that would have to crash unless it’s something else altogether in your case. Are you using the 4.8.3 compiler?
The Sloeber is as-is and using the same compiler as we use (compiled for bare metal F103CB):
12:05:04 **** Incremental Build of configuration Debug for project Test3 ****

"C:\\PrgFiles\\sloeber\\arduinoPlugin\\tools\\make\\make" all

'Building file: ..\.ino.cpp'

'Starting C++ compile'

"C:\PrgFiles\sloeber\/arduinoPlugin/packages/arduino/tools/arm-none-eabi-gcc/4.8.3-2014q1/bin/arm-none-eabi-g++" -c -g -Os -Wall -Wextra -DDEBUG_LEVEL=DEBUG_ALL -ffunction-sections -fdata-sections -nostdlib --param max-inline-insns-single=500 -fno-rtti -fno-exceptions -DBOARD_generic_stm32f103c -DVECT_TAB_ADDR=0x8000000 -DERROR_LED_PORT=GPIOB -DERROR_LED_PIN=1 -mcpu=cortex-m3 -DF_CPU=72000000L -DARDUINO=10609 -DARDUINO_GENERIC_STM32F103C -DARDUINO_ARCH_STM32F1  -DMCU_STM32F103CB -mthumb -march=armv7-m -D__STM32F1__ -DMCU_STM32F103CB -mthumb -march=armv7-m -D__STM32F1__ "-IC:/Users/pito/MyCode/Arduino/hardware/Arduino_STM32SerBuff/STM32F1/system/libmaple" "-IC:/Users/pito/MyCode/Arduino/hardware/Arduino_STM32SerBuff/STM32F1/system/libmaple/include" "-IC:/Users/pito/MyCode/Arduino/hardware/Arduino_STM32SerBuff/STM32F1/system/libmaple/stm32f1/include"                              "-IC:/Users/pito/MyCode/Arduino/hardware/Arduino_STM32SerBuff/STM32F1/system/libmaple/usb/stm32f1" "-IC:/Users/pito/MyCode/Arduino/hardware/Arduino_STM32SerBuff/STM32F1/system/libmaple/usb/usb_lib"  -I"C:\Users\pito\MyCode\Arduino\hardware\Arduino_STM32SerBuff\STM32F1\cores\maple" -I"C:\Users\pito\MyCode\Arduino\hardware\Arduino_STM32SerBuff\STM32F1\variants\generic_stm32f103c" -MMD -MP -MF".ino.cpp.d" -MT".ino.cpp.o" -D__IN_ECLIPSE__=1 -x c++ "..\.ino.cpp"  -o  ".ino.cpp.o"

'Finished building: ..\.ino.cpp'

' '

'Starting combiner'

"C:\PrgFiles\sloeber\/arduinoPlugin/packages/arduino/tools/arm-none-eabi-gcc/4.8.3-2014q1/bin/arm-none-eabi-g++" -Os -Wl,--gc-sections -mcpu=cortex-m3 "-TC:/Users/pito/MyCode/Arduino/hardware/Arduino_STM32SerBuff/STM32F1/variants/generic_stm32f103c/ld/jtag.ld" "-Wl,-Map,C:\Users\pito\MyCode\Sloeber\Test3/Debug/Test3.map" "-LC:/Users/pito/MyCode/Arduino/hardware/Arduino_STM32SerBuff/STM32F1/variants/generic_stm32f103c/ld" -o "C:\Users\pito\MyCode\Sloeber\Test3/Debug/Test3.elf" "-LC:\Users\pito\MyCode\Sloeber\Test3/Debug" -lm -lgcc -mthumb -Wl,--cref -Wl,--check-sections -Wl,--gc-sections -Wl,--unresolved-symbols=report-all -Wl,--warn-common -Wl,--warn-section-align -Wl,--warn-unresolved-symbols -Wl,--start-group    .\.ino.cpp.o   C:\Users\pito\MyCode\Sloeber\Test3\Debug\arduino.ar    C:/Users/pito/MyCode/Sloeber/Test3/Debug/arduino.ar  -Wl,--end-group

'Finished building: Test3.elf'

' '

'Create eeprom image'

"C:\PrgFiles\sloeber\/arduinoPlugin/packages/arduino/tools/arm-none-eabi-gcc/4.8.3-2014q1/bin/arm-none-eabi-objcopy" -O binary  "C:/Users/pito/MyCode/Sloeber/Test3/Debug/Test3.elf" "C:/Users/pito/MyCode/Sloeber/Test3/Debug/Test3.bin"

'Finished building: Test3.hex'

' '

'Building target: Test3'

'Printing size:'

"C:\PrgFiles\sloeber\/arduinoPlugin/packages/arduino/tools/arm-none-eabi-gcc/4.8.3-2014q1/bin/arm-none-eabi-size" -A "C:/Users/pito/MyCode/Sloeber/Test3/Debug/Test3.elf"

C:/Users/pito/MyCode/Sloeber/Test3/Debug/Test3.elf  :

section             size        addr

.text               8116   134217728

.text.align            4   134225844

.ARM.exidx             8   134225848

.data               1896   536870912

.rodata              852   134227752

.bss                 272   536872808

.debug_aranges      2824           0

.debug_info        83737           0

.debug_abbrev      16854           0

.debug_line        27463           0

.debug_frame        6620           0

.debug_str         23558           0

.debug_loc         25777           0

.ARM.attributes       41           0

.debug_ranges       4544           0

.comment             112           0

Total             202678
'Finished building target: Test3'

' '
12:05:04 Build Finished (took 821ms)
While set breakpoint at the __libc_init_array() at its memory start location I stepped through it and after a while
void boardInit(void) {

#ifndef CONFIG_MAPLE_MINI_NO_DISABLE_DEBUG

disableDebugPorts();

#endif

}

....

void disableDebugPorts(void) {

afio_cfg_debug_ports(AFIO_DEBUG_NONE);

}

....

/**

* @brief Enable or disable the JTAG and SW debug ports.

* @param config Desired debug port configuration

* @see afio_debug_cfg

*/

static inline void afio_cfg_debug_ports(afio_debug_cfg config) {

__io uint32 *mapr = &AFIO_BASE->MAPR;

*mapr = (*mapr & ~AFIO_MAPR_SWJ_CFG) | config;      <<<<<<<<<<< HERE ##########

}Although it should work since SWD debug is not disabled for serial upload. Maybe the define is not working somehow…
The flag differs a little bit in your link (Serial vs STlink) for example:
genericSTM32F103C.menu.upload_method.serialMethod=Serial

genericSTM32F103C.menu.upload_method.serialMethod.upload.protocol=maple_serial

genericSTM32F103C.menu.upload_method.serialMethod.upload.tool=serial_upload

genericSTM32F103C.menu.upload_method.serialMethod.build.upload_flags=-DCONFIG_MAPLE_MINI_NO_DISABLE_DEBUG
genericSTM32F103C.menu.upload_method.STLinkMethod=STLink

genericSTM32F103C.menu.upload_method.STLinkMethod.upload.protocol=STLink

genericSTM32F103C.menu.upload_method.STLinkMethod.upload.tool=stlink_upload

genericSTM32F103C.menu.upload_method.STLinkMethod.build.upload_flags=-DCONFIG_MAPLE_MINI_NO_DISABLE_DEBUG=1 -DSERIAL_USB -DGENERIC_BOOTLOADER
Hm.
Maybe you should just add “=1” to the end of line 210 in boards.txt, to achieve this:
genericSTM32F103C.menu.upload_method.serialMethod.build.upload_flags=-DCONFIG_MAPLE_MINI_NO_DISABLE_DEBUG=1First, in my boards config (older version?) the line with the flag was missing in Serial method. I added the line. The inclusion of the change is not easy, however..
There is an issue with cleaning the working folder via Project > Clean (sometimes it does not clean so it does not rebuild), so it must be done manually (in Sloeber). The Sloaber takes over the new flag settings from boards when the folder is cleaned and then you select the Serial method in Project > Properties > Arduino > Serial > Apply > Ok.
Then when you go into Debug it rebuilds the entire code stuff, and then debug works. Currently with ..DEBUG=1.
Now, it shows an “error” bug icon (but it compiles and debugs fine)
The type 'HardwareSerial' must implement the inherited pure virtual method 'Print::write'
So the outstanding issues so far:
1. how to start the Jlink GDB server form the “debug” directly (currently I have to start it as the external tool)
Cleaning the project – it seems it works provided there is none process locking it (not an issue).
I like the speed of the upload via Jlink after a new build – a small fraction of a second with ~15k bin .. ![]()
i’m currently setting up my tool chains, unfortunately when i tried to setup Sloeber http://eclipse.baeyens.it/
my eclipse environment could be too old and it is mixed up with too many other plugins etc, things are broken with various errors, unable to create a new sketch etc. eventually i restored eclipse from a backup,
i’m using gnu arm eclipse, gnu arm eclipse (http://gnuarmeclipse.github.io/) seemed to have some integration with jlink as well as openocd
unfortunately gnu arm eclipse
1) is not really setup for arduino, it has various templates based on st standard peripherals library and HAL)
2) seemed to be dependent on the recent gcc arm none abi from arm itself, rather than that distributed with arduino ide http://www.stm32duino.com/viewtopic.php?f=16&t=1952. the gcc arm none is apparently a rather ‘old’ version (4.8.3-2014q1) compared to that currently available from arm gcc-arm-none-eabi-6-2017-q1-update (https://developer.arm.com/open-source/g … /downloads).
there is apparently a new development from eclipse, eclipse is apparently integrating Arduino into the CDT
https://marketplace.eclipse.org/content … de-arduino
this is apparently targeted at the platforms for Oxygen (4.7), Neon (4.6) (‘unfortunately’ for myself it means upgrading)
but i think this is worth checking out
my guess is that if doing debug separately works well sufficiently, you may like to stay that way
when i tried to setup gnu arm eclipse with open ocd debugging recently, i noted that it overwrites the bootloader in stm32f103
this is despite after offsetting for the bootloader
https://www.element14.com/community/thr … ion-offset
this would probably mean that for the time being i’m better off doing openocd and gdb separately
i’m not too sure if there is a way for me to start openocd and have eclipse connect saparetely to it for gdb, would need to figure that out
i’m thinking part of the ‘magic’ of launching debug directly from eclipse is after all in the plugin itself, i.e. if one is willing to patch those codes, you may literally have the functionality
Within the Sloeber you set the configuration for “Jlink GDB Server” and “GDB client” (GDB client connects to Jlink GDB Server).
Jlink GDB Server comes from Segger. GDB client is the arm-none-eabi-gdb. The integration inside the Sloeber is done via installing plugins and it is done almost automatically.
When you want to start a project debug session inside Sloeber, by clicking on your project debug item (green bug icon) it shall start those two components in following order:
a) Jlink GDB Server first, and then
b) GDB client which connects itself to Jlink GDB Server and the debug session starts fine.
But, here it always starts:
a) GDB client first, and then
b) Jlink GDB Server, which results in a timeout of both, with an error message.
The workaround here is to start the Jlink GDB Server first via “External Tools icon” (within Sloeber), and then start the debugging of the project (green bug icon)..
The original guide http://gnuarmeclipse.github.io/debug/jl … ug-session says:
.. after a few seconds required to start the server [jlink server], to allow it to connect to the target, start the gdb client, download the application and start the debugging session, you should see something like this..
Maybe I miss something with settings, but it never started that way here automatically..
It seems it is a bug.. We will see.
—
OT:
and oh i ran into a different problem (not with Sloeber, but rather with gnu arm gcc itself)
in my eclipse setup i’m using the recent gnu-arm-none-eabi v6-2017-q1-update Released: February 23, 2017 (https://developer.arm.com/open-source/g … /downloads) the current release as of this post
when i hook up openocd and jtag, the ‘sketch’ (not arduino, rather it is a blinky template based on ST HAL), the sketch install fine (at 0x08000000) and runs ok with this setup. however, if i install the binary (bin) file via dfu-util, it stops working. note that with dfu-util , the maple bootloader loads the sketch at 0x08005000 offsetting for the boot loader)
then i patched up the ldscripts -> mem.ld script
/*

* Memory Spaces Definitions.

*

* Need modifying for a specific board.

*   FLASH.ORIGIN: starting address of flash

*   FLASH.LENGTH: length of flash

*   RAM.ORIGIN: starting address of RAM bank 0

*   RAM.LENGTH: length of RAM bank 0

*

* The values below can be addressed in further linker scripts

* using functions like 'ORIGIN(RAM)' or 'LENGTH(RAM)'.

*/
MEMORY
{
RAM (xrw) : ORIGIN = 0x20000000, LENGTH = 20K
CCMRAM (xrw) : ORIGIN = 0x00000000, LENGTH = 0
FLASH (rx) : ORIGIN = 0x08005000, LENGTH = 123K
FLASHB1 (rx) : ORIGIN = 0x00000000, LENGTH = 0
EXTMEMB0 (rx) : ORIGIN = 0x00000000, LENGTH = 0
EXTMEMB1 (rx) : ORIGIN = 0x00000000, LENGTH = 0
EXTMEMB2 (rx) : ORIGIN = 0x00000000, LENGTH = 0
EXTMEMB3 (rx) : ORIGIN = 0x00000000, LENGTH = 0
MEMORY_ARRAY (xrw) : ORIGIN = 0x00000000, LENGTH = 0
}
@Pito, so you are doing the uploads with the J-link or Stlink?
@victor: I do everything in this thread with Sloeber V4 (nightly build), and updates and plugins from V4/nightly, and the Jlink Segger hw cheapest.
I do not work with STlink hw here..
Look at my above “guide” viewtopic.php?f=41&t=655&start=40#p25805
If you might take your Jlink EDU, remove the dust from it ![]() and connect to, you could help with improving our operational excellence
and connect to, you could help with improving our operational excellence ![]()
As you work with Ozone already (assuming you have the Segger’s Jlink sw suite installed already), all you need is to install the gnu arm Jlink gdb plugin into the Sloeber from V4/nightly, double check the paths set in Debug configurations, install Packs plugin from V4/nightly (it includes the F103 .SVD files) and try.. All issues I’ve found while starting with it are described in this thread.. More issues to be discovered..
PS: if you have Sloeber V3 installed try with it. Based on the info at arm gnu eclipse forum the functionality depends on component’s versions installed ![]() . They indicate some issues with Neon.
. They indicate some issues with Neon.
PPS: so far the peripheral registers view works, I can see changes in USART1 regs bits while stepping via Serial.
What I do not see are variables in “Variables” view (empty) and no idea how to watch them there. What works is watching the selected variables via “Expressions” view.
in the current setup openocd with gnu arm eclipse works quite well. after the initial setup, the somewhat hard part is initially selecting or setting up the openocd launch scripts, once done things ‘just works’
i’ve no issues launching debug directly from eclipse and doing debug, just that for now doing it this way seem to overwrite the maple or stm32duino bootloader. hence download / backup the first 20k from flash to a file just in case
open ocd can in turn connect via j-link segger (select the appropriate launch scripts)
http://openocd.org/doc/html/Debug-Adapter-Hardware.html
if Sloeber works with Openocd as well, my guess is that it may be possible to setup that instead and this may solve the issue and you may be able to directly launch debug from within eclipse
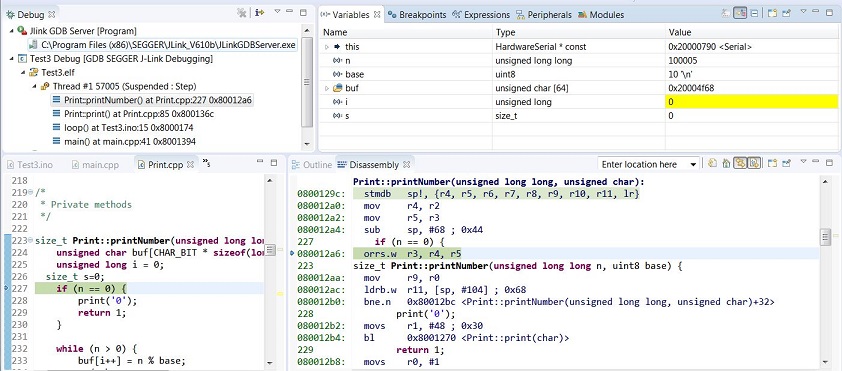
- var1.JPG (125.01 KiB) Viewed 353 times
In my case, the pointer always jumps two instructions at once instead of one…

- Stepping.JPG (9.79 KiB) Viewed 462 times
What can be the problem?
in this case the instruction hops from the previous movs to the next
there are other cases it seemed gcc is too ‘smart’ and optimise away some codes and debug skips the c instructions altogether if it isn’t referenced
found a web about gdb it seemed stepi command may do that, but i’m not sure how to do that in eclipse
http://mohit.io/blog/gdb-assembly-langu … gging-101/
FYI – a lot of interesting stuff for hobby users of Eclipse IDE and arm (and much more):
https://mcuoneclipse.com/compendium/#Eclipse%20IDE
for me at least that has to be the understatement of 2017 so far ![]()
can you overdose on eclipse?
stephen
C:/Users/pito/MyCode/Sloeber/Blink/Release/Blink.elf  :

section             size        addr

.text               8648   134217728

.ARM.exidx             8   134226376

.data               1896   536870912

.rodata             1516   134228280

.bss                 264   536872808

.debug_aranges      2896           0

.debug_info        88779           0

.debug_abbrev      17731           0

.debug_line        29199           0

.debug_frame        6720           0

.debug_str         23839           0

.debug_loc         26250           0

.ARM.attributes       41           0

.debug_ranges       4680           0

.comment             112           0

Total             212579
'Finished building target: Blink'
fixed: original fat blinky
arm-none-eabi-objcopy -O binary "STM32F103duino-blinky.elf"  "STM32F103duino-blinky.bin"

Finished building: STM32F103duino-blinky.bin
Invoking: Cross ARM GNU Print Size
arm-none-eabi-size --format=berkeley "STM32F103duino-blinky.elf"
text data bss dec hex filename
50788 1200 1016 53004 cf0c STM32F103duino-blinky.elf
Pito: are you using commandline GDB or the GUI version ? I tried the GUI but it did not work automatically. With commandline version it connects okay.
I am not 100% sure but it seems this plugin does not upload the binary in target.
EDIT: What compile flags are the best for debugging ? I’m getting quite a log of ‘optimized out’ texts in Eclipse.

It uploads the bin to the target here and it runs/debugs it (bare metal, no bootloader).
Mind you need more than 2 SWD wires with Jlink – see my above guide with Jtag connector pins used. Try with JFlash first..
-g flag does the debug here.
Device name should be “STM32F103CB” with MapleM.
You need Packs with STM32F103CB installed to see peripherals in debug (see my above guide).
Today I messed with the bootloader version – it does not work yet here.. The code start set to 0x8002000 here (in the Debug configuration -> Source). It compiles from 8002000 (doublechecked in elf) but upon the upload to target it overwrites the bootloader and the stuff is dead. So it seems it always uploads to 8000000 ![]()
https://www.element14.com/community/thr … ion-offset
apparently, there are 2 steps:
1) the ld script needs to have the start of flash offset set e.g.0x8005000 (this is mostly done, but be sure the correct ld script is used)
2) then in the case of gnu-arm-eclipse, on the startup page i need to set the executable offset similarly
an alternative way in which i tested which works as well is that i installed the binary on the board first, then in the case of gnu arm eclipse i uncheck “load executable”
i’d suggest doing it the ‘command line’ way is not too bad after all, in linux i used a script to launch openocd. then in gnu-arm-eclipse i uncheck the option to start openocd but leave gdb part intact. in that way it gnu-arm-eclipse is able to connect the debug to the openocd session that i launched separately. but there are cases doing it this way didn’t seem to halt the mcu, i’m still testing this out. i’d think it could help in the segger jlink case as well
I installed GNU Arm eclipse plugin package manually because update site gave errors.
Ozone works very well and seems to be a feature-rich debugger.
however gnuarmeclipse install page says neon.3 is the latest tested.
does anyone know if eclipse with gnuarmeclipse, sloeber, ac6 systemworkbench etc have problems co-existing ?
i usually get mutterings about workspace being written with a different version, also something on missing resources (ac6).
all seem to have dot-eclipse and dot-p2 hidden directories as well.
stephen
<EDIT>
discovered that oxygen and gnuarmeclipse has a problem. the f407 project blinky fails to compile with 7 erros time.sleep argument issue.
unpacked the neon.3 and imported the above project, clean compile
different eclipse same gnuarmeclipse
</EDIT>
Now, Neon 3 looks much more stable, I had no issues so far (using it like michael_I with PlatformIO). Debugging is also stable.
I’m in love again ![]()
i’d list my eclipse skills as nursery-kindergarten
stephen
1) the ld script needs to have the start of flash offset set e.g.0x8005000 (this is mostly done, but be sure the correct ld script is used)
2) then in the case of gnu-arm-eclipse, on the startup page i need to set the executable offset similarly
yup 0x8002000 if it is for stm32duino bootloader, 0x8005000 if it is for (old) maple bootloader (some of those boards on ebay pretty much shipped the stock maple bootloader)
yup it would be 108k with the stock maple bootloader and 120k with stm32duino bootloader, the stm32duino bootloader is really good, small and high performance
the ld scripts are part of the variants in each variant of Arduino_STM32/STM32F1/variants
https://github.com/rogerclarkmelbourne/ … 1/variants
i.e. the stm32duino arduino implementation itself not the ide
It seems to me the eabi-gdb gives a command to the jlink to flash from 8000000 even it should be from 8002000 for the bootloader variant.
PS: I’ve done following experiment in Sloeber:
1. I compile Blink with MMini Bootloader20 profile (compiles from 8002000) and flash it via Jflash. Bootloader stops working. The blink does not blink.
2. I flash the bootloader via Jflash from 8000000. The Bootloader lives and blink blinks.
So what went wrong here?
EDIT: ELF shows start address for VMA (virtual memory address) and LMA (load memory address) 0x8002000
c:.pioenvs\genericSTM32F103CB\firmware.elf

architecture: arm, flags 0x00000112:

EXEC_P, HAS_SYMS, D_PAGED

start address 0x08007b4d
Program Header:
0x70000001 off 0x00016288 vaddr 0x08016288 paddr 0x08016288 align 2**2
filesz 0x00000008 memsz 0x00000008 flags r--
LOAD off 0x00000000 vaddr 0x08000000 paddr 0x08000000 align 2**15
filesz 0x00016284 memsz 0x00016288 flags rwx
LOAD off 0x00016288 vaddr 0x08016288 paddr 0x08016288 align 2**15
filesz 0x00000008 memsz 0x00000008 flags r--
LOAD off 0x00018000 vaddr 0x20000000 paddr 0x08016290 align 2**15
filesz 0x00000ce8 memsz 0x00000ce8 flags rw-
LOAD off 0x0001ef78 vaddr 0x08016f78 paddr 0x08016f78 align 2**15
filesz 0x00000ec4 memsz 0x00000ec4 flags r--
LOAD off 0x00020ce8 vaddr 0x20000ce8 paddr 0x20000ce8 align 2**15
filesz 0x00000000 memsz 0x000036e8 flags rw-
private flags = 5000002: [Version5 EABI] [has entry point]
Sections:
Idx Name Size VMA LMA File off Algn
0 .text 00014284 08002000 08002000 00002000 2**4
CONTENTS, ALLOC, LOAD, READONLY, CODE
1 .text.align 00000004 08016284 08016284 00016284 2**0
ALLOC, CODE
2 .ARM.exidx 00000008 08016288 08016288 00016288 2**2
CONTENTS, ALLOC, LOAD, READONLY, DATA
3 .data 00000ce8 20000000 08016290 00018000 2**3
CONTENTS, ALLOC, LOAD, DATA
4 .rodata 00000ec4 08016f78 08016f78 0001ef78 2**3
CONTENTS, ALLOC, LOAD, READONLY, DATA
5 .bss 000036e8 20000ce8 20000ce8 00020ce8 2**2
ALLOC
6 .debug_aranges 00002178 00000000 00000000 0001fe40 2**3
CONTENTS, READONLY, DEBUGGING
7 .debug_info 0007657c 00000000 00000000 00021fb8 2**0
CONTENTS, READONLY, DEBUGGING
8 .debug_abbrev 0000c7a5 00000000 00000000 00098534 2**0
CONTENTS, READONLY, DEBUGGING
9 .debug_line 00016687 00000000 00000000 000a4cd9 2**0
CONTENTS, READONLY, DEBUGGING
10 .debug_frame 0000637c 00000000 00000000 000bb360 2**2
CONTENTS, READONLY, DEBUGGING
11 .debug_str 00015bff 00000000 00000000 000c16dc 2**0
CONTENTS, READONLY, DEBUGGING
12 .debug_loc 0002a6c2 00000000 00000000 000d72db 2**0
CONTENTS, READONLY, DEBUGGING
13 .ARM.attributes 00000029 00000000 00000000 0010199d 2**0
CONTENTS, READONLY
14 .debug_ranges 00002d48 00000000 00000000 001019c6 2**0
CONTENTS, READONLY, DEBUGGING
15 .comment 00000070 00000000 00000000 0010470e 2**0
CONTENTS, READONLY
SYMBOL TABLE:
08002000 l d .text 00000000 .text
08016284 l d .text.align 00000000 .text.align
My next observation (Sloeber) with bootloader20 ld profile:
1. Now (debug profile) I can compile, upload and debug the blink in the debugger. I can step through the code and asm. With “Executable offset” 08002000 set in debug config. No other settings in ld scripts or elsewhere.
2. When I try to run off the debugger (Jlink disconnected), the bootloader lives, the blink led lits but not blinks, and Win tells me there is a problem with USB port (the MMini one).
3. When I plug the usb off the MMini, and power MM from outside, the bootloader lives and the blink starts and blinks ok.
4. When I plug the usb back into MMini after a few minutes, the bootloader lives and blink blinks. The automatic upload from Sloeber via USB works as well.
i do note that it seem necessary to power cycle the MMini after disconnecting debug
it’d seem reset isn’t sufficient
i’ve a different issue though, at times my stlinkv2 simply won’t connect, but on my end it seem like a hardware / connectivity issue
More info here: https://mcuoneclipse.com/2015/04/20/ser … ipse-luna/
It appears to have an issue.
https://marketplace.eclipse.org/content … de-arduino
i’ve sort of ‘succeeded’ in compiling Arduino_STM32/STM32F1 in eclipse, no ‘arduino native’ plugin, the trouble with this approach is that you need to define all the includes, source directories, all the defines, ld scripts, and varous settings (e.g. the compile flags, debug launch parameters) manually, in terms of the source directories, you’d need to define the arduino core codes Arduino_STM32/STM32F1/cores/maple, a variant source directory for your board, and your sketch directory. And that is not yet including any external libraries. And on top of all that, you’d need to do it twice one full set for Debug another full set for Release.
The benefit of such a tedious approach is that everything is broken down to the details, but as it stands it is tedious. and for each new sketch, u’d probably need to do the same again.
hopefully the plugins could help to simply all these book keeping etc e.g. automatically derive includes, source directories, defines, compile flags and variants etc say from boards.txt and platform.txt. that’d make eclipse a really good alternative platform vs the arduino ide
$ sudo aptitude update
$ sudo aptitude install librxtx-java
It installs the .jar and lib*.so in the wrong place for me (I’m using the oracle java 8 ) So I copied the files by hand. Eclipse doesn’t seem to provide me a list of the available tty devices, however if I type in /dev/ttyACM0, it works.
Again: you download Sloeber, unpack it and work.
I think we mix a lot of different stuff here in this topic
as i do use eclipse for java / android and other stuff, i decided to postpone the upgrade to another time, i think i simply have too many interdependent plugins and it isn’t a surprise that this 1 plugin broke the camel’s back
nevertheless i think eclipse CDT default Arduino integration may become a norm, do check that out, but it requires eclipse N or O
search oxygen & Timer in my posts. that’s for the blinky ‘sketch’
neon.3 is ok as stated on wiki.
sloeber-workspace directory does persist regardless of rm -rf it seems
stephen
..

C:/Users/pito/MyCode/Sloeber/WhetstoneSP/Release/arduino.ar(rccF2.c.o): In function `rcc_clk_enable':

C:\Users\pito\MyCode\Arduino\hardware\Arduino_STM32\STM32F4\cores\maple\libmaple/rccF2.c:653: multiple definition of `rcc_clk_enable'

C:\Users\pito\MyCode\Sloeber\WhetstoneSP\Release\arduino.ar(rccF2.c.o):C:\Users\pito\MyCode\Arduino\hardware\Arduino_STM32\STM32F4\cores\maple\libmaple/rccF2.c:653: first defined here

C:/Users/pito/MyCode/Sloeber/WhetstoneSP/Release/arduino.ar(rccF2.c.o): In function `rcc_clk_disable':

C:\Users\pito\MyCode\Arduino\hardware\Arduino_STM32\STM32F4\cores\maple\libmaple/rccF2.c:653: multiple definition of `rcc_clk_disable'

C:\Users\pito\MyCode\Sloeber\WhetstoneSP\Release\arduino.ar(rccF2.c.o):C:\Users\pito\MyCode\Arduino\hardware\Arduino_STM32\STM32F4\cores\maple\libmaple/rccF2.c:653: first defined here

..

C:/Users/pito/MyCode/Sloeber/WhetstoneSP/Release/arduino.ar(systick.c.o): In function `systick_enable':

C:\Users\pito\MyCode\Arduino\hardware\Arduino_STM32\STM32F4\cores\maple\libmaple/systick.c:64: multiple definition of `systick_enable'

C:\Users\pito\MyCode\Sloeber\WhetstoneSP\Release\arduino.ar(systick.c.o):C:\Users\pito\MyCode\Arduino\hardware\Arduino_STM32\STM32F4\cores\maple\libmaple/systick.c:64: first defined here

..possibly the config directories of the ‘env in use’ are clashing?
stephen
## Combine gc-sections, archives, and objects

recipe.c.combine.pattern="{compiler.path}{compiler.c.elf.cmd}" {compiler.c.elf.flags} -mcpu={build.mcu} "-T{build.variant.path}/{build.ldscript}" "-Wl,-Map,{build.path}/{build.project_name}.map" {compiler.c.elf.extra_flags} -o "{build.path}/{build.project_name}.elf" "-L{build.path}" -lm -lgcc -mthumb -Wl,--cref -Wl,--check-sections -Wl,--gc-sections -Wl,--unresolved-symbols=report-all -Wl,--warn-common -Wl,--warn-section-align -Wl,--warn-unresolved-symbols -Wl,--start-group {object_files} "{build.path}/{archive_file}" -Wl,--end-groupthis is a some notes i made for myself when compiling the codes for F4 branch (in particular the black F4 branch), i’m setting all these pretty much manually in eclipse. i think sloeber would really help but i hope some of these notes may help find what may need to be patched into platforms.txt or boards.txt.
note that those defines are gathered by examining platforms.txt and boards.txt for my particular board. in particular i copy the defines or variables whole sale from a set for maple mini and i later add those that ends with undefined variable compile errors if i hit them. hence there could be mistakes or redundant variables
for eclipse itself, in particular the include directories, i need to make sure that the includes are defined as well as the defines/variables are defined or i’d get lots of build errors. arduino ide seem to be able to figure out the include directories and i’m now sure how arduino ide figured that out.
the defines are either in platforms.txt for shared defines e.g. SERIAL_USB or in boards.txt in the relevant variable for the board
i still couldn’t figure out how arduino ide figure out that a particular sketch and board combination should use the source and includes in a particular directory/folder, as if all the sources and includes for f1 and f4 are mixed up, there will most likely be conflicts
just 2 cents
stm32duino defines-includes
Debug
target processor:
arm-family: cortex-m4
architecture: toolchain default
instruction set: -mthumb
optimization:
opt level: opt for debug (-Og)
cflags:
-fmessage-length=0
-fsigned-char
-ffunction-sections
-fdata-sections
-ffreestanding
-fno-move-loop-invariants
Warnings:
cflags:
-Wall
-Wextra
Debug:
debug level: -g
format: toochain default
assembler
defines:
STM32_HIGH_DENSITY
STM32F4
BOARD_black_f4
VECT_TAB_ADDR=0x8000000
VECT_TAB_BASE
includes:
"${workspace_loc:/${ProjName}/STM32F4/cores/maple}"
"${workspace_loc:/${ProjName}/STM32F4/cores/maple/libmaple}"
"${workspace_loc:/${ProjName}/STM32F4/cores/maple/libmaple/include}"
c
defines:
STM32_HIGH_DENSITY
STM32F4
BOARD_black_f4
CONFIG_MAPLE_MINI_NO_DISABLE_DEBUG
DEBUG_LEVEL=DEBUG_NONE
VECT_TAB_ADDR=0x8000000
VECT_TAB_BASE
F_CPU=168000000L
SERIAL_USB
USB_VID=0x1EAF
USB_PID=0x0004
USB_MANUFACTURER="Unknown"
includes:
"${workspace_loc:/${ProjName}/STM32F4/cores/maple}"
"${workspace_loc:/${ProjName}/STM32F4/cores/maple/libmaple}"
"${workspace_loc:/${ProjName}/STM32F4/cores/maple/libmaple/usbF4/VCP}"
"${workspace_loc:/${ProjName}/STM32F4/cores/maple/libmaple/usbF4/STM32_USB_OTG_Driver/inc}"
"${workspace_loc:/${ProjName}/STM32F4/cores/maple/libmaple/usbF4/STM32_USB_Device_Library/Core/inc}"
"${workspace_loc:/${ProjName}/STM32F4/cores/maple/libmaple/usbF4/STM32_USB_Device_Library/Class/cdc/inc}"
"${workspace_loc:/${ProjName}/STM32F4/variants/black_f407vet6}"
cflags:
--std=gnu11
c++
defines:
STM32_HIGH_DENSITY
STM32F4
BOARD_black_f4
CONFIG_MAPLE_MINI_NO_DISABLE_DEBUG
DEBUG_LEVEL=DEBUG_NONE
VECT_TAB_ADDR=0x8000000
VECT_TAB_BASE
F_CPU=168000000L
SERIAL_USB
USB_VID=0x1EAF
USB_PID=0x0004
USB_MANUFACTURER="Unknown"
includes:
"${workspace_loc:/${ProjName}/STM32F4/cores/maple}"
"${workspace_loc:/${ProjName}/STM32F4/cores/maple/libmaple}"
"${workspace_loc:/${ProjName}/STM32F4/cores/maple/libmaple/usbF4/VCP}"
"${workspace_loc:/${ProjName}/STM32F4/cores/maple/libmaple/usbF4/STM32_USB_OTG_Driver/inc}"
"${workspace_loc:/${ProjName}/STM32F4/cores/maple/libmaple/usbF4/STM32_USB_Device_Library/Core/inc}"
"${workspace_loc:/${ProjName}/STM32F4/cores/maple/libmaple/usbF4/STM32_USB_Device_Library/Class/cdc/inc}""${workspace_loc:/${ProjName}/STM32F4/variants/black_f407vet6}"
cflags:
-fno-exceptions
-fno-rtti
-fno-use-cxa-atexit
-fno-threadsafe-statics
linker
ldscript:flash.ld
lib search path:../ldscripts
cflags:
-nostdlib
-Xlinker --gc-sections
--specs=nano.specs
..

C:/Users/pito/MyCode/Sloeber/WhetstoneSP/Release/arduino.ar(rccF2.c.o): In function `rcc_clk_enable':

C:\Users\pito\MyCode\Arduino\hardware\Arduino_STM32\STM32F4\cores\maple\libmaple/rccF2.c:653: multiple definition of `rcc_clk_enable'

C:\Users\pito\MyCode\Sloeber\WhetstoneSP\Release\arduino.ar(rccF2.c.o):C:\Users\pito\MyCode\Arduino\hardware\Arduino_STM32\STM32F4\cores\maple\libmaple/rccF2.c:653: first defined here

C:/Users/pito/MyCode/Sloeber/WhetstoneSP/Release/arduino.ar(rccF2.c.o): In function `rcc_clk_disable':

C:\Users\pito\MyCode\Arduino\hardware\Arduino_STM32\STM32F4\cores\maple\libmaple/rccF2.c:653: multiple definition of `rcc_clk_disable'

C:\Users\pito\MyCode\Sloeber\WhetstoneSP\Release\arduino.ar(rccF2.c.o):C:\Users\pito\MyCode\Arduino\hardware\Arduino_STM32\STM32F4\cores\maple\libmaple/rccF2.c:653: first defined here

..

C:/Users/pito/MyCode/Sloeber/WhetstoneSP/Release/arduino.ar(systick.c.o): In function `systick_enable':

C:\Users\pito\MyCode\Arduino\hardware\Arduino_STM32\STM32F4\cores\maple\libmaple/systick.c:64: multiple definition of `systick_enable'

C:\Users\pito\MyCode\Sloeber\WhetstoneSP\Release\arduino.ar(systick.c.o):C:\Users\pito\MyCode\Arduino\hardware\Arduino_STM32\STM32F4\cores\maple\libmaple/systick.c:64: first defined here

..viewtopic.php?f=41&t=655&start=100#p26636
PS: improved the Hint on how Sloeber takes over the platform.txt settings…
viewtopic.php?f=41&t=655&start=100#p26636
PS: improved the Hint on how Sloeber takes over the platform.txt settings…
Guide:
viewtopic.php?f=41&t=655&start=40#p25805
Important as well – SWD enable:
viewtopic.php?f=41&t=655&start=50#p25866
You still have to start the J-link Server first (as the External tool – see the guide).
Ask when any issue, it works fine even with 407.
Outstanding issues:
1. How to start the Jlink Server by the green bug click ![]() – seems to be gnu arm eclipse issue
– seems to be gnu arm eclipse issue
2. New: I cannot get F407 device from the installed STM32F4 PACK into
Project Properties C/C++Build Settings Devices
But debugging works with 407 (no peripheral registers imported in the view, however)..
i think each environment has their plus and minus and in fact eclipse would support arduino directly in the cdt in neon and oxygen (currently with a plugin) releases
https://marketplace.eclipse.org/content … de-arduino
we can then ‘back test’ those sketches in the arduino ide subsequently, i’d think that’d be a good hybrid of both worlds
just 2 cents
1. How to start the Jlink Server by the green bug click
2. New: I cannot get F407 device from the installed STM32F4 PACK into
Project Properties C/C++Build Settings Devices
But debugging works with 407 (no peripheral registers imported in the view, however)..
Issue 2. solved.
I had to update the Packs plugin from http://gnuarmeclipse.sourceforge.net/updates-test repo, and I reinstalled F407 package from version 2.9.0 to 2.11.0.
Now I can see the peripheral registers of F407 while in debug, it seems.
You may use it as a “Flash Only” action from the External Tools (ie. when not using the debugger, which uploads).
Save it in “load.jlink” and copy it into your active project directory (an example):
device STM32F407ZE

si 1

speed 4000

loadbin C:\Users\your_path\Blink407\Release\Blink407.bin, 0x08000000

r

g

q1. How to start the Jlink Server by the green bug click
2. New: I cannot get F407 device from the installed STM32F4 PACK into
Project Properties C/C++Build Settings Devices
But debugging works with 407 (no peripheral registers imported in the view, however)..
Issue 2. solved.
I had to update the Packs plugin from http://gnuarmeclipse.sourceforge.net/updates-test repo, and I reinstalled F407 package from version 2.9.0 to 2.11.0.
Now I can see the peripheral registers of F407 while in debug, it seems.
${jlink_path}/${jlink_gdbserver}    << this came from installation fine here

${cross_prefix}gdb << this was a mess, edit the prefix such it fits in String Substitutions${jlink_path}/${jlink_gdbserver} << this came from installation fine here
${cross_prefix}gdb << this was a mess, edit the prefix such it fits in String SubstitutionsAre any of you using MacosX with the Eclipse plugin? I’m trying to run an example on a Nucleo board with no success and the problem it seems is that the system is trying to upload to the board using windows tools.
Launching/Applications/eclipse/Eclipse.app/Contents/MacOS//arduinoPlugin/packages/STM32/tools/STM32Tools/2017.1.19/tools/win/nucleoFlasher/ -I /Users/bubulindo/Documents/workspace/TesteSTM32/Release/TesteSTM32.bin -O NODE_F103RB
Any ideas on what may be causing this? Or has anyone had this problem before?
Every debugger has got it basically in a small window.. Showing elapsed clocks with conversion to ns/us
I have no code autocomplete. Ive managed to make the libraries appear to reconnect so stupid false syntax errors have stopped. But as i said No code autocomplete. And it wont compile either. I get strange errors like…
LinkNameProvider: The call should go to the overloaded function not here.
ArchiveNameProvider: The call should go to the overloaded function not here.
I just want to let you know that in the Sloeber version I am working now, the GDB server runs as it is supposed to run.
I write JLinkGDBServerCL.exe in the Executable and I don’t have to run the JLinkGDBServer.exe myself.
I am however working on 4.1, maybe they fixed it there.
1. I cannot upload with Sloeber:
– When I have the serial to USB (project->properties->Arduino board selection)
– When I have the JLink,
I press the upload button and it does nothing.
(I don’t have both the serial to USB and the JLink at the same time)
For now, when I need to upload I have two ways:
– Arduino IDE
– Command line:
C:\Arduino\hardware\Arduino_STM32\tools\win>stm32flash -g 0x8000000 -b 230400 -w C:\sloeber_workspace\my_t_pr\Release\my_t_pr.bin COM11
2. I am using the stm ili9341 library with the hardware SPI and it is working when uploading. However when I am stepping through the begin function, I see that it reads the hwSPI as “false”, which should not be the case. So I want to go into the constructor and see what is actually happening.
The problem is that I cannot enter the constructor, the PC will be at main(), and I don’t know how to make it stop in the constructors. I placed breakpoints but it didn’t stop.
3. From the debugger, only the step in button works. Not the step over and not the resume.
Any ideas?
Thanks,
Bill.
So, when the program counter has to go over a function, it can’t handle it. That is odd.
I mean, the info of the jump is there, since the step in can follow it, so what can it be?
I also test it with SWD, it does the same.
Thanks,
Bill.
I forgot to un-comment the __libc_init_array which is responsible for the constructors, that is why it was all messed up.
Can anyone help on issue 1?
Thanks,
Bill.
[kostbill – Sat Aug 12, 2017 10:39 pm] –
1. I cannot upload with Sloeber:
– When I have the serial to USB (project->properties->Arduino board selection)
– When I have the JLink,
I press the upload button and it does nothing.
(I don’t have both the serial to USB and the JLink at the same time)For now, when I need to upload I have two ways:
– Arduino IDE
– Command line:
C:\Arduino\hardware\Arduino_STM32\tools\win>stm32flash -g 0x8000000 -b 230400 -w C:\sloeber_workspace\my_t_pr\Release\my_t_pr.bin COM11Any ideas?
Thanks,
Bill.
Really nothing? It should say in console: Starting upload… Launching… Output:…
Try to select arduino uno and start upload, compare the outputs. Check the console dropdowns
[kostbill – Sat Aug 12, 2017 10:39 pm] –
So now I am having the following problems:1. I cannot upload with Sloeber:
.
Issue 1. “Single click compile and J-link bin upload in Sloeber”:
1-2 pages back in this thread:
http://www.stm32duino.com/viewtopic.php … 110#p27004
load.jlink script file:
1. Adjust to your mcu type.
2. Edit the path to your .bin in active project (ie. the path into the release folder)
3. Copy the load.jlink script file into the active project folder
The only annoyance there is the fixed path in the load.jlink script pointing to your binary (so you have to edit the path when the jlink upload script is copied into a new project).
If you know how to replace it with a variable or relative path let us know.
.
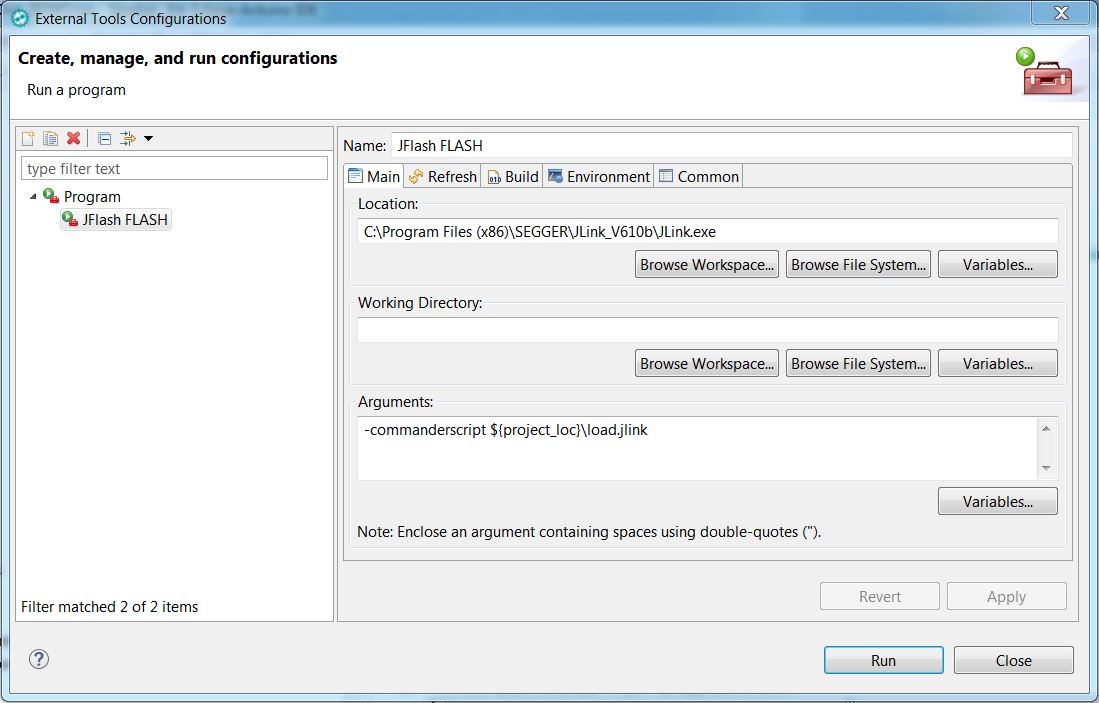
- Flash via Jlink in External tools 1.JPG (106.33 KiB) Viewed 702 times
I had to leave the si 1 there because it couldn’t do it with JTAG, I don’t know why.
Unfortunately I couldn’t find out how to use the defined local variables for the jlink commander. I tried to set up a new variable from the external tools configuration->Environment but it didn’t work.
Also at the jlink commander section of the jlink datasheet I couldn’t find anything.
Perhaps the solution is to execute a batch file from the external tools configuration which will create the jlink commander script and then call the jlink.
I am not good at this, but I started something, however I cannot make the program start, so I paste the code here and you may take it and finish it if you want.
@echo off
for %%* in (.) do set CurrDirName=%%~nx*
set my_path=%CD%
set my_bin_file=%my_path%\Debug\%CurrDirName%.bin
echo %my_bin_file%
set my_jlink_commander_file=%CD%\load.jlink
echo.>"%CD%\load.jlink"
echo %my_jlink_commander_file%
echo device STM32F103CB > %my_jlink_commander_file%
echo si 1 >> %my_jlink_commander_file%
echo speed 4000 >> %my_jlink_commander_file%
echo loadbin %my_bin_file%, 0x08000000 >> %my_jlink_commander_file%
echo r >> %my_jlink_commander_file%
echo g >> %my_jlink_commander_file%
echo q >> %my_jlink_commander_file%
set jlink_path=C:\Program Files (x86)\SEGGER\JLink_V618\JLink.exe
set jlink_arguments=-commanderscript ${project_loc}\load.jlink
REM THE LINE BELOW, IS THE LINE THAT I CANNOT GET WORKING.
start "" "C:\Program Files (x86)\SEGGER\JLink_V618\JLink.exe" -commanderscript ${project_loc}\load.jlink
I am using Ozone for debugging and whenever I use a Serial function it doesn’t work.
Thanks,
Bill.
Try to place a breakpoint at the Serial.print() and then step over it. It should print out the result (in the terminal connected to the UART).
When I place the breakpoint on Serial.print, it will stop there, but if I press go into, it will just step over it and output nothing.
Do you remember if you are using any configuration for the Serial port?
Also, are you using any kind of semihosting with Ozone?
But when I connect JLink and program with usb to serial, then UART is not working.
I guess it has to do with some kind of configuration, but I cannot find it.
However I am not sure this is so easily solved.
I am afraid that I may be doing something completely stupid without noticing it and I am causing the problem.
I will know if it happens again.
Thanks and I am very sorry that I bother you with all my stupid mistakes.
Bill.
My current experience with the Sloeber and Jlink plugin: viewtopic.php?f=41&t=655&start=40#p25805
Can you please share detail installation of Jlink debugging with Sloeber? I’ve tried your steps but I still cannot make it.
My configuration is
- Windows 10 64-bit

- Jantje's plugin Sloeber V4.1

- STM32F103C8T6 blue pill

- Segger J-Link black colour
Thank for sharing…
pak
