I ordered this one:
Hesine M-505B (“B” stands for black acrylic version, but it’s a little bit different to the original one)
http://www.aliexpress.com/item/Black-Fa … 71936.html
Nice thing: Free shipping via Fedex (so I ordered it last week on the delivery day is next wednesday)
I’m new to 3d printers, but this looks (and I read many reviews) like a solid printer.
Problem: Lack of documentation. After buying the thing you get a common(!!!!) dropbox account login with all the doc files (some better some really …)
So I keep you updated when I build it, because 210 Euros (and I think additional 50 Euros for taxes) is really a “hot” price.
I paid $800 for a MendleMax kit about 2 years ago
Designs for 3d printers have improved a lot in the couple of years.
Mine uses an Arduino Mega2560 + RAMP’s shield, where as that one looks like it uses a dedicated board that has both the MCU and the stepper controllers and power fets.
One common problem is the PSU’s are always very cheap and nasty. Mine is the same, its a PSU designed for large LED lighting arrays.
Mine is just about running after 2 years but its fan is very noisy.
I’m not sure if they recommend what software to print using.
I use an old version of Cura (V13 or V14) from when they still made an attempt to support open source hardware.
Otherwise you’d have to slice using another program e.g. Slic3r and copy the slice file via the SD card
Personally, I found it far more practical to use a PC etc to control the printer, rather than trying to print from SD card.
I know some people prefer printing from SD card as you then don’t need to leave your PC turned on, and some people say that the PC can’t transfer commands fast enough to print intricate detail. But I suspect the speed issue would only be a problem is you had a much faster printer.
So I’d recommend taking a look at Cura or use PronterFace / Printrun (Python) — Or use both depending on the situation.
The mainboard is a “Melzi V2” (looks really like a V2). Ok, the seller isn’t really competently:
I asked some questions like
What is the reference voltages for this motor currents to setup on the melzi board?
and got this answer:
That is a professional problem, I can’t reply you.
A more honest answer would be the following:
“Sorry, I’ve taken your cash, so please bug me not”
BTW: I guess it’s a repetier firmware on it.
I dont think it matters that much. Mine runs Marlin.
The main setup things you need to do are to insure the distance travelled by the bed etc are correct.
But it may be OK.
Because my 3d printer was a kit, It took quite a while to build, however yours should be easier.
I think now its best to wait for it to arrive, and then ask any questions if things dont work.
The Reprap forum is very good, and I may be able to answer some questions….
… which looks too good to be true, and like all things too good to be true, it probably is.
Can anybody see the downside to this? It appears to be a complete 3D printer, almost identical to the 210 euros one, but at half the price.
I don’t know, but I’m tempted too …
Try it out first, and tell us about your experiences …
I bet its mechanics are better than my $800 MendleMax from 2 years ago ![]()
I suspect the PSU is junk… Mine is, but it works.
Control board is probably OK, but personally I prefer having a separate Mega 2560 and RAMPS board and my RAMPS board has plug-in stepper controllers
I initially managed to blow up 3 of my 4 stepper controllers, I got some sort of voltage spike that killed them all ![]()
But even if you had to replace the controller board with a Mega 2560 and had to buy new RAMPS board etc, you’d still have a cheap deal.
(This is what I also did, so that I have spares. I now have a spare RAMPS board and I keep a Mega2560 in my box of Arduinos)
No problem for me, I’ve many good PSU’s at home
RAMPS:
I was really considering buying a spare RAMPS board, I’ve a mega2560 at home with a layer of dust. This is maybe the “upgrade step” – and I know myself that I’ll modify the printer after a while (so this was my decision to take a well known open source concept printer kit)
On wednesday it will arrive, but I lack on time building it (more problem: I have no space for it and my wife is really angry meanwhile… so the first things I’ll print are the whole IKEA collection of 3d models and repairing the whole furniture (classic part: the holder for the rollers) to earn some karma points from her).
I have no space for it and my wife is really angry meanwhile
My 3D printer is now in the shed in the garden (but its a nice dry shed and its never that cold here )
One thing you should order is some Polyimide tape. if you don’t already have some
http://www.ebay.com/sch/i.html?_odkw=ka … e&_sacat=0
It can withstand the temperature even of the heated nozzle, and you are likely to need some.
BTW. I noticed this printer does not have a heated bed as far as I can tell.
This possibly explains why its a bit cheaper.
No. Sorry, it doesnt mention a heated bed, but it does seem to have wires going to the back of the bed which would suggest possibly it is heated.
BTW. You need to buy some sheets of glass to print on. Well, I suppose you may be able to print directly onto that bed, but generally I think people print on glass.
I don’t know, but I’m tempted too …
Try it out first, and tell us about your experiences …
Aaaaarrgh
It at 78 Euro’s I almost considered buying one myself..
Like you said, its worth more than that in spares.
I wonder if they will honour the existing orders at the incorrect price. I suspect they may find some way just to not ship and then give a refund when the orders have not been received within the allotted time.
I doubt the AliExpress escrow system is designed to handle instances when the supplier decides they don’t want to supply
it might be end of stock? something wrong with it? ….
ordered it, no nasty surprises at checkout.
see what happens…
stephen
… which looks too good to be true, and like all things too good to be true, it probably is.
Can anybody see the downside to this? It appears to be a complete 3D printer, almost identical to the 210 euros one, but at half the price.
i was tempted to put ‘scam’ in the message for seller box i expecting with ‘other reasons’
didn’t get a box though ![]()
so approximately they get £67 – $15
so if they get told to refund, they have £57 earning interest until they do
or i they can’t be made to, you’re out £57
stephen
If this was a genuine price screw up and they don’t want to be held to the price, If you raise an issue, they will *accidentally* refund the full price, and you get nothing… when you try to re-order it is back at full price, and they don’t have to honour the order.
Odd that they claimed to have shipped it though… assuming they did of course.. that might be the key. If it never arrives… and they have refunded you… no problem, and they don’t loose as a result of their screwup.
I could of course be wrong. ![]() Let me think about this… what other angle could they be working.
Let me think about this… what other angle could they be working.
RogerClark wrote:
I wonder if they will honour the existing orders at the incorrect price. I suspect they may find some way just to not ship and then give a refund when the orders have not been received within the allotted time.
I doubt the AliExpress escrow system is designed to handle instances when the supplier decides they don’t want to supply
that’s not going to happen any which way!
ok maybe if DHL call ![]()
stephen
My wife even ordered some Birkenstock sandals but the ad was clearly marked “imitation”. Amazingly, she was delighted with the order.
I’ve generally have ordered electronics from the same small group over-and-over. But every once in a while, I go with a really weird store site (like lithium “R” cells from a lingerie store! If the search shows the article, with free shipping, with a goodly number of positive responses …. why not? The whole Aliexpress thing is like a gamble… IMO. I was raised with the idea that if you gamble, only gamble what you can afford to lose.
Ray
My printer has arrived. Really well packed into 4 seperate layers of Styrofoam (unlike the “clear acrylic” version of this printer, found really bad pics on web). Additional taxes (paid directly to the FEDEX guy) were about 54 EUR, so overall costs: ~270 Euros (for me in Austria), so I will call it a real bargain, In view of the fact that the FEDEX delivery (tooks only 1 week) was included! This is about nearly 150 Euros cheaper than every (comparable) printer kit I can get in Europe (without shipping!)
I examined all parts and they look really ok, the acrylic frame is very thick and stable, nothing is bent or cracked.
So don’t believe in “looks too good to be true” offers, because FEDEX transport alone is about ~50 Euros, even for them.
I strongly recommend the black version of the printer, because it’s a newer revision with several improvements over the “clear” version (end stop holders…) and it’s much better packed up.
Maybe I would have time during the next week building it up, so stay tuned ![]()
I’m not sure whether you need to manually align anything, eg using a set square, or whether you can just bolt it all together and it will all be in alignment.
In the end I had to buy a digital Inclinometer to line mine all up, but the MendleMax is much more complicated to assemble with loads of things to get wrong ![]()
http://www.ebay.at/itm/Digital-Bevel-Ga … yaK4Ja_Myw
I think these sorts of builds can’t be rushed.
I do hot bed alignment with a piece of paper ![]() (yes seriously….)
(yes seriously….)
Its just its alignment with the print head.
I normally only have to realign when I change the glass I use to print on.
There are several “sellers” – all with 0(!) feedback and all look like each other. So there must be a big scam going on on ali at the moment.
To be honest: Even if you get one for that price you wont get any support or spare parts from them!
I bought my (linked on the first page) because of the feedbacks: Even if there was a problem, the buyers wrote, that they get replacement parts delivered via FEDEX from this seller. (I always search within the feedbacks on ali for “problems” and how the seller resolve it).
This is the orgin seller / manufactor:
http://www.aliexpress.com/store/group/3 … 71533.html
Best of it: You can get all spare parts from there!
Maybe better buying directly there (nearly same price)
Did you already took a look at the instructions? trust me, pure garbage.
but except for that, its actually a really nice printer. quality is ok for the price.
Well, since my melzi which came with the printer was defect on the z-axis, i ordered a ramps board with drv8825 drivers, because 1. i couldnt wait for the replacement and 2. these drivers have a finer microstepping (1/32 vs 1/16) and still can handle more current (2.5A vs 2A)(compared to the drivers on the melzi) a4425 or something like that). since then im printing with marlin firmware and octopi (a must have if your printer isnt next to your computer).
Tried to upgrade the hotend to a e3d lite6, but failed. i somehow managed to screw up the homing position, so it was pushing against the heatbed and basically destroyed one of the coupling (it still works). will try to fix it again tomorrow.
if you want i can send some pics of 3dbenchy prints if you want ![]()
min. layer height was 0.2mm. managed to get 0.1mm working, but it didnt looked really finished (maybe too fast).
~Straw
If you speak german, there is a little bit better manual at: http://dein-3d-drucker.de/prusa-i3-bauanleitung-teil-1/
It seems to be nearly the same printer (some exchanges, like PSU)
I have a problem while building with the x-axis:
The side which holds the motor goes really hard, I don’t no if it will harm the stepper motor. Tried everything, but no luck, I think the motor holder (white printed part) is the problem (distance between the “feed rod” and the “leadscrew rod”.
And I’m happy, because I have MANY M** screws at home. Many of them doesn’t really fit for about 1-2mm.
~Straw
EDIT: you could also stop this problem for now by lifting the smooth rod a bit,so its not in its mount anymore. but thats more of a temporary “hack”
I found the solution for the jamming rods, maybe it is also your problem!:
Pull the white plastic rod holder a little bit apart, like on my photo, so it works for me! They are totally stiff
maybe release the drive shaft from coupler on one side, the blocks could skewed to each other.
srp

Probably overkill however and if you can place the printer on a totally level surface, you can use a normal spirit level.
But a “bevel box” is more accurate, as it reads to the nearest 1/10 deg
(BTW. they only read relative angles, despite what it says on eBay)
stephen
all prices paid were posted.
Mine is very old and now very expensive for what it is, I think around $800 plus loads of extra costs for replacement parts e.g RAMPS etc
Z-axis rod problem is not done 100% but it’s more a noise problem, I have to fine tune more.
Results are better than expected, really!
BTW. Do you use OpenSCAD? to generate models ?
@bianchifan:
I’m sure you are right with your complains. But I’m quiet new the 3d printing, and I bought this kit because you can upgrade it easily.
The bearings are really not the best, even the rods, but they are cheap even at conrad/reichelt (german electronic sellers) I hope the quality is better since they tend to sell the same chinese goods. I’ll get the next week my conrad birthday voucher, so I’ll buy the parts there (The only time int the year, I’ll buy at Conrad
Next step (after changing rods and bearings) would be buying a RAMP 1.4 with DRV8825 stepper drivers (There is a set on ali for 13 Euros, I have all other parts like an Arduino mega,…. at home) . I read good things about them (1/32 steps instead of 1/16). One issue could be (more an optical issue) that my LCD with 4 buttons wouldn’t match with RAMPS 1.4 (especially the sd-card holder is on most RAMPS boards directly on the LCD panel). So I’m going to print out an esthetic adapter plate/case for it, so it will match into my acrylic frame:)
Bearings on my Mendle Max are from rollerblade skates and seem Ok.
But I don’t expect to print precision parts.
My nozzle is 0.4mm so getting dimensional accuracy of around 0.5mm is the best I would expect.
If I want to print a part that has to be very dimensionally accurate, e.g. to fit in with an existing steel or plastic assembly, I normally do a test print of the area were the two items meet, and when change my model e.g. by 0.75mm to get it to fit exactly.
I find size is dependant on flow rate. High flow rates are more forgiving, but lead to less dimensional accuracy.
But I just use the printer as a tool. so as long as I end up with a usable part e.g like new feet for my aluminium step ladder, I am happy
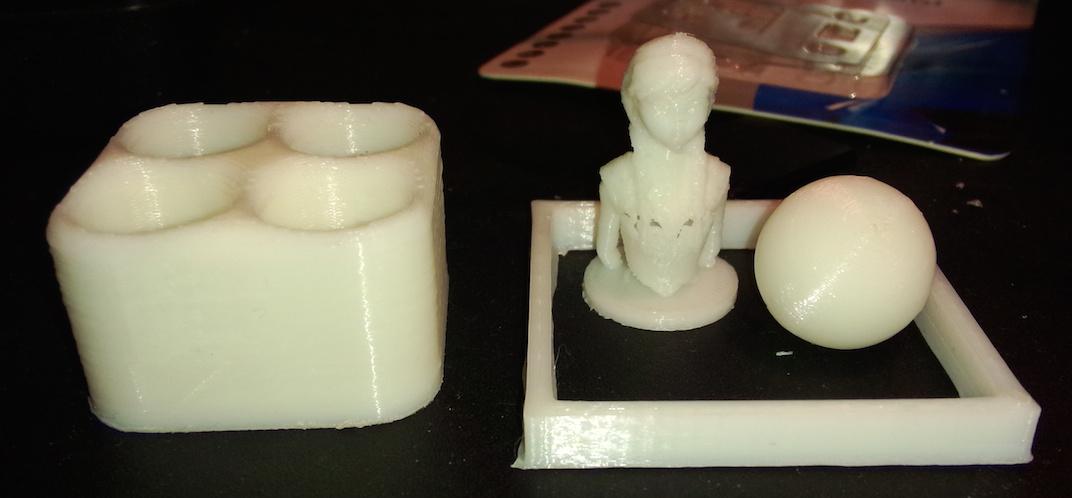
(size of the ball is 2 cm, the torso is 3.4cm, the test square is 5cmx5cm and the real dimensions are 4.87×4.79 so accuracy is for a 50mm object about 0.2mm, quiet good for my purposes)
I doubt you could get the printer much more accurate even if you messed with the settings.
One thing I have noticed is that the slicers don’t take much care about internal dimensions e.g. of that square
Outside dimensions were always fairly good, but internal dims could be a lot worse.
BTW. What slicer and control sw are U using ?
But I use the old Cura V13 or V14 which makes the expert controls more easily visible
I still use Printrun/ Pronterface if I have problems with the printer as its movement and temperature controls are better.
Cura is good if I just have a STL file I want to print and not think too much about it
I think KISSlicer may be the best slicer, but it is very picky about the STL file and complains about things that are technically incorrect but which other slicers don’t have a problem with
I doubt my MendelMax would be good enough. I normally print at about 0.4mm or perhaps 0.5mm per layer.
I think Matthias’s printer can do 0.1mm but I wonder how well it would come out.
Also he mentions it takes the Ultimaker a day to print.
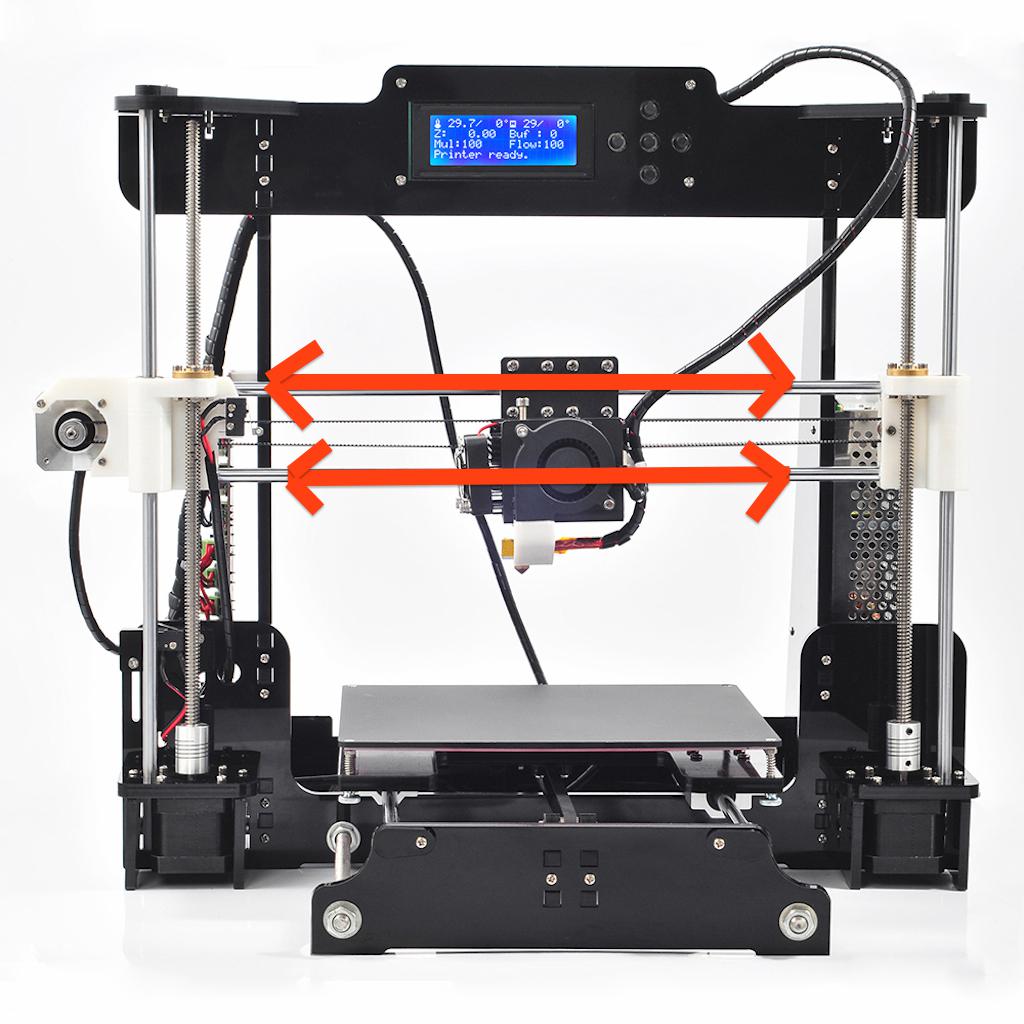
The Ultimaker is quite a fast printer, as it moves the print head in XY and not the head in X and the bed in Y.
also the print head is just the Hot End and not the extruder motor, as the motor etc is static and feeds the filament down a sort of bowden cable.
This makes me think, Id live a Ultimaker, but for the amount Id use the extra speed and resolution it would not be worth the money for me ![]()
~Straw
~Straw
BTW: About the heatbed: I’d read much about isolating the heatbed today. I thing this is the problem (not the PSU) and it can easily fixed with a few tricks: for example: https://www.youtube.com/watch?v=ry-qBs-i21E
Meanwhile I really like the printer and everything is only up to fine tuning and/or software settings, but just one important info:
the shipped Melzi board uses a counterfeit FTDI chip, so be careful running the printer under windows with newer driver (just google: “FTDI brick”) but even with a bricked FTDI it’s possible within a few steps to solve it.
And I never got around to ordering another one.
One trick I use to speed up the time to get the heated bed hot, is to put an old towel on it while it is heating. This helps it get hot enough for abs in about 50% of the un insulated time.
But if course you have to wait and then remove it when its hot enough.
I also made my own box to put the printer in, Its not that pretty but it works well. I will take some photos when I get time.
The benefit of putting it in a box is that the temperature of the whole printer can be raised, so that the print does not cool as quickly.
And, for ABS printing, I fitted an extractor fan, which is connected to a long piece of flexible 30mm dia electrical conduit. I can put the end of the conduit out the window, and although the little 50mm fan does not push much air down the tube, it does keep a small negative pressure inside the box, so that no ABS smell escapes.
This is almost essential for printing ABS in my opinion, unless you can print in an empty room ( no people) with an open window.
BTW. My psu and control boards are outside the box, so they get enough cooling, and my stepper drivers have a cooling fan, clipped to the top of the RAMPS board.
Can just recommend thomas, he got really great 3d printing videos
~Straw
Ok, you can build a big one ….
Yes. The box I made for my MendelMax is quite large ![]()
a) putting heat paste between heatbed and alu plate
b) putting Styrofoam (wicked into alu foil) under heatbed
c) raising the voltage of the PSU a little bit (12.5 V, it’s an 180 Watt device so totally under powered and breaks voltage!)
Conclusion: 110 degrees without problems, maybe better results with a more useful PSU (on my “to buy” list or I’m looking into the garbage box in my office if there is a server PSU). On Monday my PGET filaments and myn Kapton tape will arrive, I’m curious using them. ![]()
Meanwhile my daughter is happy with her new “Disney frozen” figure collection (I used them for test printings…)
BTW: My heatbead can be used for 24V (maybe I’ll use the direct 24V and relay trick, but without hysteresis it would “click” all the time)
But anyway thanks for your tips!
I used wool and foil under my heat bed as I was concerned about the melting point of plastic insulation, but I’m sure you can’t do much damage at 110 deg C
I print on glass and change the glass depending on what I’m printing, i.e I have one sheet of glass with Kapton tape on it to print PLA and another piece of glass for ABS that doesnt have the kapton, but which I paint with “ABS juice”.
So I can’t put heat paste between the heating PCB and the glass as it would get very messy when I changed the glass ![]()
I’ve not tried PET filament, I only have ABS and PLA. My preference is for ABS for anything I’m actually going to use for a purpose, e.g. curtain pole fixings etc, but PLA is fine for demos and general stuff
I’m not sure its worth me getting any PET.
I would like to print in nylon, but I don’t want to ruin my hot end, as taking it apart and replacing it would be a nightmare.
So I’ll probably carry on with ABS and PLA
Printing on blue tape with 220-230 extruder and 80 heatbed.
Results: Amazing! This material is really the missing link between ABS and PLA: Strong as ABS and easy as PLA (no warp effect), first two prints were a 100% succeed!
Stick on blue tape, no problems to get the part away from it (after cooling under 50 degrees).
I ordered for a cheap price in the Netherlands (under 30 USD), but I’m sure you can get it on ali or similar, because it’s made in china:
Details:
esun 1.75mm PETG 3d Filament – natural 1kg
Best of all: completely NO smell at all!
So no need for ABS juice and other stinky chemicals
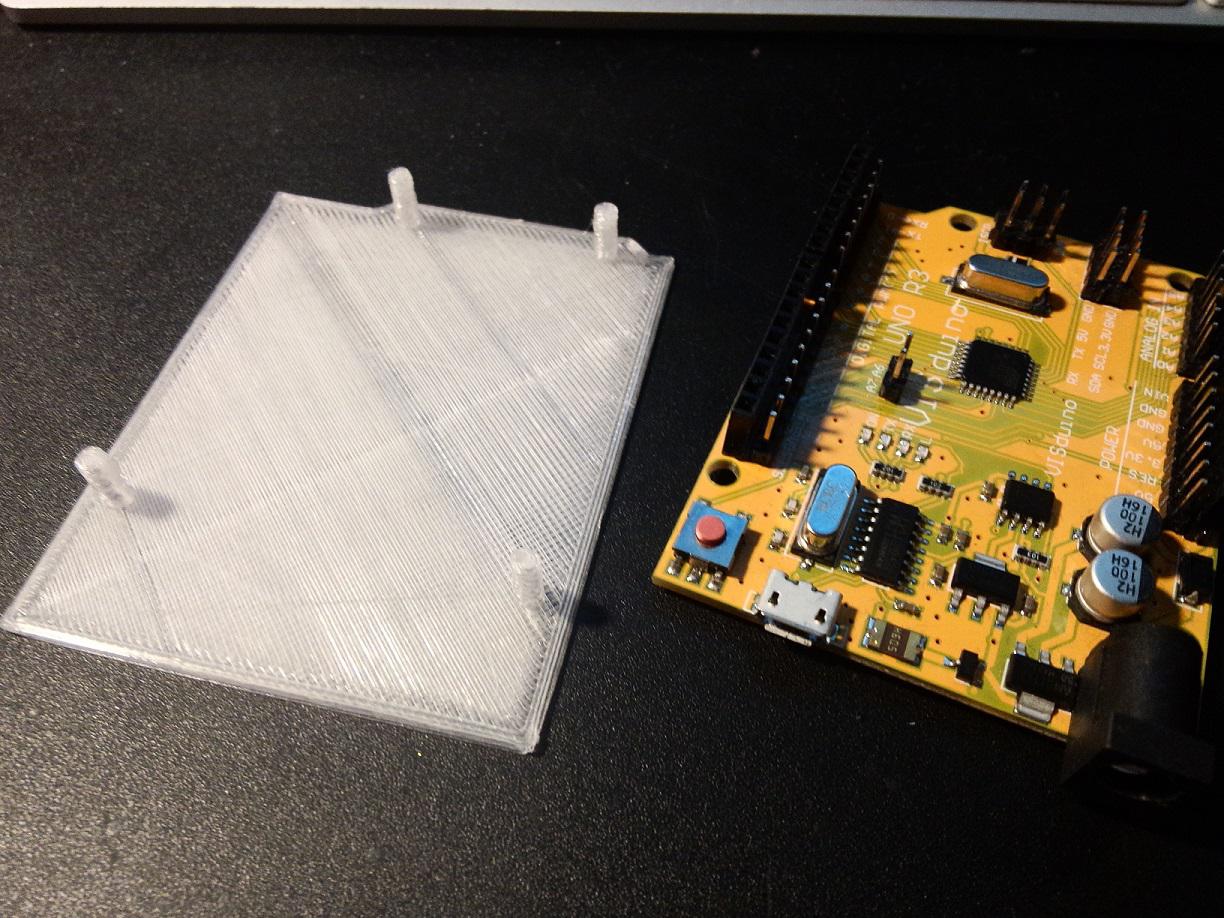
Here is my quick&dirty arduino uno backside safer (printed in draft mode for max speed, no need for beautiful this time
edit: material is transparent/natural, this is why it looks a little bit strange on the photo